
Macrame Heart Bracelet - Free Tutorial

If you’re searching for a fun and nostalgic crochet project, the Eeyore Amigurumi – Free Pattern is a heartwarming choice that brings joy to any Disney or Winnie the Pooh fan.
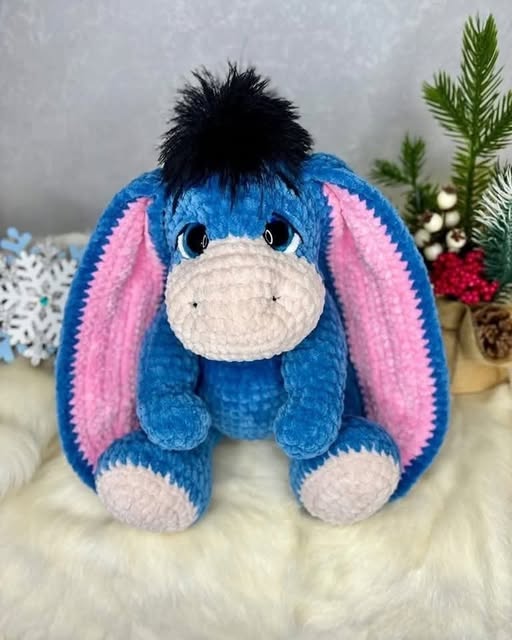
Whether you’re an experienced crafter or just getting started, this pattern offers a charming and cuddly outcome. Featuring the beloved donkey character from Hundred Acre Wood, this crochet project can be both a delightful collectible and a meaningful handmade gift.
Creating your own Eeyore Amigurumi – Free Pattern isn’t just about crafting—it’s about reliving childhood memories and infusing them with your own creativity. The soft, floppy ears, melancholic eyes, and cute tail with a pink bow make Eeyore an iconic figure that brings smiles and sentiment.
Working on this project can feel meditative and joyful, a gentle way to connect with your love for handmade art.
In this guide, we’ll walk you through all the essential aspects of this adorable pattern. From selecting the right materials and stitches to shaping and assembly, everything is laid out to support you. Let’s dive into the magic of the Eeyore Amigurumi – Free Pattern and learn how to make this little donkey come to life with yarn, a hook, and love.
To begin your Eeyore Amigurumi – Free Pattern, you’ll first need to gather your tools and materials. These can be found at most craft stores or even from supplies you already have at home. Choose soft yarns that reflect Eeyore’s signature look: muted blue-grey for the body, black for the mane, and a splash of pink for the tail bow.
You will need a crochet hook that matches your yarn weight. For amigurumi, smaller hooks are often preferred to create tighter stitches and a sturdy shape. A 2.5mm to 3.5mm hook is ideal for this kind of detailed work. Fiberfill stuffing is essential to shape Eeyore’s body and limbs, while safety eyes add personality and expression.
Other important tools include a yarn needle for sewing the parts together, stitch markers to help keep track of your rounds, and scissors. It’s also helpful to have a comb or brush to gently fluff the mane and tail for a softer look.
Choosing the right yarn is important. Cotton yarns create defined stitches and are easy to handle for beginners, while acrylic yarns offer flexibility and affordability. Whichever you choose, make sure it’s soft to the touch and durable for cuddling or display.
Having a printed or digital version of the Eeyore Amigurumi – Free Pattern beside you as you work makes following the steps much easier. Don’t forget to read through the entire pattern before starting to avoid any surprises as you go.
If this is your first time making amigurumi, take a moment to practice your magic ring and single crochet. These are the foundation of many amigurumi patterns, including this one, and mastering them will make your process smoother and more enjoyable.
The Eeyore Amigurumi – Free Pattern primarily uses basic stitches, making it beginner-friendly while still producing a professional result. The most common stitch you’ll be working with is the single crochet (sc), which creates a tight and even texture, ideal for plushies.
You will also encounter increases and decreases, which help shape the limbs and body. Increasing means adding more stitches to widen your round, while decreasing pulls the stitches together to taper your work. These changes are seamless when done with consistent tension.
The pattern is worked in continuous rounds instead of joined rounds, which helps avoid visible seams. This method requires the use of a stitch marker to identify the beginning of each round. Simply move the marker up as you complete each round.
Some parts, like the ears and tail, may use half double crochet (hdc) or even double crochet (dc) to achieve a specific shape or texture. These taller stitches can give structure or flexibility to the smaller components of your Eeyore.
You’ll also need to sew pieces together using a yarn needle. Attaching the limbs, head, and tail in a symmetrical and balanced way ensures that Eeyore sits properly and maintains his cute expression. Take your time here for the best results.
The mane and tail are great places to add detail. Use small strands of yarn knotted or stitched in to create a fluffy effect. A gentle brush or comb can also fluff the yarn for a more realistic look, especially if you want Eeyore’s mane to have volume.
Once all the parts of your Eeyore Amigurumi – Free Pattern are crocheted and ready, it’s time for the exciting step: assembly. Start by stuffing each piece firmly but not too tightly. The head, body, and legs should hold their shape while staying soft.
Begin by attaching the head to the body using the yarn needle and the long yarn tail from the head piece. Ensure it’s centered and securely sewn. Stitch slowly and evenly to create a smooth, invisible seam that blends with the body.
Next, attach the arms and legs. You can pin them in place before sewing to make sure the placement looks even. Eeyore typically sits down, so attaching the legs in a seated position adds to the authentic look. The arms should rest by his sides or slightly raised.
Sew on the ears, making sure they droop in that classic Eeyore style. They should be attached to the sides of the head and angled slightly downward. Use a few stitches to secure them without flattening their natural curve.
Now it’s time to add the tail. Eeyore’s tail is one of his most recognizable features, complete with a pink bow and sometimes even a small button. Attach it at the back and let it hang down naturally. Add the bow and fluff the yarn if desired.
Lastly, stitch on the mane along the top of the head and down the back of the neck. You can use small strands of black yarn looped through stitches to create a shaggy effect. Comb it lightly to add softness and volume.
While the Eeyore Amigurumi – Free Pattern has a classic look, there’s always room for customization. One fun idea is to change the color scheme slightly while keeping the essence of Eeyore’s personality. You can try pastel variations or even rainbow hues for a playful twist.
You can also adjust the size of your finished Eeyore by changing the yarn weight and hook size. Using thicker yarn and a larger hook will create a bigger plushie, while finer yarn and smaller hooks will give you a miniature Eeyore, perfect as a keychain or ornament.
Personal touches like embroidered initials, accessories such as a mini scarf or hat, or even adding a scent sachet inside the body can make your Eeyore unique and gift-worthy. These small additions turn a fun project into a memorable keepsake.
If you’re giving it to a child, make sure all parts are securely attached and safety eyes are used. For babies, consider embroidering the eyes instead of using plastic ones to ensure the toy is entirely soft and safe.
Display options are endless. Your handmade Eeyore can sit on a shelf, desk, or bed. He can also be part of a themed nursery or used as a prop in photo shoots. Wherever you place him, he’s sure to brighten the space.
Don’t forget to take a picture of your finished project. Sharing your work with other crocheters is a great way to inspire others and get feedback on your craftsmanship. The Eeyore Amigurumi – Free Pattern is not just a crochet piece; it’s a symbol of creativity and joy.
Q: Is this pattern suitable for beginners?
A: Yes, the Eeyore Amigurumi – Free Pattern is ideal for beginners. It uses basic stitches like single crochet, and the step-by-step construction makes it easy to follow.
Q: How long does it take to complete the Eeyore Amigurumi?
A: On average, it can take between 6 to 10 hours depending on your skill level and how much detail you add. It’s a great weekend project!
Q: Can I use any yarn for this pattern?
A: You can use most yarns, but soft cotton or acrylic yarn in DK or worsted weight is recommended for best results and a plush texture.
Q: How do I clean the finished Eeyore amigurumi?
A: Handwashing in cold water with mild detergent is best. Avoid wringing out the toy to maintain its shape. Air-dry flat.
Q: Can I sell items made from this pattern?
A: If you’re using a free pattern for personal crafting, check the creator’s policy. Many designers allow sales of finished products with credit given, but it’s good practice to verify.
Q: What if my stitches are too loose?
A: Use a smaller hook or tighten your tension slightly. For amigurumi, tight stitches help prevent the stuffing from showing through.
The Eeyore Amigurumi – Free Pattern is a delightful project for any crochet enthusiast. With just a few materials and basic skills, you can bring this gentle, lovable character to life. Whether you’re making it for yourself, a loved one, or to brighten a child’s room, this pattern is a perfect blend of creativity, comfort, and nostalgia.
We covered everything from materials and stitches to assembly and customization, making sure you’re fully equipped to start your own Eeyore journey. Now it’s your turn! Grab your hook and yarn, and share your honest thoughts in the comments—was this pattern easy for you to follow? What other characters would you love to see in amigurumi form?
Let us know your suggestions and don’t forget to leave a sincere review. Your feedback helps us grow and continue offering beautiful crochet inspiration for everyone.


