
Macrame Heart Bracelet - Free Tutorial

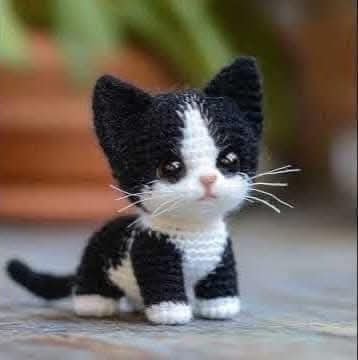
If you’re looking for a charming project to brighten your day, the Free Amigurumi Little Cat Pattern is the perfect choice. This adorable little cat is ideal for both beginners and experienced crocheters who love creating cute handmade items.
Small, portable, and filled with personality, this project offers a wonderful way to explore the world of amigurumi.
The magic of the Free Amigurumi Little Cat Pattern lies in its simplicity and customization. Whether you want to craft a playful kitten for a child, a desk companion, or a thoughtful handmade gift, this pattern allows you to express your creativity. You can personalize the colors, facial expressions, and accessories to make each cat truly unique.
In this detailed guide, you will learn everything you need to know to crochet your own Free Amigurumi Little Cat Pattern. From gathering materials to mastering the basic stitches and assembling the final piece, this tutorial walks you through each step with ease and clarity.
Before you begin crafting your Free Amigurumi Little Cat Pattern, it’s essential to have the right materials. The right tools not only make your project easier but also ensure that your finished cat looks polished and professional.
Start by choosing the right yarn. For amigurumi, cotton yarn or cotton blends are highly recommended. They provide a clean, structured look that holds the shape well and resists fuzzing over time.
You’ll also need an appropriately sized crochet hook. Typically, a smaller hook size than what’s recommended for the yarn is used to create tight stitches that prevent stuffing from showing through.
A set of safety eyes gives your cat a cute and polished appearance. However, if the toy is intended for young children, you can embroider the eyes for safety.
You will need polyester fiberfill or similar stuffing material to give your Free Amigurumi Little Cat Pattern its adorable, squishy shape. Stuffing should be firm but not overpacked.
A yarn needle is essential for sewing the different parts together and weaving in the ends. It’s a key tool for assembling your little cat with clean seams.
Other helpful tools include stitch markers to keep track of your rounds, sharp scissors for cutting yarn, and possibly a stitch counter if you prefer to track your rows digitally or manually.
Crocheting the Free Amigurumi Little Cat Pattern starts with understanding basic amigurumi techniques, primarily working in continuous spirals using single crochet stitches.
Begin with the head. Start by creating a magic ring and work single crochet stitches into it. Gradually increase the number of stitches in each round until the head reaches the desired width.
After reaching the widest point, continue with even rounds to build the head’s height. Then, start decreasing stitches evenly to shape the top of the head. Remember to insert the safety eyes before closing the head completely.
Move on to the body by following a similar process. Start with a magic ring, increase to the required width, and then work several rounds evenly before decreasing to close the body. Make sure to stuff it as you go.
The ears are small triangle-shaped pieces made with a few rows of increases and decreases. Once crocheted, they are sewn onto the top of the head to give the cat its signature look.
Create the legs and arms by making small tubular shapes. Each limb starts with a magic ring, followed by a few rounds of increases, then several rounds without increases, and finishes with decreases before stuffing.
Finally, crochet the tail. The tail is usually a long tube or a simple chain with single crochets worked into it. This completes the structural parts of your Free Amigurumi Little Cat Pattern.
With all your pieces crocheted, it’s time to assemble your Free Amigurumi Little Cat Pattern. Taking care during this stage ensures your cat looks neat, balanced, and full of character.
Start by attaching the head to the body. Use a yarn needle and whip stitch around the base of the head, sewing it firmly to the top of the body. Make sure it’s centered before securing.
Sew the ears onto the head. Placement is important—space them evenly with a slight tilt forward to give the cat a playful expression.
Attach the arms to the sides of the body, just below the neck. They can be positioned flat against the body or angled slightly forward as if the cat is waving or reaching out.
Sew the legs to the bottom of the body. Check that the cat sits upright without tipping forward or backward. Adjust the placement if needed for balance.
The tail should be attached to the back of the body, either pointing upwards for a playful look or downwards for a relaxed pose. You can also add a slight curve while sewing for extra charm.
Add the facial details. Embroider a small nose with pink or black yarn, and use black embroidery floss to create a sweet smile and whiskers. This final step gives your Free Amigurumi Little Cat Pattern its unique personality.
One of the joys of working with the Free Amigurumi Little Cat Pattern is how easily it can be customized. Small changes in colors and details make each cat special.
Experiment with different yarn colors. Create a gray tabby, an orange ginger cat, or even a calico. Adding stripes, spots, or color patches is a simple way to mimic real-life cats.
Change the size by using thicker or thinner yarn combined with an appropriate hook size. This can make your little cat tiny enough for a keychain or large enough to be a cuddle buddy.
Accessorize your cat with tiny bows, scarves, or hats. Simple crochet accessories take only a few minutes to make but add a lot of charm.
Vary the eye placement or facial embroidery to change the expression. Placing the eyes wider apart creates a cute, innocent look, while closer eyes give a curious expression.
Try adding extra features like tiny paw pads on the feet, or a bell on the collar. These details can make your Free Amigurumi Little Cat Pattern even more adorable.
If you’re feeling adventurous, combine this cat pattern with others. For example, create a matching puppy or bunny for a cute animal set, or modify the body shape slightly for different poses.
Is the Free Amigurumi Little Cat Pattern beginner-friendly?
Yes, this pattern is great for beginners. It uses basic stitches and simple shapes, making it an excellent introduction to amigurumi.
How long does it take to crochet the little cat?
On average, it can take 4 to 6 hours, depending on your crochet speed and skill level. More experienced crafters might finish faster.
What type of yarn is best for this pattern?
Cotton yarn is recommended because it holds shape well and creates neat stitches. However, acrylic yarn can also be used for a softer finish.
Can I make the cat bigger or smaller?
Yes, by changing the yarn weight and hook size, you can adjust the overall size of the cat without altering the pattern structure.
Are safety eyes safe for children?
Safety eyes are generally secure, but for toys intended for children under 3 years, it’s best to embroider the eyes to eliminate any choking hazard.
Do I need to know advanced crochet techniques?
No, only basic techniques like magic ring, single crochet, increases, and decreases are needed to complete the Free Amigurumi Little Cat Pattern.
In this guide, you’ve learned how to create the Free Amigurumi Little Cat Pattern from start to finish. From gathering the right materials, crocheting each part, assembling the pieces, and adding personal touches, every step has been explained to help you succeed.
This adorable project is not only fun and satisfying but also offers endless ways to personalize. Whether you choose bright, playful colors or stick to classic cat patterns, your creation will be uniquely yours.
If you found this guide helpful or have ideas for future patterns, I would love to hear from you! Please leave a sincere opinion, share your finished cat, and suggest what you’d like to see next. Your feedback means the world and helps grow this creative community!


