
Macrame Heart Bracelet - Free Tutorial

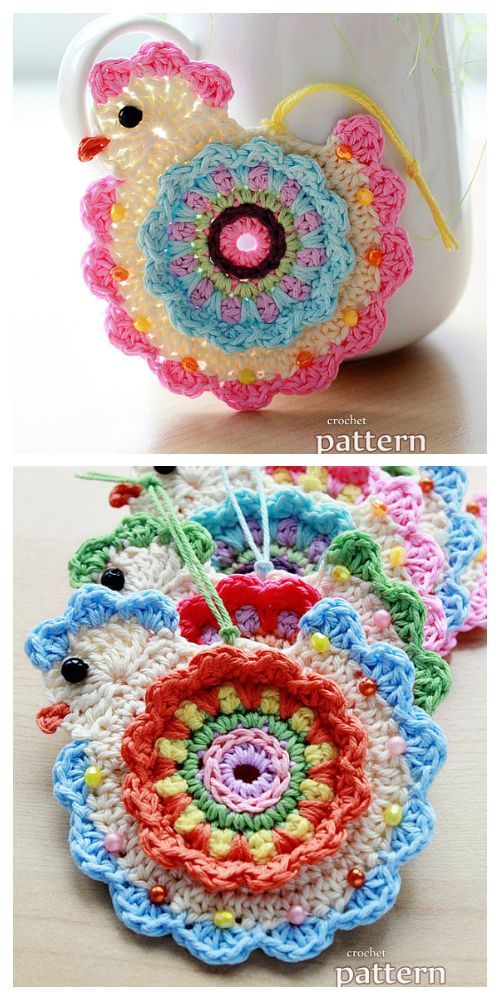
The Happy Easter Chick Ornament Crochet Pattern is a delightful and creative way to celebrate the season of spring.
This charming crochet project allows you to create a small, colorful chick that can be used as an ornament for your Easter decorations or gifted to loved ones. Whether you’re a seasoned crocheter or a beginner, this project is both simple and fun to make.
Crocheting an Easter chick is an excellent way to combine the festive spirit of the holiday with the art of amigurumi. The small size of the chick ornament makes it perfect for decorating Easter baskets, hanging on a tree, or adding a cheerful touch to a mantel.
The project can be customized in various colors and styles, allowing you to add your unique flair to this holiday craft.
In this article, we will walk you through the entire process of creating your very own Happy Easter Chick Ornament Crochet Pattern. From gathering your materials to adding the final touches, we’ve got you covered. Let’s dive in and start making this adorable Easter chick ornament!
Before you begin crocheting your Happy Easter Chick Ornament, it’s important to gather all the necessary materials. Having everything ready will make the process more enjoyable and ensure you have a smooth crafting experience. Here’s a list of the materials you will need for this project:
Once you’ve gathered your materials, you’re ready to start crocheting the Happy Easter Chick Ornament. Let’s move on to the basic crochet techniques that you will need to complete the project.
Before we begin creating the Happy Easter Chick Ornament, there are a few essential crochet techniques you’ll need to know. These techniques are commonly used in amigurumi patterns and will help you create a tidy, professional-looking chick.
The magic ring technique is the foundation of many amigurumi projects. It allows you to start crocheting in a circular shape without leaving a hole in the center. To make a magic ring, wrap the yarn around your fingers and create a loop. Crochet into the loop, and then pull the ring tight to close it. This is a crucial technique for the chick’s body, as it will give it a clean, closed appearance.
The single crochet stitch is the most commonly used stitch in amigurumi patterns, including the Happy Easter Chick Ornament. It’s a tight stitch that helps create a firm and structured shape for your chick. To do a single crochet, insert the hook into the stitch, yarn over, and pull through. You’ll have two loops on your hook. Yarn over again and pull through both loops to complete the stitch.
As you work through the Happy Easter Chick Ornament Crochet Pattern, you’ll need to increase and decrease to shape the chick. Increasing is done by crocheting two stitches into the same stitch, while decreasing involves crocheting two stitches together to reduce the stitch count. These techniques are essential for forming the body and head of the chick.
Most of the pieces in the Happy Easter Chick Ornament are crocheted in continuous rounds, which means you won’t turn your work at the end of each round. To keep track of your rounds, use a stitch marker to mark the beginning of each round, ensuring that your ornament remains symmetrical.
Once you’ve crocheted the individual parts of your chick (head, body, wings, etc.), you’ll need to join them together. Use a tapestry needle to sew the pieces securely, making sure to stitch tightly so the parts don’t come apart.
With these basic techniques in mind, you’re ready to start crocheting your Happy Easter Chick Ornament. Let’s dive into the step-by-step instructions to bring your chick to life!
Start by making a magic ring and crocheting in the round to form the chick’s head. Use yellow yarn for the head and work in single crochet. Increase as instructed in the pattern until the head is the desired size. Be sure to stuff the head lightly with fiberfill to give it some shape. Finish off the head and leave a long tail for sewing it to the body.
Next, crochet the body of the chick, using the same technique as the head. Work in continuous rounds, and increase where needed to form the round shape of the body. Once you’ve completed the body, stuff it with fiberfill and finish off the piece, leaving a long tail for sewing.
To make the wings, crochet two identical pieces using yellow yarn. Work in the round and increase or decrease as necessary to form small, rounded wings. Once finished, stuff them lightly with fiberfill and attach them to the sides of the chick’s body using a tapestry needle.
For the beak, use orange yarn and crochet a small triangle shape. The feet can be made by crocheting small ovals and adding tiny toes. Attach both the beak and feet to the chick’s face and bottom using your tapestry needle. These small details will give your chick character and personality.
Now that the body is complete, it’s time to add the safety eyes. Attach the eyes securely to the face of the chick. If you’re using embroidery, carefully stitch two small black dots for the eyes. These details will bring your Happy Easter Chick Ornament to life.
The final step is to attach a small hook or ribbon to the top of the chick’s head, so you can hang it as an ornament. Use a small length of yarn or a decorative ribbon to create a loop for hanging.
1. What type of yarn is best for this project? For the Happy Easter Chick Ornament, worsted weight yarn is ideal because it’s easy to work with and provides a nice texture. Yellow is the main color for the body, but you can use other colors for accents like the beak and feet.
2. How do I make the magic ring for the chick’s head? To make the magic ring, wrap the yarn around your fingers to form a loop, crochet into the loop, and pull the yarn tight to close it. This will create a tight center for the chick’s head.
3. Can I use this pattern for other holiday ornaments? Absolutely! You can use the basic techniques from the Happy Easter Chick Ornament Crochet Pattern to create other holiday-themed ornaments, such as a bunny for Easter or a Santa Claus for Christmas. Just change the yarn colors and accessories to suit the season.
4. How can I make the chick larger or smaller? To adjust the size, you can use thicker or thinner yarn, as well as a corresponding hook size. Changing the yarn weight will affect the final size of your ornament.
5. Can I make the chick without safety eyes? Yes, you can embroider the eyes instead of using safety eyes. Just make sure to stitch them securely to avoid them coming loose.
6. How do I add a hook for hanging? To add a hook, simply use a small piece of yarn or ribbon, tie it securely at the top of the chick’s head, and form a loop. This will allow you to hang the ornament easily.
Join our VIP broadcast list and gain access to exclusive patterns, all for free. As a VIP member, you’ll receive the best patterns daily, delivered directly to your device. ✨📱 It’s a unique opportunity to stay up-to-date with the latest trends and designs, curated just for you. Don’t miss out on enhancing your projects and discovering new inspirations with the best patterns every day! 🎨🔝
In this tutorial, we’ve shown you how to create a Happy Easter Chick Ornament Crochet Pattern from start to finish. By following the step-by-step instructions and mastering a few basic crochet techniques, you can make this adorable chick to add to your Easter decorations or give as a thoughtful gift. Remember, crochet is all about creativity, so feel free to experiment with different colors and accessories to personalize your ornament.
We hope you enjoyed this crochet project. If you have any questions or suggestions, feel free to leave a comment below. We’d love to hear your thoughts and see your finished Easter chicks! Happy crocheting and have a wonderful Easter!


