
If you’re looking to learn how to crochet a cute chicken keychain – Amigurumi style, you’ve found the perfect guide! Whether you’re new to crochet or an experienced crafter, making small amigurumi projects like this one is a fun and rewarding way to use your skills.
Not only is this keychain adorable and functional, but it also makes a thoughtful handmade gift or an eye-catching addition to your own bag or keys.
Amigurumi, the Japanese art of crocheting small stuffed creatures, has gained popularity around the world for its whimsical designs and simple construction.
Learning how to crochet a cute chicken keychain – Amigurumi style introduces you to basic shaping techniques and minimal sewing, all while keeping things small and beginner-friendly.
This step-by-step tutorial will walk you through the materials you’ll need, each step of the crocheting process, and creative ideas for customizing your chicken keychain. Get ready to crochet your way into a fun and cheerful little project you’ll be proud to carry everywhere!
1. Materials You’ll Need for a Chicken Amigurumi Keychain
Before diving into how to crochet a cute chicken keychain – Amigurumi style, gather your supplies to ensure a smooth and enjoyable experience. You don’t need much, which makes this a great project for using leftover yarn.
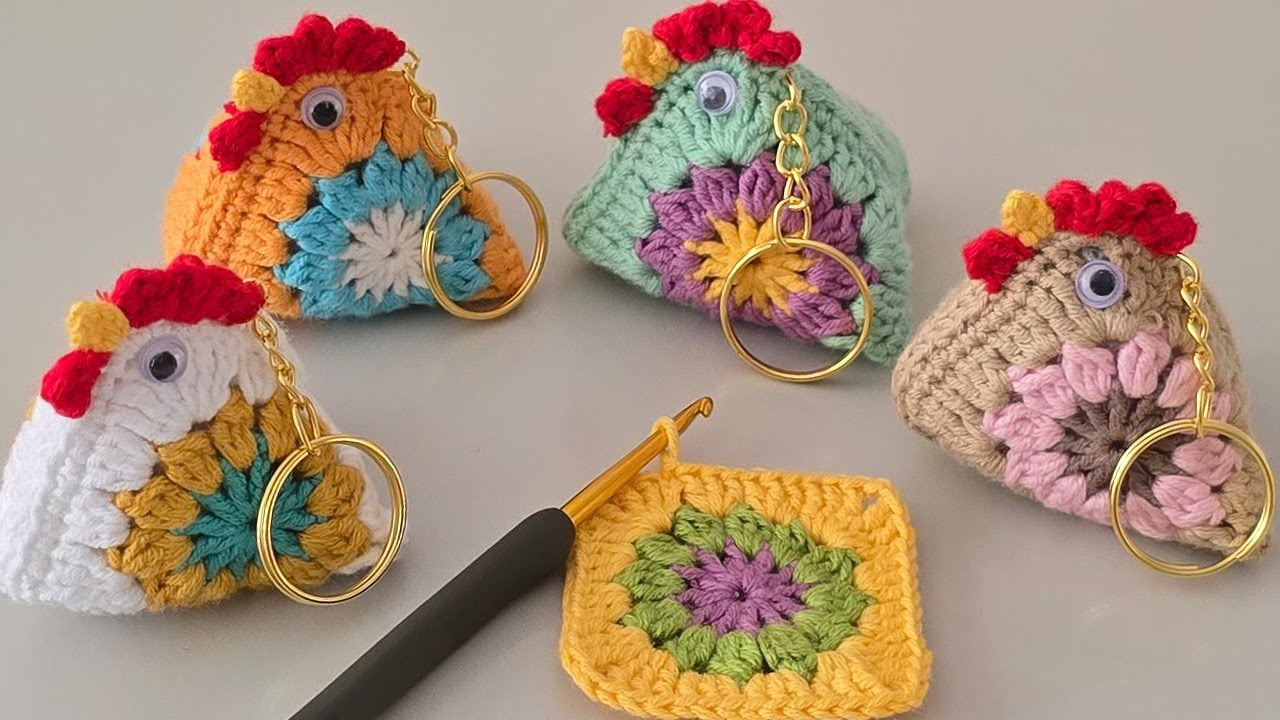
The first and most important material is yarn. For small amigurumi projects, it’s best to use cotton yarn or acrylic with a tight twist. Choose classic chicken colors like white for the body, yellow for the beak and feet, and red for the comb and wattle.
A 2.5mm or 3mm crochet hook is ideal, depending on your yarn. Smaller hooks help keep your stitches tight so the stuffing doesn’t peek through.
You’ll also need a small amount of fiberfill stuffing to shape your chicken. Even though the piece is tiny, proper stuffing gives it that plump, rounded amigurumi look.
A yarn needle is necessary for sewing parts together and weaving in ends neatly. Tiny safety eyes or black embroidery thread work well for facial features—just make sure they’re secure if gifting to children.
Finally, attach a keychain ring or lobster clasp to turn your finished piece into a functional accessory. You can also add a jump ring to make it extra secure.
2. Step-by-Step Guide: How to Crochet a Cute Chicken Keychain
Now that you have your materials, it’s time to learn how to crochet a cute chicken keychain – Amigurumi style step by step. This project typically involves working in the round, using basic stitches like single crochet, increases, and decreases.
Start by crocheting the body. Using your white yarn, create a magic ring and begin working single crochet stitches in a continuous spiral. Gradually increase stitches to form a small sphere. This will serve as the main body of your chicken.
Once your body has reached the desired size (usually around 4-5 rounds of increases), crochet several rounds without increasing to give it height. After that, begin to decrease and stuff the piece before fully closing it off.
Next, crochet the beak and feet. These are usually made with yellow yarn using just a few stitches. You can create a small triangle for the beak and tiny nubs or loops for the feet. Sew them securely to the body using a yarn needle.
Now, add the comb and wattle with red yarn. These are often crocheted as tiny bumps or loops, then sewn on top of the chicken’s head and under the beak.
Attach safety eyes between rounds 4 and 5, or embroider eyes with black thread for a softer look. Make sure the eyes are evenly spaced for a cute expression.
Finally, sew a keychain ring to the top of your chicken using a strong thread or by crocheting a small loop. Now your keychain is ready to travel with you everywhere!
3. Creative Customization Ideas
Once you’ve mastered how to crochet a cute chicken keychain – Amigurumi style, you can start playing with color, shape, and accessories to make your piece even more unique.
Try using variegated or pastel yarns for a more playful look. You can even create a rainbow chicken or use metallic yarns for a fun twist.
Add tiny accessories like a bowtie, flower crown, or mini scarf. These little touches bring out the personality of your amigurumi and make them extra gift-worthy.
Vary the size of your chicken by using thicker or thinner yarn and adjusting your hook size accordingly. Making a family of chickens in different sizes can be a charming display or gift set.
Consider crocheting seasonal variations like an Easter chick with a tiny egg, or a Christmas version with a Santa hat. These themes make for great holiday gifts or decorations.
Instead of just a keychain, you can turn your mini chicken into a bag charm, zipper pull, or ornament. Just change the type of clasp or string you attach to the top.
For those who sell handmade goods, offering custom color combinations and packaging can turn your keychains into a successful product line for craft fairs or online shops.
4. Amigurumi Tips for Beginners
If you’re new to amigurumi or just want to refine your technique while learning how to crochet a cute chicken keychain – Amigurumi style, these tips will help make the process easier and more enjoyable.
Use a stitch marker to keep track of the beginning of each round. This helps prevent mistakes and keeps your stitches even.
Keep your tension tight. Loose stitches can cause stuffing to show, which reduces the polished look of your finished piece. Practice using a firm, consistent grip.
Always stuff gradually. Add small amounts of fiberfill and use a tool like a chopstick or the back of your hook to shape the chicken as you go.
When sewing parts together, use matching yarn colors and keep your stitches neat and secure. Invisible stitch techniques make your amigurumi look professional.
Take breaks if your hands start to cramp. Working with small hooks and tight tension can be tiring, especially during intricate sections like beaks and feet.
Lastly, don’t be afraid to experiment. Amigurumi is as much about creativity as it is about precision. Your chicken doesn’t have to be perfect—it just has to make you smile!
FAQ – Frequently Asked Questions
What is amigurumi?
Amigurumi is the Japanese art of crocheting small stuffed toys or objects. It’s characterized by working in the round with single crochet stitches and shaping through increases and decreases.
Is this project beginner-friendly?
Yes! The cute chicken keychain in Amigurumi style uses simple stitches and small pieces, making it perfect for beginners or those wanting a quick project.
How long does it take to make one chicken keychain?
On average, it takes 1–2 hours to complete one, depending on your skill level and whether you add extra embellishments.
Can I use other yarn types?
Yes, but cotton or tightly spun acrylic is best for amigurumi to ensure the shape holds and stuffing doesn’t peek out.
What if I don’t have safety eyes?
You can use black yarn or embroidery floss to stitch eyes instead. It’s a great alternative for young children’s toys.
Can I sell the chicken keychains I make?
Yes, as long as the pattern you use allows for commercial use. Always credit the original designer if required.
Conclusion
Now that you know how to crochet a cute chicken keychain – Amigurumi style, you’re ready to bring joy into your crafting with this small but impactful project. From choosing your yarn to attaching the final keyring, each step is a creative journey that results in a charming little companion.
Whether you’re making one for yourself, as a gift, or as a product to sell, the possibilities are endless once you get started. Amigurumi is more than just crochet—it’s a way to share smiles, color, and creativity.
VIDEO TUTORIAL
We’d love to hear from you! Have you tried making your own crochet chicken keychain? Leave a comment with your honest opinion, tips, or suggestions to inspire fellow crafters!


