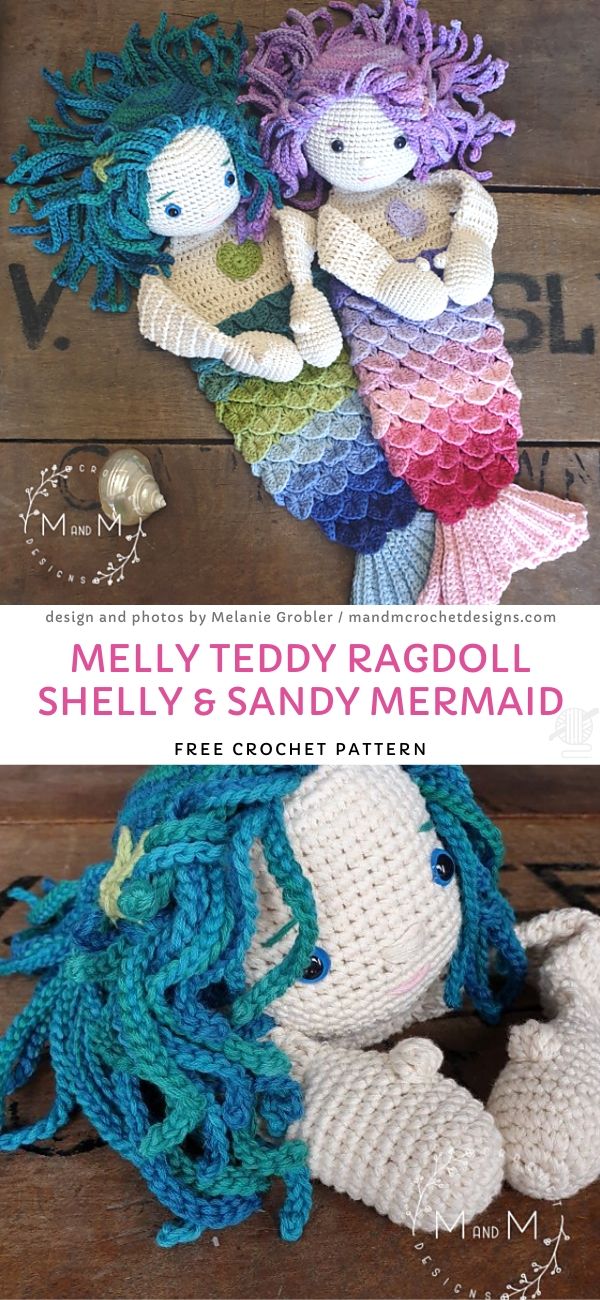
If you love crocheting adorable toys, then the Melly Teddy Ragdoll Shelly & Sandy Mermaid Free Crochet Pattern is perfect for your next project.
These delightful ragdoll-style mermaids bring a touch of magic to any collection, making them a wonderful gift for children and ocean lovers. The combination of vibrant colors and soft textures creates a unique and cuddly companion.
Advertising
Creating a crochet ragdoll involves a mix of traditional amigurumi techniques with flat panel crocheting, making it an exciting challenge for both beginners and experienced crafters.
Image from google.
With this free crochet pattern, you can customize your mermaids with different colors, accessories, and yarn types to make them truly special.
In this article, we’ll cover everything you need to know to bring Shelly & Sandy to life. We’ll discuss the materials required, step-by-step instructions, creative variations, and tips for assembling your mermaid ragdolls. Let’s get started!
Before starting your Melly Teddy Ragdoll Shelly & Sandy Mermaid Free Crochet Pattern, gather the necessary materials to ensure a smooth crocheting experience.
Advertising
Yarn Selection: Choose soft, lightweight yarn in various colors for the body, tail, and hair. Cotton or acrylic blends work well for durability.
Crochet Hook: A 3.5mm or 4mm crochet hook is commonly used for ragdoll projects.
Tapestry Needle: Essential for weaving in loose ends and stitching the pieces together.
Safety Eyes or Embroidery Thread: For facial features, you can use safety eyes or embroider the eyes for a softer look.
Stuffing Material: Polyfiber fill ensures your ragdoll is plush and huggable.
Stitch Markers: Helps keep track of stitches, especially when working on small details.
Having the right materials ensures your crochet project turns out exactly as you envision.
2. Step-by-Step Instructions for Crocheting Shelly & Sandy Mermaid
Once you have your materials ready, follow this simple breakdown to crochet your Melly Teddy Ragdoll Shelly & Sandy Mermaid.
Create the Mermaid’s Head and Body: Start with a magic ring and work in continuous rounds to shape the head and torso.
Crochet the Mermaid Tail: Use shell stitch or textured patterns to give the tail a beautiful, flowing effect.
Add the Mermaid’s Hair: Loop strands of yarn onto the head to create long, flowing mermaid hair.
Stitch the Arms and Fins: Make small tubular shapes for arms and attach delicate fins to the tail.
Assemble the Pieces: Sew the different body parts together securely for a durable and finished look.
Embroider the Face or Attach Eyes: Add personality to your mermaid with embroidered details or safety eyes.
Following these steps will help you bring your crochet mermaid to life with ease.
3. Creative Variations for Your Mermaid Ragdoll
One of the best parts about the Melly Teddy Ragdoll Shelly & Sandy Mermaid Free Crochet Pattern is that you can customize your design in endless ways.
Different Hair Styles: Experiment with curly, braided, or short hair for unique looks.
Add Accessories: Create a small crochet crown, starfish, or seashell necklace for an extra touch.
Play with Color Schemes: Use pastel shades for a dreamy aesthetic or bold colors for a striking mermaid.
Make a Matching Set: Crochet multiple mermaids in different styles for a fun collection.
Add Embellishments: Use beads or sequins to add sparkle to the tail.
Create a Mini Version: Make a smaller version as a keychain or ornament.
With these variations, you can make every mermaid truly one-of-a-kind.
4. Tips for Assembling and Finishing Your Crochet Mermaid
To ensure your Melly Teddy Ragdoll Shelly & Sandy Mermaid looks polished and professional, follow these expert tips.
Use Firm and Even Stitches: This prevents gaps and ensures a well-shaped ragdoll.
Stuff Evenly: Avoid overstuffing to maintain a soft and flexible doll.
Securely Sew All Parts: Make sure all pieces are attached firmly so they don’t come loose.
Block the Pieces Before Assembly: Lightly steam or wet block your crochet pieces to ensure even shaping.
Double-Knot the Hair Strands: This keeps the mermaid’s hair secure and prevents unraveling.
Test Different Expressions: Try different embroidery techniques for varied facial expressions.
These finishing touches will give your crochet mermaid a flawless and polished appearance.
FAQ – Frequently Asked Questions
Is the Melly Teddy Ragdoll Shelly & Sandy Mermaid pattern beginner-friendly? Yes! While some parts require basic amigurumi techniques, beginners can follow along with patience.
What type of yarn is best for this project? Soft cotton or acrylic yarn works best for durability and a smooth texture.
How do I make my mermaid ragdoll more durable? Ensure tight stitches, securely sew parts together, and avoid overstuffing.
Can I sell finished crochet mermaids from this pattern? Many free patterns allow for selling finished items, but always check the designer’s copyright terms.
How do I attach hair to the crochet mermaid? Loop strands of yarn through the head and secure them with double knots for a realistic look.
Can I resize the pattern? Yes! Use a larger hook and thicker yarn for a bigger mermaid or a smaller hook for a tiny version.
Join our VIP broadcast list and gain access to exclusive patterns, all for free. As a VIP member, you’ll receive the best patterns daily, delivered directly to your device. ✨📱 It’s a unique opportunity to stay up-to-date with the latest trends and designs, curated just for you. Don’t miss out on enhancing your projects and discovering new inspirations with the best patterns every day! 🎨🔝
The Melly Teddy Ragdoll Shelly & Sandy Mermaid Free Crochet Pattern is a fantastic project for anyone who loves handmade toys.
Whether you’re creating them for gifts, decorations, or personal collections, these crochet mermaids bring charm and creativity to every stitch. With endless customization options, you can make each mermaid truly unique.