Crochet Dragon Ornament - Free Pattern

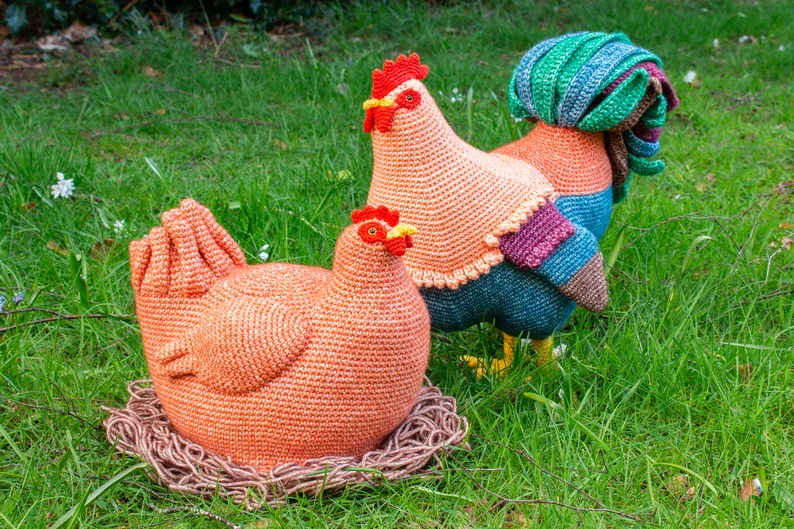
The Rooster Crochet Pattern – Full Size Rooster Amigurumi Pattern is a fun and charming project that will bring a touch of rustic charm to your crochet collection. Crocheting a full-sized rooster is not only a rewarding experience but also an opportunity to learn advanced techniques and create a delightful handmade piece.
Whether you are an experienced crocheter or just starting out, this detailed tutorial will guide you step by step through the process of making your very own rooster amigurumi.
Amigurumi is the Japanese art of crocheting small, stuffed animals and creatures, and creating a rooster is an ideal way to explore this technique.
With its vibrant colors and intricate details, a rooster amigurumi can become a unique decoration for your home or a special gift for a loved one. In this tutorial, we’ll walk you through the materials needed, the basic techniques involved, and the step-by-step process to help you achieve a full-sized rooster amigurumi.
The Rooster Crochet Pattern – Full Size Rooster Amigurumi Pattern allows you to explore various crochet skills, from shaping and colorwork to adding tiny details like the comb, beak, and tail feathers.
It’s a perfect project for those who enjoy creating whimsical, detailed pieces that showcase their skills. So, gather your materials and let’s begin this creative adventure!
Before starting your Rooster Crochet Pattern, it’s essential to gather the right materials. Having the correct yarn, hooks, and tools will ensure that your project goes smoothly and results in a high-quality finished product. Here is a list of the materials you’ll need for this full-sized rooster amigurumi:
Once you have all your materials ready, you’re all set to start the Rooster Crochet Pattern! Let’s move on to learning the basic crochet techniques you’ll need to make this amigurumi.
To successfully complete the Rooster Crochet Pattern, there are several key crochet techniques that you’ll need to be familiar with. These techniques will help you create the various parts of the rooster, such as the body, wings, comb, and tail feathers. Here’s an overview of the essential techniques:
The magic ring is a crucial technique when crocheting in the round, which is the most common method for amigurumi. This technique allows you to start crocheting without leaving a hole in the center. To make the magic ring, create a loop with your yarn, crochet into it, and pull the yarn tight. This method creates a neat, seamless beginning for your rooster project.
The single crochet stitch is a fundamental stitch in amigurumi and will be used throughout the Rooster Crochet Pattern. This stitch creates a tight fabric that holds the stuffing securely inside the finished piece. To make a single crochet stitch, insert your hook into the stitch, yarn over, pull through, and yarn over again to complete the stitch.
In amigurumi, increasing and decreasing stitches are essential for shaping the different parts of the rooster. Increasing is done by crocheting two stitches into one stitch, while decreasing is achieved by crocheting two stitches together. These techniques allow you to shape the rooster’s body and add dimension to the wings, comb, and tail.
For the majority of this project, you’ll be working in continuous rounds. This means you won’t be turning your work after each round. To help keep track of where each round begins, use a stitch marker at the start of each round.
The Rooster Crochet Pattern requires several color changes, especially when working on different sections of the rooster. To change colors, simply finish the last stitch of the old color and introduce the new color into the stitch. Make sure to join the new color tightly to avoid any gaps in the work.
As the rooster comes together, you’ll need to attach different parts, like the wings, comb, and tail. Use a tapestry needle to sew the pieces together neatly. This step requires patience to ensure the parts are aligned correctly for a polished final result.
With these techniques mastered, you’re ready to begin making the rooster! Let’s break down the step-by-step process.
To create the body of the rooster, start with the magic ring technique and crochet several rounds of single crochet in red or yellow yarn. Make sure to increase and decrease as needed to form the oval shape of the body.
The head is a key feature of the rooster. Use a combination of red and orange yarn for the beak, and crochet a small, rounded shape for the head. You can attach safety eyes to give the rooster a lively, expressive face.
The comb and wattle are iconic features of a rooster. To create the comb, use red yarn and crochet a series of small, pointed shapes. The wattle, which hangs below the beak, can be made with a few simple stitches in red or orange yarn.
The rooster’s wings should be made with a combination of single crochet stitches and color changes for the feathers. Use red or yellow yarn for the main body of the wings, and add accents in black or brown for a realistic effect. Attach the wings to the sides of the body with a tapestry needle.
The rooster’s tail feathers can be made with a combination of long and short stitches, using brown or black yarn. These feathers add flair to the rooster and make it stand out as a beautiful amigurumi. Attach the tail to the back of the rooster once the feathers are complete.
Once all parts of the rooster are crocheted, it’s time to assemble everything. Attach the head, wings, comb, wattle, and tail to the body using a tapestry needle. Make sure to stitch each part securely. Finally, weave in any loose ends, and your full-size rooster amigurumi is complete!
1. Can I make the rooster smaller or larger? Yes! You can adjust the size by using different yarn weights and adjusting your crochet hook size accordingly. Thicker yarn and a larger hook will result in a bigger rooster, while finer yarn will make a smaller version.
2. How can I make the rooster’s comb stand up properly? To make the comb stand up, you can stiffen it by adding a little fabric stiffener or by using a thicker yarn for the comb itself.
3. What type of yarn is best for this project? For amigurumi, it’s best to use medium-weight yarn (worsted weight). This type of yarn is easy to work with and holds its shape well.
4. Can I substitute the safety eyes with embroidery? Yes, if you prefer, you can embroider the eyes using black embroidery floss or yarn instead of using safety eyes.
5. How do I attach the parts securely? Use a tapestry needle to carefully sew the parts together. Be sure to stitch each piece firmly to avoid any loose parts.
6. Can I add accessories to my rooster? Absolutely! You can add accessories like a small scarf or a tiny hat to give your rooster a more personalized touch.
Join our VIP broadcast list and gain access to exclusive patterns, all for free. As a VIP member, you’ll receive the best patterns daily, delivered directly to your device. ✨📱 It’s a unique opportunity to stay up-to-date with the latest trends and designs, curated just for you. Don’t miss out on enhancing your projects and discovering new inspirations with the best patterns every day! 🎨🔝
In this Rooster Crochet Pattern – Full Size Rooster Amigurumi Pattern, we’ve covered the entire process of creating a beautiful, full-sized rooster from start to finish. With the right materials, crochet techniques, and attention to detail, you can create a charming rooster amigurumi that will be a standout piece in your crochet collection. Whether you’re gifting it or keeping it for yourself, this project is sure to bring a smile to anyone who sees it.
We hope you enjoyed this tutorial! If you have any questions or suggestions, feel free to leave a comment below. Happy crocheting!