
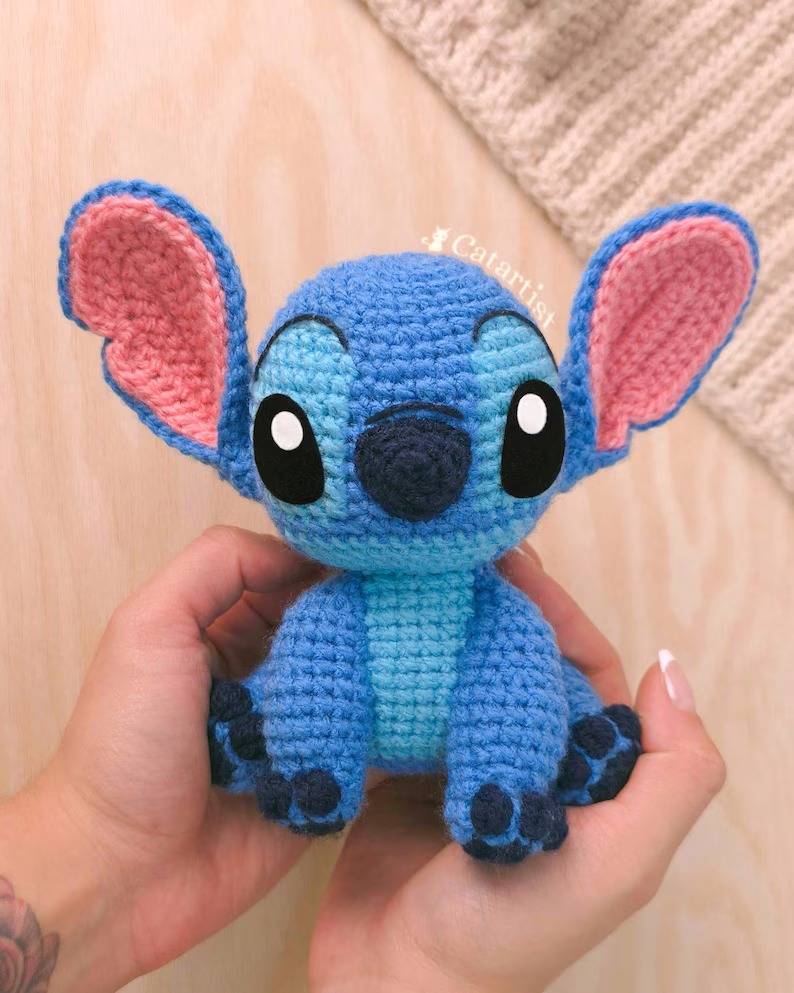
If you’ve ever dreamed of creating your own adorable Stitch Blue Monster – Amigurumi, you are in the right place! This step-by-step guide is designed to help you crochet an irresistibly cute blue alien inspired by one of the most beloved characters in pop culture.
Whether you are a beginner or an experienced crocheter, this project will bring joy, creativity, and a sense of accomplishment.
Learning how to make a Stitch Blue Monster – Amigurumi is not just fun, but also a rewarding experience.
You will develop your crochet skills while crafting a unique handmade toy that can be a perfect gift, a collectible item, or a beautiful piece to decorate your home. Plus, this little blue monster is always a favorite among kids and adults alike.
In this detailed tutorial, you will discover how to choose the right materials, follow a clear pattern, assemble each part of the blue monster, and add final touches that make it truly special. Get ready to dive into the wonderful world of amigurumi and enjoy every stitch along the way.
1. Materials Needed for Stitch Blue Monster – Amigurumi
To start your Stitch Blue Monster – Amigurumi, gathering the correct materials is the first important step. The right tools and yarn will make the process easier and the result more professional.
For the yarn, a soft yet sturdy cotton or acrylic yarn works best. Choosing the iconic shades of blue is key: one medium blue for the body, a lighter blue for the belly and eye details, and black and white for the eyes.
You will need a crochet hook size that matches your yarn. Typically, a 2.5 mm or 3.0 mm hook is perfect for tight stitches that hold the stuffing well without gaps.
Polyester fiberfill stuffing is essential for giving your Stitch Blue Monster – Amigurumi its perfect shape. It keeps the toy soft, fluffy, and huggable while maintaining structure.
Safety eyes are highly recommended for a polished look. You’ll need black eyes about 10mm in diameter, or you can crochet the eyes if you prefer an entirely handmade finish.
Other tools include a yarn needle for sewing pieces together, stitch markers to help keep track of rounds, and a small pair of sharp scissors for trimming yarn ends.
Optionally, you may want to use a little bit of pink yarn or felt for the inside of Stitch’s ears and nose to add more character to your finished amigurumi.
2. Crochet Pattern for the Body and Head
The most exciting part of creating your Stitch Blue Monster – Amigurumi is starting with the body and head. This section is where the personality of the toy really begins to form.
Begin by crocheting a magic ring and making six single crochets (SC) into the ring. This is the classic start for amigurumi to create a tight, closed circle.
Increase evenly in each round to form a spherical shape for the head. For example, in round two, make two SC in each stitch to double the count. Continue adding increases in each round until the head reaches the desired size.
Once the head size is achieved, crochet several rounds without increases to build the height of the head. This will give Stitch his recognizable rounded, oval-shaped head.
To create the body, follow a similar process but with fewer increases to form an oval shape that is slightly narrower than the head. This gives Stitch his cute, chubby body shape.
After finishing the head and body, stuff both firmly with fiberfill. Ensure the stuffing is even but not so tight that the stitches stretch or distort.
Leave a long tail on both the head and body pieces. You will use this tail later to sew them together securely as part of assembling your Stitch Blue Monster – Amigurumi.
3. Making Ears, Arms, Legs, and Eyes
Now it’s time to bring more life to your Stitch Blue Monster – Amigurumi by creating his distinctive features like the ears, arms, legs, and eyes.
For the ears, start with the lighter blue for the inner ear and then switch to the main blue for the outer ear. The ears are slightly curved and long, which gives Stitch his signature playful look.
The arms are simple cylindrical shapes. Start with a magic ring, then increase, and continue with several rounds of single crochet. Stuff lightly so the arms stay soft but hold their shape.
Create the legs in a similar fashion to the arms, but make them slightly larger and flatter at the bottom. This allows your blue monster to sit upright if desired.
The eyes are an important focal point. Use safety eyes or crochet small circles in black with a white accent for the sparkle. Attach them symmetrically to the face for a balanced, adorable appearance.
Don’t forget the nose! Crochet a small oval or circle in dark blue or black and stitch it between the eyes to complete Stitch’s iconic face.
Finally, for extra details, you can add tiny claw stitches at the ends of the arms and legs or embroider small eyebrows for extra expression on your Stitch Blue Monster – Amigurumi.
4. Assembling and Finishing Your Amigurumi
Assembling the Stitch Blue Monster – Amigurumi is where all your hard work comes together to form a cute, lovable toy.
Start by sewing the head to the body using the long yarn tails you left earlier. Position the head securely so it balances well on top of the body.
Attach the ears to the sides of the head. Make sure they are symmetrical and slightly curved upwards or to the sides, depending on the look you prefer.
Next, sew the arms to the sides of the body slightly below the head. Position them slightly forward for a hugging pose or straight down for a classic standing look.
Attach the legs at the bottom of the body. Make sure the toy sits nicely and the legs are evenly placed for stability.
Now, sew the eyes, nose, and any other facial details onto the head. Take your time with this step, as the face is what brings the most character to your Stitch Blue Monster – Amigurumi.
Double-check all seams and stitches to ensure they are tight and secure, especially if the toy is intended for children. Once you’re happy with the result, trim any loose threads, and your Stitch is complete!
FAQ About Stitch Blue Monster – Amigurumi
1. Is this Stitch Blue Monster – Amigurumi suitable for beginners?
Yes! While it has multiple parts, the stitches are basic, and with patience, beginners can complete it successfully.
2. How long does it take to crochet a Stitch Blue Monster – Amigurumi?
It typically takes between 6 to 10 hours, depending on skill level and how detailed you make it.
3. What is the best yarn for this amigurumi?
Cotton or acrylic yarn works best. Cotton holds shape well, while acrylic offers softness and flexibility.
4. Can I wash the Stitch Blue Monster – Amigurumi?
Yes, but hand washing is recommended to maintain the shape and avoid damaging safety eyes or seams.
5. Can I sell Stitch Blue Monster – Amigurumi that I make?
Yes, you can sell finished items. Just make sure to use your own photos and clearly state it’s a handmade fan creation.
6. What crochet stitches do I need to know?
Basic stitches like single crochet (SC), increases, and decreases are primarily used in this pattern.
Conclusion
In this complete guide on Stitch Blue Monster – Amigurumi, you’ve learned how to choose the right materials, crochet each part of the toy, assemble it with care, and add finishing details that make your amigurumi truly special. This adorable blue monster is a fun and satisfying project for anyone who loves crochet.
I would love to hear your feedback! Please share your honest opinion about this guide and leave your suggestions or questions in the comments. Your input helps improve future tutorials and keeps the creative spirit alive. Happy crocheting!


