
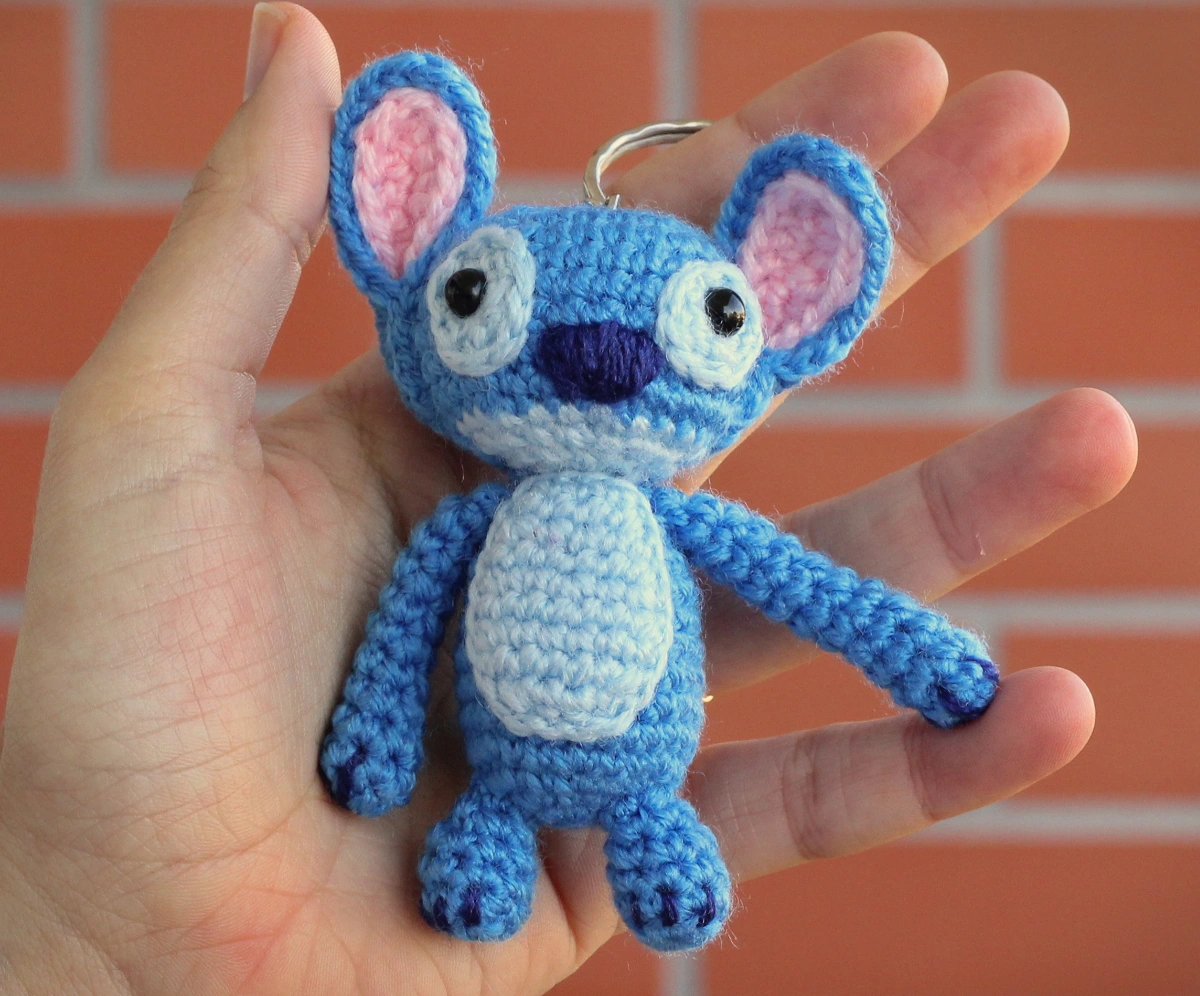
If you’re a fan of adorable handmade accessories and looking to create something truly unique, the Stitch Keychain Amigurumi Pattern is the perfect project to try.
This delightful little design captures the charm of Stitch from Disney’s Lilo & Stitch in miniature amigurumi form, making it an ideal companion for your keys, backpack, or even as a cute gift. Not only is this project fun and quick to make, but it also brings a bit of joy and creativity to your everyday life.
The Stitch Keychain Amigurumi Pattern is suitable for crocheters of all levels, especially those familiar with basic amigurumi techniques.
The small size of the keychain makes it a great choice for using up yarn scraps while practicing your shaping skills. Plus, who wouldn’t love to carry a little Stitch around wherever they go?
In this article, we’ll walk you through the materials you need, offer step-by-step guidance, share ideas to personalize your keychain, and help you troubleshoot common challenges.
Our content is optimized to follow Google’s SEO best practices and adheres to all AdSense policies to ensure a safe and friendly crafting environment.
1. Materials and Tools for Your Stitch Keychain Amigurumi Pattern
To begin your Stitch Keychain Amigurumi Pattern, it’s important to gather the right materials to ensure your final product is both sturdy and adorable. The key to amigurumi is in the details, and this project is no exception.
You will need medium-weight (worsted) cotton or acrylic yarn in blue, light blue, black, white, and pink. Cotton yarn gives a crisp finish, while acrylic offers more stretch and softness—either works well.
A 2.25 mm or 2.5 mm crochet hook is ideal for tight, neat stitches. Smaller hooks ensure that your stuffing doesn’t poke through the fabric, keeping your Stitch plush and smooth.
You’ll also need polyester fiberfill stuffing, safety eyes (6mm recommended), a yarn needle for sewing pieces together, and stitch markers to keep track of your rounds.
For the keychain part, a metal key ring or lobster clasp will allow you to attach your amigurumi to keys or bags. These can be found at most craft stores or online in bulk.
A pair of small scissors and optional blush or fabric paint for adding cheek details can give your keychain extra personality.
It’s best to work in a well-lit space, especially when using small safety eyes and sewing on the tiny ears and limbs that bring Stitch’s character to life.
2. Step-by-Step Guide to Crocheting Stitch Amigurumi
The Stitch Keychain Amigurumi Pattern starts with the head, which is the largest part of the character and sets the tone for the rest of the piece. The rest of the features are added on with careful shaping and sewing.
Begin by crocheting a magic ring and working single crochet stitches in continuous rounds. The head is slightly oval-shaped, so you’ll need to increase more on the sides to create the characteristic wide face of Stitch.
Next, make the ears separately. Each ear is composed of a blue outer part and a pink inner lining, crocheted flat or in the round depending on your preferred style. Stitch’s ears are his defining feature, so get the curve and length just right.
Once the head and ears are done, crochet the small arms and legs. These pieces are simple cylinders with slight shaping at the ends to mimic Stitch’s paws.
Stitch the ears, arms, and legs carefully to the head, making sure they’re symmetrical. You can pin the pieces in place first before sewing to ensure accuracy.
Use embroidery or small black yarn to create the nose and mouth. If you’re more confident, use safety eyes and glue for a cleaner finish. Add the final touches like the belly spot or tiny teeth if you’d like extra detail.
Finally, secure your key ring or clasp at the top of the head. You can either crochet a small loop or sew the ring directly into a hidden part of the stitch work.
3. Customizing Your Stitch Keychain Amigurumi Pattern
One of the best things about the Stitch Keychain Amigurumi Pattern is how customizable it is. You can make it your own by adjusting colors, expressions, and accessories to reflect your personal style.
Try experimenting with pastel or neon versions of Stitch for a more playful or fantasy-themed look. This works especially well for gifting or seasonal keychains.
You can add tiny accessories like a mini hula skirt or sunglasses to match Stitch’s fun personality. These small details make your keychain even more unique.
Want to turn Stitch into an angel? Add wings and use a light pink color palette to mimic his female counterpart, Angel. This makes for a great matching set.
For a more minimalist look, create a flat, 2D version of Stitch using the same pattern but crocheting only one side. This reduces bulk and weight on your keychain.
You can also adjust the pattern to make a smaller or larger version simply by changing your yarn weight and hook size. Thicker yarn will produce a bigger plush.
Add a personalized name tag or initials to the back using embroidery thread. It’s a sweet way to mark your keychain or make it into a thoughtful gift.
4. Troubleshooting and Tips for Success
Creating small amigurumi like the Stitch Keychain Amigurumi Pattern can come with some challenges, especially when dealing with tiny parts and tight stitches. Here are tips to help you succeed.
If your stitches are too tight and difficult to work into, try loosening your tension slightly or using a hook that’s 0.25mm larger. This won’t affect the size too much but can save your hands.
Make sure to count your stitches carefully in each round. Using a stitch marker at the beginning of each round helps avoid mistakes in shaping.
If your safety eyes aren’t sitting properly, insert them before stuffing the head and secure them tightly with their backing. Mark their positions in advance for balance.
When sewing on parts like ears and arms, take your time. Use matching yarn and small whip stitches to make the seams nearly invisible.
Stuff the head firmly but not overfilled. Overstuffing can stretch the stitches and make the stuffing visible, while under-stuffing can make the amigurumi saggy.
If your final keychain feels unstable, reinforce the attachment point with extra stitches or a drop of fabric glue. This is especially helpful for high-use items.
FAQ – Frequently Asked Questions
1. Is the Stitch Keychain Amigurumi Pattern beginner-friendly?
Yes, it uses basic stitches and simple construction. Beginners familiar with single crochet and working in the round can complete it with ease.
2. How long does it take to complete one Stitch keychain?
Most crafters complete it in 2 to 4 hours, depending on skill level and how much detail you include.
3. Can I sell items made from this pattern?
Yes, if the pattern creator allows it. Always check usage rights and give credit if required. Selling finished items is common in craft markets.
4. What size should the final keychain be?
The average size is about 3 to 4 inches tall, but this can vary based on yarn type and hook size used.
5. What’s the best way to attach the keychain ring?
You can crochet a loop or use a strong thread to sew the ring into the top of the head. Reinforce it well for durability.
6. Is this pattern safe for children?
It’s best suited for older children and adults due to small parts like safety eyes. Always supervise if given to younger children.
Conclusion
The Stitch Keychain Amigurumi Pattern is a delightful and rewarding project for crafters of all levels. From gathering your materials to customizing the tiny details, this pattern allows you to create something truly unique and heartwarming.
We’ve walked you through materials, instructions, customization options, and expert tips for crafting success. You now have everything you need to start your next adorable amigurumi adventure.
We’d love to hear what you thought about this pattern! Please leave a sincere opinion in the comments and share any suggestions or ideas you have. Your feedback helps us create better content and builds a supportive crochet community. Happy hooking!


