
Macrame Heart Bracelet - Free Tutorial

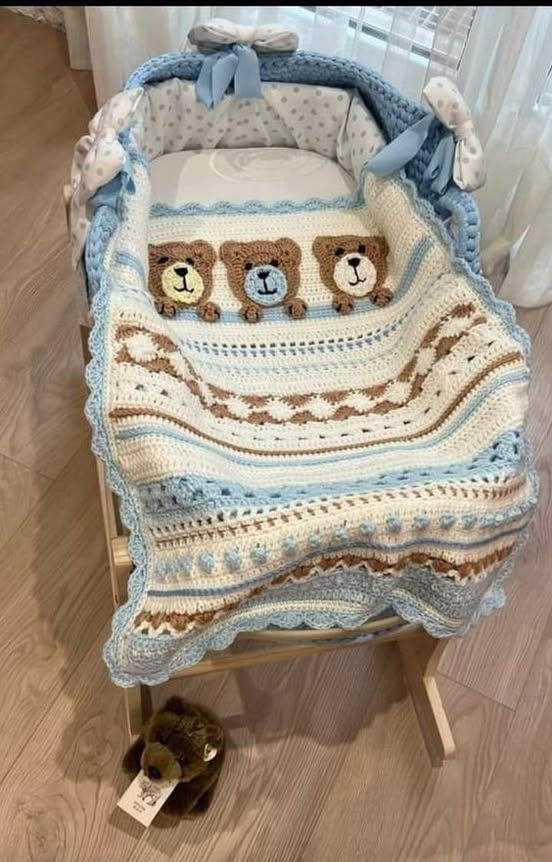
Creating a cozy and colorful blanket is one of the most satisfying projects for any crocheter or knitter. The AS-WE-GO Stripey Blanket – Tutorial is the perfect way to combine your love for color with your crochet skills.
This blanket offers a versatile and fun approach, perfect for beginners and experienced crafters alike. Throughout this tutorial, we will guide you through the entire process, from choosing the right yarn to finishing the blanket with precision and flair.
Whether you’re looking to make a gift for a loved one or simply want to enhance your living room, the AS-WE-GO Stripey Blanket – Tutorial is ideal.
The stripes add a cheerful touch to any space, and the design is simple enough that you can personalize it with your favorite colors. As we go through each step of the tutorial, you’ll learn how to work with different yarns, manage your stitches, and create an even and uniform blanket.
This tutorial will ensure that even if you are a beginner, you will feel confident about your ability to create a beautiful, functional blanket.
With just a few basic supplies and the right techniques, you’ll be able to complete your blanket in no time. Now, let’s dive into the process, starting with selecting the right materials for your project.
Before beginning the AS-WE-GO Stripey Blanket – Tutorial, it’s essential to choose the right yarn for the project. The yarn you select will determine the texture, durability, and overall appearance of your blanket. For this blanket, it’s best to use a soft, medium-weight yarn such as acrylic or cotton. These yarns are easy to work with and maintain, and they come in a wide variety of colors.
When selecting colors for the stripes, think about the overall design you want to achieve. You can either choose contrasting colors for a bold and vibrant look or stick to complementary colors for a more subtle and sophisticated design. The yarn should be soft enough to ensure comfort, especially if the blanket will be used as a throw or a bedspread.
Once you’ve chosen your yarn, be sure to check the recommended hook or needle size on the label. This will help ensure that your stitches are consistent and that the blanket comes out with the right dimensions. Generally, a 5mm crochet hook works well for medium-weight yarns, but always refer to the yarn’s label for the most accurate recommendations.
The yarn you choose can also influence the weight of the blanket. If you want a thicker, cozier blanket, consider using a heavier weight yarn. On the other hand, for a lighter, airy feel, a thinner yarn would be more appropriate. Experiment with different yarns to find the one that suits your preferences.
The beauty of the AS-WE-GO Stripey Blanket lies in its simple yet eye-catching striped design. The pattern involves alternating rows of different colors, and you can adjust the width and frequency of the stripes to suit your style. Here’s how you can create the stripes:
One important tip is to make sure you don’t carry the unused yarn across rows, as this can create unsightly lumps. Instead, always cut the yarn when you switch colors and tie off the ends securely before starting a new section.
As you continue working, remember that the beauty of the AS-WE-GO Stripey Blanket is that you can customize the width of the stripes. Feel free to play around with different combinations to create the perfect look for your home.
Managing yarn ends and joining new stripes seamlessly are crucial steps in ensuring that your AS-WE-GO Stripey Blanket looks polished and professional. As you work through the blanket, you’ll encounter the challenge of how to securely attach the new yarn colors and manage the loose ends.
By keeping these techniques in mind, you’ll be able to join your stripes flawlessly and manage your yarn ends without creating any unsightly lumps or bumps.
Once you’ve completed the main body of your AS-WE-GO Stripey Blanket, it’s time to finish it off. The final touches are just as important as the main design, as they can elevate the look of your blanket and add a professional finish.
When you’re happy with the size and the finish, your AS-WE-GO Stripey Blanket is ready to be enjoyed! It’s now a cozy, colorful addition to your home or a beautiful gift for someone special.
1. How many colors should I use for the AS-WE-GO Stripey Blanket?
There’s no set rule for the number of colors, but we recommend using at least three or four colors for a balanced, vibrant look. You can choose complementary or contrasting colors depending on your design preference.
2. Can I adjust the size of the blanket?
Yes, you can adjust the size of your blanket by increasing or decreasing the number of rows you work. Simply adjust the foundation chain to make the blanket larger or smaller.
3. What is the best yarn for this project?
A soft, medium-weight yarn like acrylic or cotton is ideal for this blanket. These yarns are easy to work with and create a soft, comfortable finish.
4. How do I keep the stripes even?
To keep your stripes even, work each stripe for the same number of rows and maintain consistent tension. This will ensure the stripes have a uniform width and appearance.
5. Can I use a different stitch for the blanket?
Yes! While the double crochet stitch is commonly used for this pattern, you can experiment with other stitches like half-double crochet or treble crochet for different textures.
6. How do I finish the blanket neatly?
To finish neatly, add a simple edging, weave in all yarn ends securely, and block the blanket to even out the stitches.
Join our VIP broadcast list and gain access to exclusive patterns, all for free. As a VIP member, you’ll receive the best patterns daily, delivered directly to your device. ✨📱 It’s a unique opportunity to stay up-to-date with the latest trends and designs, curated just for you. Don’t miss out on enhancing your projects and discovering new inspirations with the best patterns every day! 🎨🔝
The AS-WE-GO Stripey Blanket – Tutorial is an excellent project for crocheters of all skill levels. With the step-by-step guide provided, you now have the tools to create a colorful and cozy blanket that will add warmth and personality to any space. From selecting the right yarn to finishing with a neat edging, each step plays a vital role in creating a beautiful, functional blanket.
We hope this tutorial has inspired you to embark on your own crochet journey. Don’t forget to share your thoughts and experiences in the comments below. We’d love to hear your feedback and any suggestions you might have for future tutorials. Happy crocheting!


