
The Crochet Shell Pattern Tutorial is a fantastic way to learn one of the most elegant and versatile stitch patterns in crochet.
Whether you’re making blankets, scarves, or delicate lace projects, the shell stitch adds texture and beauty to any design. In this tutorial, you’ll learn how to create this stunning pattern with step-by-step guidance.
The shell stitch is ideal for both beginners and advanced crocheters. It creates a lacy, decorative effect that is easy to master with a little practice.
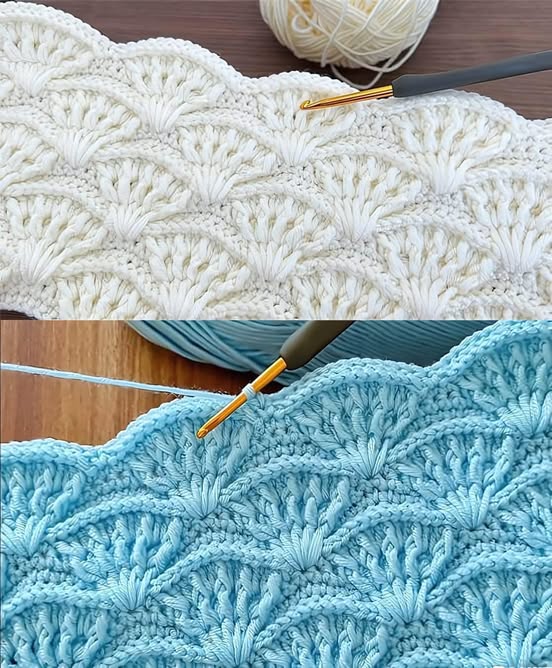
This stitch is often used in borders, shawls, and baby blankets due to its soft and intricate appearance. With the right yarn and hook, you can achieve a professional-looking crochet piece effortlessly.
Before diving into the tutorial, it’s essential to gather the necessary materials and understand the basic techniques involved. This guide will provide everything you need, from selecting the best yarn to mastering the shell stitch with confidence. Let’s get started!
Materials and Tools Needed
To begin your Crochet Shell Pattern Tutorial, you’ll need the following materials:
- Yarn Selection: Choose a soft and durable yarn. Cotton and acrylic are excellent choices for their versatility.
- Hook Size: A medium-sized crochet hook (such as 4mm or 5mm) works well for most shell stitch projects.
- Scissors: Sharp scissors for cutting yarn neatly.
- Tapestry Needle: For weaving in loose ends and finishing touches.
- Stitch Markers: Useful for keeping track of pattern repeats.
- Measuring Tape: Ensures consistency in size and dimensions.
Having the right tools will make your crochet experience smooth and enjoyable. Beginners should start with a light-colored yarn to easily see stitches and patterns.
HStep-by-Step Instructions
Follow these steps to create a basic Crochet Shell Pattern:
- Foundation Chain: Begin with a multiple of 6 stitches plus 1 for a balanced pattern.
- First Row: Work a single crochet stitch in the second chain from the hook, then continue across the row.
- Second Row: Chain 3 (counts as the first double crochet), then make 5 double crochets in the same stitch to create the first shell.
- Spacing the Shells: Skip two stitches, single crochet in the next, then skip two more and repeat the shell pattern.
- Continuing the Pattern: Repeat the steps until reaching the end of the row, turning your work after each row.
- Adding Rows: Repeat row two until the desired length is achieved, ensuring consistent spacing and tension.
With patience and practice, the shell stitch will become second nature, allowing for intricate and decorative crochet projects.
Common Mistakes and How to Fix Them
Even experienced crocheters can make mistakes. Here’s how to troubleshoot common issues:
- Uneven Stitches: Maintain even tension to prevent loose or tight loops.
- Miscounting Stitches: Always count stitches to avoid pattern misalignment.
- Gaps Between Shells: Ensure correct stitch spacing to maintain an even appearance.
- Curling Edges: Use a larger hook or block your work to flatten edges.
- Inconsistent Shells: Verify stitch counts within each shell to maintain uniformity.
- Loose Ends: Secure yarn ends properly to prevent unraveling.
By addressing these common mistakes, you can perfect your crochet shell pattern with ease.
Tips for Customizing Your Shell Pattern
Customization allows for creativity and personal touch in crochet projects. Here are some ideas:
- Color Changes: Incorporate different yarn colors for a gradient or striped effect.
- Yarn Weight Variations: Experiment with different weights to create varied textures.
- Adding Borders: Use a contrasting border for a professional finish.
- Pattern Adjustments: Modify shell sizes by increasing or decreasing stitch counts.
- Combining with Other Stitches: Mix shell stitch with basic stitches for unique designs.
- Blocking for Shaping: Wet block your project to achieve a polished look.
These techniques allow crocheters to personalize their projects and create one-of-a-kind designs.
FAQ
Q1: Is the shell stitch beginner-friendly? A1: Yes! The shell stitch is easy to learn and perfect for beginners who want to add texture to their crochet projects.
Q2: What is the best yarn for a shell stitch project? A2: Cotton and acrylic yarns work well, but the best choice depends on the project type and desired texture.
Q3: Can I use the shell stitch for garments? A3: Absolutely! The shell stitch is commonly used in shawls, cardigans, and summer tops.
Q4: How do I keep my shell pattern even? A4: Counting stitches carefully and maintaining even tension will help keep the pattern consistent.
Q5: Can I mix the shell stitch with other crochet stitches? A5: Yes! The shell stitch pairs beautifully with single crochet, double crochet, and picot stitches.
Join our VIP broadcast list and gain access to exclusive patterns, all for free. As a VIP member, you’ll receive the best patterns daily, delivered directly to your device. ✨📱 It’s a unique opportunity to stay up-to-date with the latest trends and designs, curated just for you. Don’t miss out on enhancing your projects and discovering new inspirations with the best patterns every day! 🎨🔝
Conclusion
In this Crochet Shell Pattern Tutorial, we’ve explored the fundamentals of creating a beautiful and textured stitch. From selecting materials to customizing designs, this tutorial equips you with everything needed to master the shell stitch. With practice and creativity, you can incorporate this elegant pattern into various crochet projects.
VIDEO TUTORIAL
Have you tried the shell stitch? Share your thoughts and suggestions in the comments! We’d love to hear about your crochet experiences and see your wonderful creations.


