
The Granny Spike Stitch is a beautiful and textured crochet stitch that adds dimension and creativity to your projects.
If you’re familiar with the classic granny stitch, the granny spike stitch is an exciting variation that enhances the design with elongated stitches, giving a unique and eye-catching effect. This stitch is perfect for blankets, scarves, and decorative pieces, offering a vintage yet modern aesthetic.
Learning how to create the granny spike stitch is simple and rewarding. With just a few basic crochet skills, you can master this stitch and incorporate it into your work.
In this tutorial, we’ll cover the essential materials, step-by-step instructions, tips for achieving perfect tension, and creative ways to use this stitch in your projects. Let’s get started!
1. Materials and Tools Needed
Before you begin, gather all the necessary materials to ensure a smooth crocheting experience.
Choosing the right yarn is essential for the best results. Medium-weight yarn (such as worsted weight) is an excellent choice for practicing this stitch, as it provides good stitch definition.
A crochet hook that matches your yarn weight is crucial. Check the yarn label for the recommended hook size, but typically, a 5mm (H-8) hook works well with worsted-weight yarn.
Sharp scissors are necessary for cutting your yarn cleanly when changing colors or finishing a project.
A tapestry needle is helpful for weaving in loose ends and securing stitches for a polished final look.
A stitch marker can be beneficial if you want to keep track of your stitch count or mark your starting point in each row.
2. Step-by-Step Instructions to Crochet the Granny Spike Stitch
Now that you have your materials ready, it’s time to learn how to create the granny spike stitch step by step.
Begin with a foundation chain. Make a multiple of three chains plus two extra for the turning chain.
For the first row, work a double crochet (DC) into the fourth chain from the hook. Continue working double crochets across the row.
In the second row, create a standard granny stitch by making clusters of three double crochets in each space between stitches.
To introduce the spike stitch, insert your hook into the row below the current working row, pulling up a long loop before completing a double crochet. This creates the elongated spike effect.
Repeat the granny stitch and spike stitch alternately across the row, ensuring an even and consistent pattern.
Continue building rows, maintaining the granny stitch clusters and inserting spike stitches at regular intervals to create the textured effect.
3. Tips for Achieving the Perfect Granny Spike Stitch
To ensure that your granny spike stitch looks neat and professional, follow these helpful tips.
Maintain consistent tension while crocheting. Pulling the yarn too tightly may cause the spike stitches to pucker, while loose tension can make the design uneven.
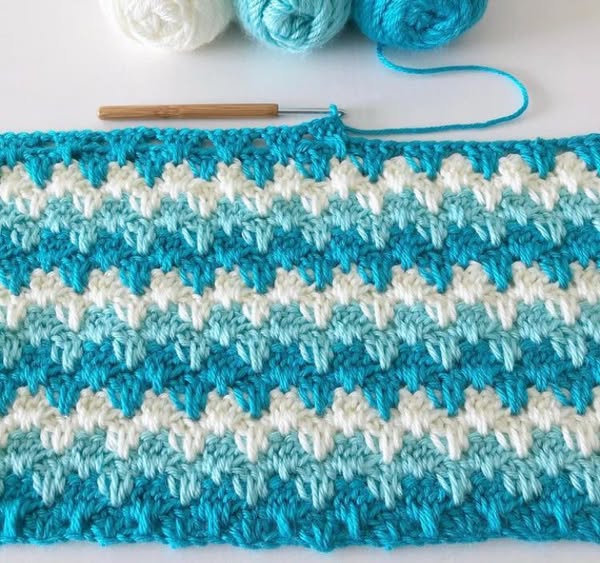
Use color changes to highlight the spike stitch effect. Alternating colors every few rows makes the spike stitches stand out beautifully against the granny clusters.
Keep your stitches uniform by pulling the spike stitch loop to the correct height. This helps maintain the balance and symmetry of the pattern.
Weave in loose ends properly to avoid unraveling. Secure your yarn tails by threading them through stitches on the backside of the work.
Practice on a swatch before starting a larger project. This helps you get comfortable with the stitch and determine the right hook and yarn combination.
Take breaks if needed. Crocheting for long periods can lead to hand fatigue, so relax your hands occasionally to maintain precision and comfort.
4. Creative Ways to Use the Granny Spike Stitch
The granny spike stitch is incredibly versatile and can be incorporated into a variety of crochet projects.
Use this stitch to make cozy and colorful blankets. The texture adds visual interest, and you can experiment with different yarn colors for a stunning effect.
Create stylish scarves and shawls that showcase the spike stitch’s unique design. The elongated stitches add depth, making each piece truly stand out.
Make decorative pillow covers with this stitch for a handmade, textured look. The granny spike stitch adds charm to any home decor.
Design tote bags using this stitch for a durable and fashionable accessory. Pairing the stitch with sturdy yarn ensures long-lasting results.
Craft pot holders or dishcloths that are both functional and decorative. The raised texture of the spike stitch enhances grip and usability.
Combine the granny spike stitch with other crochet stitches to create unique patterns. Mixing techniques allows for endless creative possibilities.
FAQ
1. What type of yarn works best for the granny spike stitch?
Medium-weight yarn, such as worsted weight, is ideal because it provides good stitch definition and durability.
2. Can I use the granny spike stitch for garments?
Yes! This stitch can be used for sweaters, cardigans, and ponchos, adding a unique texture to wearable items.
3. How do I keep my spike stitches even?
Pull the yarn up to a consistent height when making spike stitches and maintain even tension throughout your work.
4. Can I crochet the granny spike stitch in a round pattern?
Absolutely! This stitch works well in circular patterns, making it great for mandalas and round blankets.
5. What is the best way to change colors in this stitch?
Change colors at the beginning of a row by completing the last yarn-over of the previous row with the new color.
6. How do I prevent my project from curling?
Ensure you’re working with the correct hook size and tension, and block your finished project if needed to help it lay flat.
Conclusion
Now that you’ve learned how to create the granny spike stitch, you’re ready to add this beautiful technique to your crochet projects. This stitch provides texture, depth, and a unique visual appeal that enhances any crochet work.
VIDEO TUTORIAL
We’d love to hear about your experience! Have you tried the granny spike stitch before? Share your thoughts and suggestions in the comments below. Happy crocheting!


