
Macrame Heart Bracelet - Free Tutorial

Solid Granny Square Blanket is one of the most timeless and versatile crochet projects you can make. Known for its clean, modern look and ease of assembly, this pattern is perfect for beginners and seasoned crafters alike.
If you’re searching for a practical, beautiful, and satisfying crochet journey, creating your own Solid Granny Square Blanket may be just what you need.
Unlike traditional granny squares with open, lacy patterns, the solid version features tighter stitches, giving the blanket a sturdier and warmer texture. This makes it ideal for cozying up on a cold evening or adding a pop of handmade charm to your living space.
Whether you prefer a monochrome design or a patchwork of vibrant colors, the Solid Granny Square Blanket allows unlimited creativity.
Another advantage of this project is its portability. You can crochet the squares individually, making it a perfect on-the-go project.
Plus, assembling the squares gives you the freedom to design your blanket layout however you like—symmetrical, random, color-blocked—it’s up to you! In this tutorial, we’ll guide you through all the key steps and helpful tips to master your own Solid Granny Square Blanket.
Before diving into the stitches, it’s essential to choose the right materials for your Solid Granny Square Blanket. Your choice of yarn and hook will impact the softness, durability, and overall look of your finished project.
Many crocheters prefer using medium-weight (worsted) yarn for blankets. It provides warmth and durability while still working up relatively quickly. Cotton yarn offers a clean stitch definition and breathability, while acrylic yarn is budget-friendly, hypoallergenic, and easy to care for.
When it comes to colors, think about your home’s decor or the person you’re making the blanket for. You can go for neutral tones for a minimalist look, or use bold, contrasting colors to create a vibrant mosaic of squares.
You’ll also need a suitable crochet hook for your yarn weight. Typically, a 5mm (H-8) hook works well with worsted-weight yarn. Be sure to check your yarn label for recommendations and adjust as needed to match your gauge.
Other useful tools include scissors, a yarn needle for sewing the squares together, and stitch markers if you want to keep track of your rounds. Having a blocking mat can also help shape your squares neatly before joining.
By preparing your materials thoughtfully, you’ll set yourself up for a smooth and enjoyable crafting experience—and a beautiful Solid Granny Square Blanket.
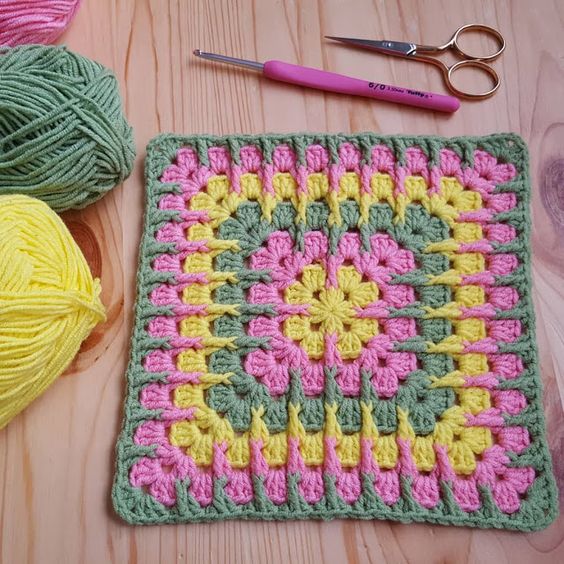
Once your materials are ready, it’s time to start creating the foundational element of your Solid Granny Square Blanket: the square itself. This version eliminates gaps, making it perfect for a warmer and more refined blanket.
To begin, make a magic ring or chain four and slip stitch to form a ring. Chain three (counts as your first double crochet), then crochet two more double crochets into the ring. Chain two for the corner, then work three more double crochets. Repeat this process until you have four groups of three double crochets, with chain-two spaces in between. Slip stitch to join.
For round two and beyond, start in a corner space. Chain three, make two double crochets, chain two, and work three more double crochets in the same corner. Then, move to the next space between clusters and work three double crochets. Repeat this pattern, always placing two clusters with a chain-two in each corner.
Continue increasing with each round by adding a cluster of three double crochets into each side space and two clusters in every corner. The square will naturally grow as you repeat the rounds.
Keep your tension consistent to ensure all squares are the same size. You can stop at any round depending on the desired size of your square, which could range from 3 inches to over 10 inches across.
Fasten off your yarn neatly and weave in the ends. If using multiple colors, change yarns at the beginning of a new round for a clean finish. This gives your Solid Granny Square Blanket a tidy and polished appearance.
After you’ve crocheted all your individual squares, it’s time to bring them together. The way you join them plays a big role in the overall look and feel of your Solid Granny Square Blanket.
First, lay out all your completed squares on a flat surface to determine your preferred layout. You can organize them by color, shape, or completely at random—there’s no wrong way! Take a picture of your layout if needed, to remember the arrangement.
There are several joining methods available. A common one is whipstitching, which uses a yarn needle to sew squares together through the back loops. This creates a flat and nearly invisible seam.
Another popular method is the slip stitch join, where you use a crochet hook and working yarn to attach the squares together directly. This creates a slightly raised seam, which can add a nice texture to your blanket’s design.
If you like a decorative join, the single crochet method adds a visible ridge between squares and is ideal for adding contrast if you use a different yarn color.
Once all squares are connected row by row, go back and check all joins to make sure they’re secure. Then, weave in any remaining yarn tails and give the blanket a gentle block if needed to help even out the shape.
Taking the time to assemble carefully ensures your Solid Granny Square Blanket will not only look great but also last for years.
With all your squares joined, your Solid Granny Square Blanket is almost complete. The final step is adding an edge—a detail that frames your work and adds a professional touch.
A simple single crochet border works well to clean up the edges and give a cohesive look. You can also add a round of half-double or double crochet for a thicker border. Repeat as needed to build up a substantial frame around the blanket.
For a more decorative finish, consider a scalloped edge, picot stitches, or a shell border. These patterns add a charming flair and help personalize your blanket further.
Make sure your edge lies flat and doesn’t curl. You may need to adjust your tension or stitch count slightly to achieve this. Blocking after adding the edge can also help smooth everything out.
Use a coordinating or contrasting yarn color for the border. This decision depends on your blanket’s style—contrast can create bold drama, while coordinating yarn blends everything together.
Weave in any final ends carefully and trim excess yarn. Gently steam or block your entire blanket if needed, especially if you used different yarn brands or textures that may have affected the shape.
Now you can finally wrap yourself in your warm and cozy Solid Granny Square Blanket, or present it as a thoughtful handmade gift.
1. How many granny squares do I need for a blanket?
It depends on the size of your squares and the blanket. For a baby blanket, 36 squares (6×6) might be enough, while a large throw may need 100 or more.
2. Can I use different yarn types in the same blanket?
Yes, but it’s best to use yarns of the same weight and fiber type to ensure consistent tension and washing instructions.
3. Do I need to block each square?
Blocking helps maintain uniformity, especially if your tension varies. It’s highly recommended before joining the squares.
4. How do I change colors without leaving messy ends?
Use the “invisible join” method or fasten off neatly at the end of the round. Weave in ends securely as you go to avoid tangles later.
5. How do I make the blanket softer?
Use soft yarn like baby acrylic or washed cotton, and consider washing the finished blanket with fabric softener according to yarn care instructions.
6. Is the solid granny square easier than the traditional one?
Yes and no. The solid granny has fewer gaps and is more straightforward once you understand the corner placements, but it requires attention to stitch count.
Creating your own Solid Granny Square Blanket is more than just a crochet project—it’s a chance to craft something useful, beautiful, and lasting. With every square you make, you bring your vision to life, piece by piece. This pattern is beginner-friendly, easy to personalize, and incredibly satisfying to complete.
We’ve walked through choosing the best materials, crafting the perfect square, assembling them into a stunning layout, and adding the finishing touches. Whether you’re keeping it for yourself or gifting it, your blanket will be a heartfelt handmade treasure.
We’d love to hear from you! Leave a sincere comment sharing your thoughts, questions, or tips about this project. Have you made a Solid Granny Square Blanket before? Do you have color combos you love? Let us know—we’re always inspired by your creativity!


