
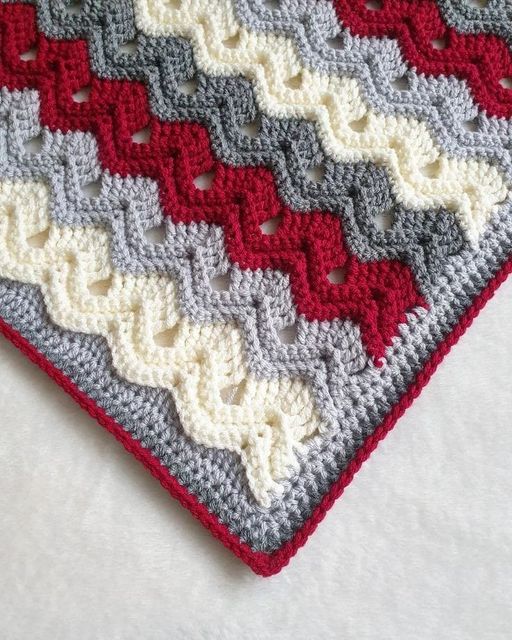
The Vintage Fan Ripple Stitch – Free Tutorial is perfect for crocheters who love elegant and classic designs. This beautiful stitch combines the graceful curves of the fan stitch with the soothing waves of the ripple stitch, creating a visually stunning pattern.
Whether you want to make blankets, scarves, or decorative pieces, mastering this stitch will add charm and sophistication to your projects.
One of the reasons why the Vintage Fan Ripple Stitch is so popular is its versatility. It can be used with different yarn weights and colors to create various effects, from soft pastels for baby blankets to bold hues for eye-catching throws. This stitch also provides great texture, making it both visually appealing and comfortable to touch.
In this free tutorial, you’ll learn everything you need to create the Vintage Fan Ripple Stitch. From choosing the right materials to step-by-step instructions, this guide will help you confidently crochet this classic design with ease.
1. Materials and Tools Needed
Before starting the Vintage Fan Ripple Stitch – Free Tutorial, it’s essential to gather the right materials and tools. Using high-quality supplies will ensure that your crochet project turns out beautifully.
- Yarn selection: Choose a soft and durable yarn for the best results.
- Crochet hook: The hook size should match your yarn weight.
- Scissors: A sharp pair ensures clean cuts.
- Tapestry needle: Useful for weaving in loose ends.
- Stitch markers: Helps track pattern repeats.
- Measuring tape: Ensures accurate dimensions.
Selecting the right yarn is crucial for achieving the desired effect. Lightweight yarns create delicate, airy designs, while heavier yarns produce more structured, textured patterns. Experimenting with different fibers like cotton, wool, or acrylic can also impact the final look.
The crochet hook size affects the tension and drape of the fabric. If you crochet tightly, consider using a slightly larger hook; if your stitches are loose, a smaller hook may be better.
Using stitch markers helps maintain pattern consistency, especially when working on larger projects. Placing markers at key points in the pattern prevents errors and makes counting stitches easier.
2. How to Crochet the Vintage Fan Ripple Stitch
Now that you have your materials ready, it’s time to start crocheting the Vintage Fan Ripple Stitch – Free Tutorial. Follow these steps carefully to achieve the perfect ripple effect.
- Start with a foundation chain that is a multiple of the pattern repeat.
- Work the first row by establishing the base stitches.
- Create the fan shapes by working groups of stitches into designated spaces.
- Form the ripple effect by increasing and decreasing stitches at key points.
- Repeat the pattern to build the desired length.
- Maintain even tension to ensure smooth, uniform waves.
The foundation chain should be long enough to accommodate the full design. Making a practice swatch first helps determine the right stitch count.
Creating the fan shapes requires placing multiple stitches in the same space, giving the pattern its signature scalloped look. Ensuring these fans are evenly spaced keeps the design balanced.
The ripple effect is achieved by strategically increasing and decreasing stitches. This technique creates the gentle waves characteristic of the stitch.
Repeating the pattern consistently is key to a flawless design. Double-check your stitch count at the end of each row to avoid errors.
Keeping a relaxed hand while crocheting helps maintain an even texture. Too much tension can cause stiffness, while too little tension can result in loose, uneven stitches.
3. Tips for Achieving the Best Results
To ensure your Vintage Fan Ripple Stitch – Free Tutorial project turns out beautifully, follow these expert tips for better consistency and aesthetics.
- Use a light-colored yarn to easily see stitches.
- Maintain a steady tension for even stitches.
- Count stitches regularly to prevent mistakes.
- Block your work to enhance the finished appearance.
- Choose complementary colors for a harmonious look.
- Experiment with different yarns to see various effects.
Lighter-colored yarns make it easier to see stitch placement, especially for beginners. This helps in identifying errors early on.
A steady tension ensures that the ripple pattern remains consistent throughout the project. If stitches vary in tightness, the ripples may look uneven.
Counting stitches at the end of each row prevents mistakes. Skipping or adding stitches can distort the pattern, so regular checks are essential.
Blocking your crochet project helps set the stitches in place, giving a polished and professional finish. Simply dampen the fabric, shape it to the desired dimensions, and allow it to dry.
Choosing colors wisely enhances the beauty of the ripple effect. Gradient or ombre yarns create a stunning transition between shades, while contrasting colors make each wave stand out.
Trying different yarn types, from silky bamboo to rustic wool, adds unique textures to your finished piece. Swatching different materials allows you to find the perfect match for your project.
4. Creative Project Ideas Using the Vintage Fan Ripple Stitch
The Vintage Fan Ripple Stitch – Free Tutorial is not limited to just one type of project. Here are some inspiring ideas to use this elegant stitch in various ways.
- Blankets: Create cozy throws with vibrant ripple patterns.
- Scarves and shawls: Add a touch of elegance to your wardrobe.
- Table runners: Design a stylish centerpiece for your table.
- Pillows and cushions: Enhance home decor with textured accents.
- Sweaters and cardigans: Incorporate the stitch into stylish garments.
- Tote bags: Make a fashionable crochet bag with a unique texture.
Blankets using this stitch offer warmth and beauty, making them perfect gifts. You can adjust the size by increasing the foundation chain.
Scarves and shawls crocheted with this pattern look sophisticated and stylish. Choosing a soft yarn ensures comfort and drape.
Table runners made with this stitch add charm to dining settings. Using neutral tones or metallic thread enhances elegance.
Decorative pillows using this design bring texture and character to living spaces. Matching colors with existing decor makes them blend seamlessly.
Sweaters and cardigans featuring this stitch have a delicate, lacy look. This makes them ideal for layering in cooler months.
Tote bags crocheted with this pattern are both stylish and functional. Using sturdy yarns ensures durability while keeping the vintage aesthetic.
FAQ
1. Is the Vintage Fan Ripple Stitch difficult for beginners? No, this stitch is beginner-friendly with a bit of practice. Mastering basic increases and decreases is key to success.
2. What is the best yarn for this stitch? Soft, lightweight yarns such as cotton, bamboo, or acrylic work best for a smooth finish.
3. Can I adjust the size of my project using this stitch? Yes, simply modify the foundation chain to make your project larger or smaller.
4. How do I keep the ripple pattern even? Maintaining a consistent tension and counting stitches carefully ensures uniform waves.
5. Can I use multiple colors for this stitch? Absolutely! Color changes enhance the ripple effect, creating a striking visual design.
6. Should I block my finished piece? Yes, blocking helps set the stitches and improves the overall appearance of the finished project.
Join our VIP broadcast list and gain access to exclusive patterns, all for free. As a VIP member, you’ll receive the best patterns daily, delivered directly to your device. ✨📱 It’s a unique opportunity to stay up-to-date with the latest trends and designs, curated just for you. Don’t miss out on enhancing your projects and discovering new inspirations with the best patterns every day! 🎨🔝
Conclusion
The Vintage Fan Ripple Stitch – Free Tutorial provides an elegant and versatile pattern suitable for a variety of crochet projects. With proper materials, patience, and practice, you can create beautiful and timeless pieces using this classic design.
VIDEO TUTORIAL
Have you tried the Vintage Fan Ripple Stitch? Share your thoughts in the comments below! We’d love to hear your experiences and any suggestions for future tutorials.


