
Macrame Heart Bracelet - Free Tutorial

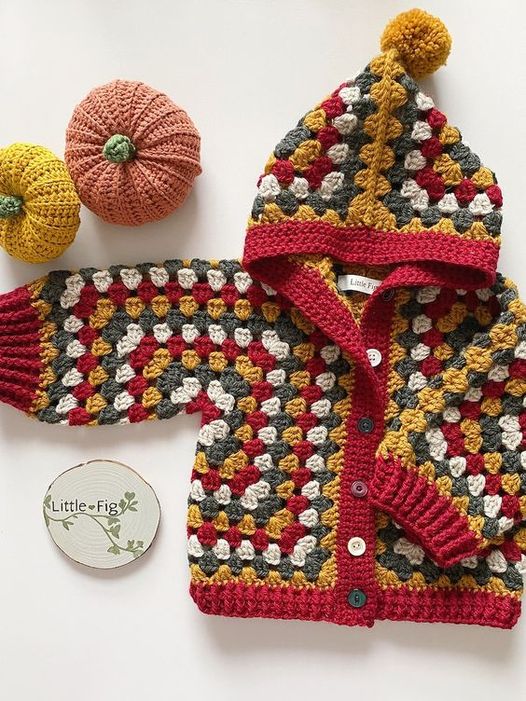
If you are searching for a stylish, cozy, and beginner-friendly project, the 2 Hexagon Hoodie – Crochet is an excellent choice.
This hoodie has become incredibly popular in the crochet community because it’s simple to make and requires only two hexagons to form the main body. With minimal shaping and sewing, this project is perfect for crocheters of all skill levels.
The beauty of the 2 Hexagon Hoodie – Crochet is its versatility. You can customize it with different colors, yarn weights, and sizes.
Whether you’re creating a lightweight hoodie for spring or a chunky one for winter, the basic pattern remains the same, allowing for endless creative possibilities.
In this detailed guide, you’ll learn how to create your own 2 Hexagon Hoodie – Crochet step by step. From choosing the right materials to assembling the pieces and adding finishing touches, we will cover everything you need to know to make this beautiful garment.
Before starting your 2 Hexagon Hoodie – Crochet, it’s important to gather the right materials. Having the correct supplies ensures your project turns out comfortable, durable, and stylish.
Start by selecting your yarn. The type of yarn you choose will determine the look and feel of your hoodie. Cotton blends are perfect for lighter hoodies, while acrylic or wool blends are great for warmth during colder months.
Choose the appropriate crochet hook size based on your yarn. Most yarn labels suggest a hook size, but you can adjust slightly depending on how loose or tight you prefer your stitches.
You’ll need a pair of sharp scissors for trimming yarn ends neatly. Clean cuts help prevent fraying and make finishing your project much easier.
A yarn needle is essential for weaving in loose ends and sewing sections together when assembling your 2 Hexagon Hoodie – Crochet.
Consider using stitch markers. They are particularly helpful for marking the beginning of rounds in your hexagons and for guiding the assembly process later.
A measuring tape will also be helpful to ensure that your hexagons reach the correct dimensions for the hoodie to fit comfortably.
Creating the 2 Hexagon Hoodie – Crochet starts with making two large hexagons that will form the body, sleeves, and shoulders of the hoodie. This simple approach means very little shaping is needed.
Begin by creating a magic ring and crocheting the center of your hexagon. Most patterns use basic stitches like double crochet, which makes it beginner-friendly.
As you continue, each round increases at the corners to expand the hexagon evenly. Pay close attention to the placement of your increases to maintain the shape.
The size of your hexagons will determine the size of your hoodie. Continue crocheting rounds until the hexagon is large enough to cover from your shoulder to your hip or desired length.
Make a second hexagon exactly like the first. Consistency is key, so count your stitches carefully to ensure both hexagons match perfectly.
Once both hexagons are finished, fold each one to form an L-shape. The arms of the L become the sleeves, and the back and front panels form naturally.
Sew the two L-shaped pieces together along the back and shoulders, leaving openings for the sleeves and front of the hoodie. This forms the main body structure of the 2 Hexagon Hoodie – Crochet.
One of the best things about the 2 Hexagon Hoodie – Crochet is how easy it is to personalize. Simple adjustments in yarn, color, and stitch type can completely change the look of the final garment.
Play with colors to create stripes, color blocking, or even a gradient effect. Using variegated yarns can also add beautiful, random color transitions.
If you prefer a textured look, consider using different stitch patterns within the hexagon. Simple substitutions, like replacing double crochet with a puff stitch or granny stitch, can add extra dimension.
Adjust the sleeve length by continuing to crochet rounds at the sleeve openings after assembling the hoodie. You can make short sleeves, three-quarter sleeves, or long sleeves depending on your preference.
For the bottom edge and sleeve cuffs, add ribbing or a simple border. This not only improves the fit but also gives a polished, professional finish.
Adding a hood is optional but highly recommended for the 2 Hexagon Hoodie – Crochet. To create the hood, crochet directly onto the neckline with half-double crochet or double crochet stitches, shaping it with gradual increases and decreases.
You can also add pockets, buttons, or a zipper for both style and function. These small details elevate the hoodie from a simple garment to a wardrobe favorite.
To ensure your 2 Hexagon Hoodie – Crochet looks great and fits well, keep these helpful tips in mind as you work on your project.
Gauge matters. Even though this hoodie is flexible in size, checking your gauge ensures the finished garment fits as intended, especially if you are following a specific pattern size.
Use high-quality yarn for garments. Softer yarns with good drape make the hoodie more comfortable to wear and help it hang nicely on the body.
Weave in ends as you go. Since the project involves two large hexagons, dealing with yarn tails right away prevents the task from becoming overwhelming at the end.
Try on your hoodie as you assemble it. This helps you check the fit and make adjustments, like adding extra rows to the sleeves or body if needed.
When adding a hood, make sure to measure carefully from shoulder to shoulder across the back of your neck. This ensures the hood fits comfortably without being too tight or too loose.
Block your finished hoodie before wearing. Wet blocking or steam blocking helps even out stitches, improves drape, and gives the hoodie a clean, polished look.
Is the 2 Hexagon Hoodie – Crochet suitable for beginners?
Yes, this hoodie is perfect for beginners. It uses basic stitches like double crochet and simple increases, making it easy to follow.
How do I know when my hexagon is the right size?
Measure from your shoulder to your hip or desired length. The hexagon should reach that distance when folded into the L-shape.
Can I use different yarn weights for the 2 Hexagon Hoodie – Crochet?
Absolutely. Just be aware that lighter yarn creates a drapier, more lightweight hoodie, while thicker yarn makes it warmer and cozier.
Do I have to add a hood?
No, the hood is optional. You can leave it without a hood for a cardigan-style look or add a collar instead.
How do I make the sleeves longer?
Simply add more rounds at the sleeve openings after assembly. You can crochet until you reach your desired sleeve length.
Can I add buttons or a zipper to my hoodie?
Yes! Buttons, zippers, and even drawstrings are great additions to customize the look and functionality of your 2 Hexagon Hoodie – Crochet.
In this guide, you learned how to create the 2 Hexagon Hoodie – Crochet, from gathering materials to crocheting the hexagons, assembling the hoodie, and customizing it to your style. This pattern is not only beginner-friendly but also highly versatile, allowing you to create a piece that truly fits your personality.
The simplicity of the 2 Hexagon Hoodie – Crochet combined with the ability to personalize colors, stitch patterns, and finishing details makes this project fun and rewarding. Whether you want something cozy for winter or light for summer, this hoodie fits the bill.
I would love to hear your thoughts! If you tried this pattern or have suggestions for future tutorials, please leave your honest opinion and ideas in the comments. Your feedback helps make this space even better for all crochet lovers!


