If you’re looking for a creative and textured addition to your next crochet project, the 3D CROCHET SQUARE – Free Pattern is the perfect place to start. This versatile design adds a layer of dimension and depth to traditional granny squares, making your handmade pieces pop with personality.
Whether you’re planning to create a blanket, pillow, tote bag, or wall hanging, a 3D square can give your project a modern and artistic twist.
The charm of the 3D CROCHET SQUARE – Free Pattern lies in its rich texture and visual interest. By incorporating raised elements, layered petals, or sculptural shapes, you can create motifs that are not only beautiful but also tactile. These squares are fun to make and offer endless customization possibilities in terms of colors, stitches, and layout.
In this tutorial, you’ll learn how to make a 3D crochet square step by step. We’ll cover the materials you’ll need, how to form the base, build the 3D structure, and connect multiple squares for larger projects.
Whether you’re a beginner ready to try something new or an advanced crocheter looking to add flair to your designs, this guide is crafted with clarity and creativity in mind.
To get started on your 3D CROCHET SQUARE – Free Pattern, you’ll want to choose materials that complement the textural nature of the design. The right yarn and tools will make the process easier and help your finished square look professional and polished.
A good yarn choice is medium-weight (worsted) yarn made of cotton or a cotton blend. Cotton helps to define stitches clearly, which is ideal for 3D patterns that rely on visible structure and texture. You may also use acrylic yarn for a softer effect with more stretch.
Color selection is another exciting part of this project. Since the 3D crochet square usually includes layered or dimensional elements, using contrasting or gradient colors can really make those layers stand out. You can go for bold combinations or subtle shades, depending on the mood you want to convey.
A 4 mm to 5 mm crochet hook is generally suitable for this type of project. Make sure your hook size matches your yarn to ensure that the stitches remain consistent and that the square keeps its shape.
Other tools you’ll need include a yarn needle for weaving in ends, a pair of scissors, and stitch markers if your pattern involves complex stitch placements or multiple layers. These markers can help you track where elements should be attached.
You may also want to lightly block your finished square to help the layers open up and sit correctly. A simple spray of water and a gentle pat-down on a flat surface will usually be enough for this.
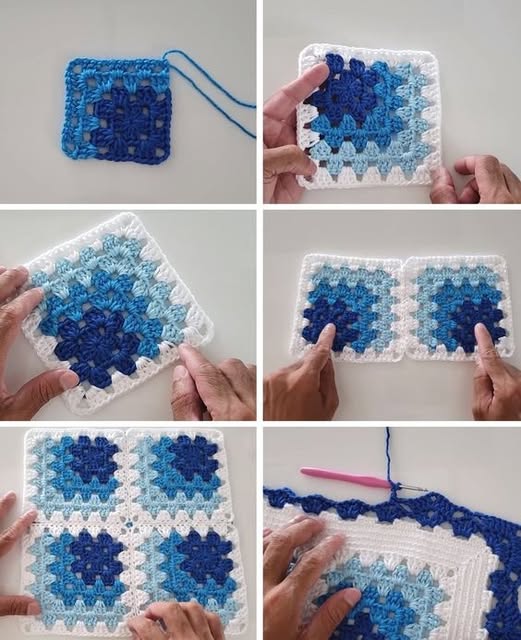
To begin the 3D CROCHET SQUARE – Free Pattern, you’ll start with a simple flat base. This foundation is important because it supports the 3D elements and ensures the piece stays balanced.
Start with a magic ring or chain four and slip stitch to form a circle. Work your first round into this circle using basic stitches like double crochet (dc) or half double crochet (hdc), depending on the specific style you’re aiming for.
After completing the first round, begin to increase evenly around the circle to create a flat disc. Transition to a square shape by strategically placing increases in the corners. This technique is commonly used in granny squares and is easy to adapt for 3D designs.
To ensure symmetry, many crocheters prefer to work in sets of three double crochets per side, with two chain stitches in each corner. This structure keeps your square flat while preparing it for layered design elements.
You can continue for several rounds to enlarge the square. Once the base is complete, tie off the yarn if you’re switching colors, or continue directly into the 3D elements with the same yarn for a monochrome effect.
This foundation stage may seem simple, but it’s the canvas for everything that follows. A strong and balanced base will make adding raised or sculptural features much easier.
This is where the 3D CROCHET SQUARE – Free Pattern really comes to life. The 3D effect is achieved by adding layers or raised stitches on top of your flat base, creating a visually striking and tactile square.
One popular technique is to crochet petals or raised motifs onto the surface of the square. You can do this by attaching new yarn to specific stitches and working front post stitches or popcorn stitches to create dimension.
Another method is to create small shapes separately—such as puff stitch flowers or spirals—and then sew or crochet them onto the base square. This gives you more control over placement and allows for highly customizable designs.
Using back loops only is another useful approach. If you work some rounds in the back loop, you leave the front loop free to crochet raised ridges or designs, adding a natural elevation to the square’s surface.
Layering is key in a good 3D crochet square. You can create multiple rows of petals or motifs stacked on top of each other. To keep them from collapsing, use sturdy yarn and tight stitches.
Don’t forget to secure each layer carefully. Whether you’re crocheting directly onto the square or sewing separately made pieces, make sure everything is tightly fastened to avoid sagging or unraveling.
This stage allows you to explore your creativity. You can make floral designs, geometric shapes, or abstract textures. No matter your style, these raised elements will make your 3D crochet square unforgettable.
Once you’ve made one 3D CROCHET SQUARE – Free Pattern, you might want to use it in a larger project. These squares are perfect for afghans, bags, wall art, or even garments. The trick is joining them in a way that doesn’t flatten their 3D charm.
When joining multiple squares, consider using the flat slip stitch method or a decorative join like the zigzag or cable join. This helps maintain the square shape without distorting the raised elements.
It’s best to lay out your squares before joining to get a clear visual of how the patterns interact. Place flower-centered squares in corners or as focal points to draw attention.
You may also alternate 3D squares with flat squares to create contrast in a blanket or large panel. This mix can give a sophisticated texture and keep the project from feeling too heavy or busy.
Be cautious when choosing projects that involve a lot of wear and tear. For example, while a 3D square looks great on a cushion, it may not be ideal for clothing if the raised parts catch easily on objects.
You can also frame a single 3D crochet square for wall décor or use it as a decorative pocket on a tote bag. The possibilities are endless when you combine creativity with structure.
When you’ve finished your project, block it carefully to help the 3D shapes sit correctly and maintain their form. This final step ensures that your masterpiece looks crisp, clean, and professionally crafted.
Q: What is a 3D crochet square?
A: A 3D crochet square is a type of motif that features raised or layered elements, creating a textured, sculptural appearance. It’s often used in blankets, bags, or home decor.
Q: Is the 3D crochet square pattern suitable for beginners?
A: Yes, beginners can try it with some basic crochet knowledge. Start with simple 3D elements like front post stitches or puff stitches before attempting layered flowers or shapes.
Q: What yarn is best for a 3D crochet square?
A: Cotton or cotton-blend yarn is recommended because it holds shape well and defines texture clearly, which is essential for 3D elements.
Q: Can I use different colors for the layers?
A: Absolutely! Using multiple colors enhances the visual impact of the 3D design. Just make sure the colors complement each other.
Q: How do I keep the 3D shapes from flattening?
A: Use firm yarn, tight tension, and proper blocking techniques. Avoid putting heavy weight on finished pieces to preserve their structure.
Q: What projects can I make with 3D crochet squares?
A: You can use them in afghans, pillows, bags, wall art, coasters, or as embellishments on clothing. Their texture makes them a standout feature.
In this tutorial, we explored the world of the 3D CROCHET SQUARE – Free Pattern and learned how to bring texture, creativity, and structure to a traditional crochet shape. From building a strong base to crafting eye-catching raised designs, this pattern allows you to explore endless possibilities.
With the right materials, careful construction, and thoughtful color choices, your 3D crochet square will become a focal point in any project. Whether you’re aiming for a bold floral centerpiece or a textured geometric panel, you now have the knowledge to bring your vision to life.
We hope this article has inspired you to pick up your hook and try something new. If you enjoyed this 3D CROCHET SQUARE – Free Pattern, we’d love to hear your feedback! Leave a comment with your thoughts, share your creations, and feel free to suggest what you’d like to see next. Happy crocheting!