
Macrame Heart Bracelet - Free Tutorial

Looking for a creative and fun crochet project? This Adorable Crochet Kitten Keychains – Free Tutorial is perfect for crafters of all skill levels!
These miniature kitten keychains make fantastic gifts, accessories, or additions to your collection of handmade items. Not only are they adorable and practical, but they’re also an excellent way to use up leftover yarn.
In this tutorial, we’ll guide you step by step through the process of creating your very own crochet kitten keychains.
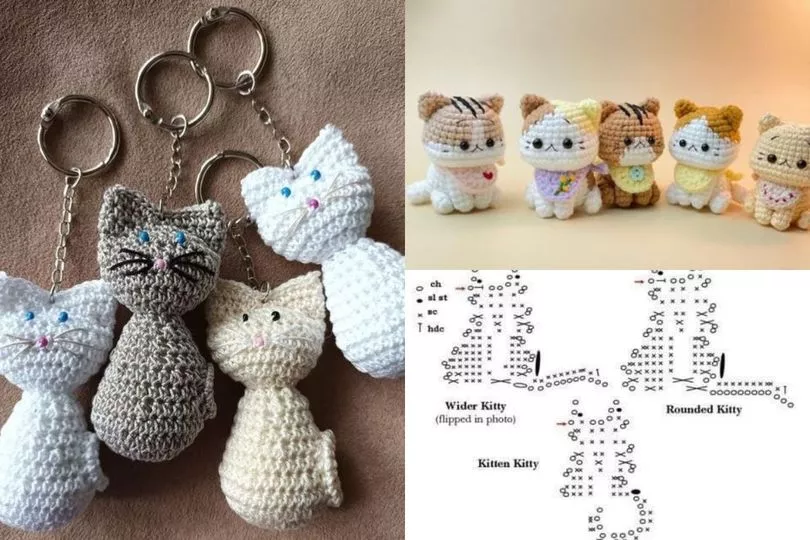
Image from google.
From gathering materials to finishing touches, we’ve got you covered. The best part? It’s a free tutorial that’s easy to follow and incredibly rewarding. Grab your crochet hook, and let’s dive into this delightful craft.
Whether you’re an experienced crocheter or just starting, this project is a great way to sharpen your skills while creating something truly special.
Plus, these keychains are lightweight and customizable, making them an instant favorite for anyone who sees them. Let’s start crafting your adorable crochet kitten keychains today!
Before diving into the process, it’s important to gather all the materials you’ll need for this Adorable Crochet Kitten Keychains – Free Tutorial. Here’s a checklist to ensure you’re fully prepared:
By ensuring you have these items on hand, you’ll avoid interruptions during your crafting process. Having the right materials is the first step to a successful project.
The body of the kitten is the foundation of this Adorable Crochet Kitten Keychains – Free Tutorial. Follow these steps to create a solid base:
Following these instructions will provide you with a sturdy and well-formed kitten body that’s ready for customization.
The face is what gives your kitten its personality! In this section of the Adorable Crochet Kitten Keychains – Free Tutorial, we’ll add those charming details.
Adding these details brings your crochet kitten to life, making it irresistibly cute and unique.
The final steps of this Adorable Crochet Kitten Keychains – Free Tutorial involve assembling the pieces and attaching the keychain. Here’s how to complete your project:
Now your adorable crochet kitten keychain is complete! It’s ready to add a touch of handmade charm to your keys or to give as a thoughtful gift.
1. How long does it take to make a crochet kitten keychain? The time varies based on skill level but typically takes 1-2 hours per keychain.
2. Can beginners try this project? Yes! This tutorial is beginner-friendly, with simple stitches and clear instructions.
3. What type of yarn is best for this project? Lightweight cotton or acrylic yarn works best. It’s easy to handle and holds its shape well.
4. Can I customize the design? Absolutely! Experiment with different colors, facial expressions, and accessories to make it unique.
5. How do I clean my crochet kitten keychain? Hand wash gently with mild soap and let it air dry to maintain its shape.
6. Can I sell these keychains? Yes, these make great handmade items for sale. Just ensure your design follows any pattern copyright rules.
Join our VIP broadcast list and gain access to exclusive patterns, all for free. As a VIP member, you’ll receive the best patterns daily, delivered directly to your device. ✨📱 It’s a unique opportunity to stay up-to-date with the latest trends and designs, curated just for you. Don’t miss out on enhancing your projects and discovering new inspirations with the best patterns every day! 🎨🔝
This Adorable Crochet Kitten Keychains – Free Tutorial has shown you how to create charming and practical keychains step by step. From gathering materials to adding personal touches, you now have the knowledge to craft these delightful accessories. We hope you enjoyed this project as much as we did!
Feel free to share your thoughts in the comments below. What was your favorite part of the process? Let us know how your kitten keychains turned out and if you have suggestions for future tutorials. Happy crocheting!


