
Macrame Heart Bracelet - Free Tutorial

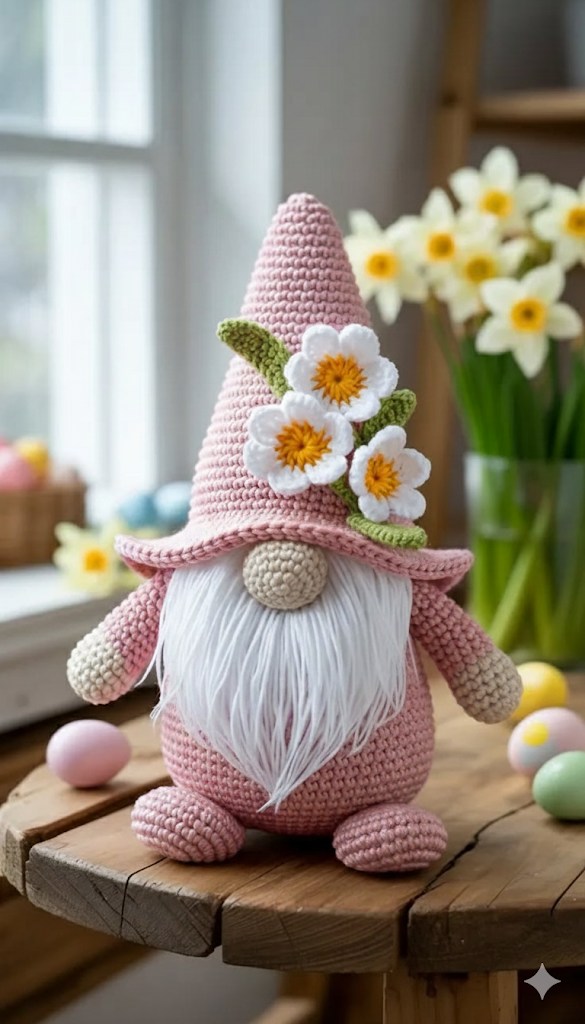
The Amigurumi Spring Gnome with Flower Hat – FREE Crochet Pattern is a delightful project for crochet enthusiasts who love seasonal decorations and whimsical handmade characters. Combining the charm of gnomes with the freshness of spring, this pattern captures the joy of blooming flowers and warmer days.
Whether you’re an experienced crocheter or just starting out, this project offers a unique way to explore the art of amigurumi and create something cheerful for your home or as a thoughtful gift.
Crocheting gnomes has become a popular trend, especially when they are designed to represent seasons and holidays. The Amigurumi Spring Gnome with Flower Hat brings a soft, handmade touch to your seasonal décor, making it perfect for display on shelves, mantels, or even as part of an Easter centerpiece.
What makes this project stand out is the creative use of a flower hat that symbolizes renewal and growth, reminding us of the beauty that comes with springtime.
This Amigurumi Spring Gnome with Flower Hat – FREE Crochet Pattern is not only adorable but also beginner-friendly. With simple stitches, clear steps, and a design that encourages creativity, it’s an excellent project to practice shaping, color changes, and adding fun little details. From its fluffy beard to the cheerful flower on top of the hat, every element of this pattern is designed to bring joy. Now, let’s dive into the process of creating this spring-inspired amigurumi friend.
To begin your Amigurumi Spring Gnome with Flower Hat, you’ll need a small selection of yarns, hooks, and basic crochet tools. Using the right materials ensures that your gnome has the perfect texture and shape while still being soft and cuddly. Choose vibrant springtime colors to bring out the theme.
A medium-weight yarn works perfectly for this project, as it gives the gnome a sturdy structure while remaining easy to work with. Opt for soft pastels like pink, yellow, lavender, or mint green for the hat and flower. For the body and beard, neutral shades such as beige, white, or light gray provide a good contrast. A 3.5mm or 4mm crochet hook is typically recommended for amigurumi, but you can adjust depending on your yarn.
Other materials include stuffing for the body, safety eyes or embroidery thread for facial features, and a yarn needle for sewing pieces together. Stitch markers are also useful for keeping track of rounds, especially since amigurumi is usually worked in continuous spirals.
Make sure to have a pair of scissors and some optional embellishments, such as a tiny button or ribbon, to give your gnome even more personality. The combination of these elements will bring your Amigurumi Spring Gnome with Flower Hat to life in a way that feels uniquely yours.
Once you’ve gathered everything, set up your crafting space with good lighting and comfort in mind. Having your tools ready before starting helps maintain the flow of your work, making the experience both relaxing and enjoyable. This preparation step is just as important as the actual crocheting because it sets the tone for a stress-free project.
The construction of the Amigurumi Spring Gnome with Flower Hat is broken down into manageable parts. By working on one section at a time, you’ll be able to watch your gnome come together gradually while gaining confidence in your crochet skills.
Start with the gnome’s body, usually crocheted in a cone-like shape. Work in the round, increasing at the bottom to form a stable base and then tapering towards the top. This structure ensures that your gnome stands upright without needing extra support. Once the body is complete, fill it with fiber stuffing to give it volume and firmness.
Next, move on to the beard and nose. The beard is often created with loop stitches or by attaching strands of yarn, giving the gnome its signature fluffy appearance. The nose, a small round piece, is sewn securely onto the front, adding character and charm. This part is especially fun because it brings the gnome’s personality to life.
After the body and face are prepared, it’s time to crochet the hat. The flower hat is the highlight of this design. Start with a base cone shape for the hat, then add petals around the brim or at the top to mimic a blooming flower. Using bright colors for the petals helps reinforce the spring theme. Experimenting with different flower styles, such as daisies or tulips, can make each gnome unique.
Attach the hat securely to the gnome’s head, making sure it fits snugly over the beard and nose. Adjust stuffing and shaping as needed to keep the gnome balanced. Finally, add details such as safety eyes, embroidered eyelashes, or even a little butterfly accessory for extra flair.
Each step may seem simple, but together they form an enchanting project that is sure to impress anyone who sees it. The step-by-step process not only makes the Amigurumi Spring Gnome with Flower Hat fun to create but also a wonderful way to practice patience and creativity.
One of the best aspects of the Amigurumi Spring Gnome with Flower Hat is the freedom to customize it. No two gnomes need to look alike, and adding personal touches ensures your creation is truly one-of-a-kind.
You can change the color scheme to match your home décor or holiday celebrations. For example, pastel pink and lavender give a soft Easter feel, while bright yellow and green make it perfect for general springtime décor. The choice of yarn texture also makes a difference, with fluffy yarns giving a softer look and cotton yarns offering clean stitch definition.
The hat’s flower design can be adjusted to represent different blooms. Daisies, roses, tulips, or even sunflowers can be crocheted to sit on the hat, creating unique themes for each gnome. This variation makes it easy to create a whole collection of seasonal characters.
Adding embellishments is another fun way to personalize your gnome. Small ribbons tied around the hat, tiny beads as flower centers, or a miniature basket accessory can elevate the design and tell a little story about your gnome.
You might also experiment with different gnome sizes. By adjusting hook sizes and yarn thickness, you can create tiny keychain gnomes or large display pieces. These variations make the Amigurumi Spring Gnome with Flower Hat suitable for both practical gifts and decorative items.
The creative possibilities are endless, and this flexibility is what makes amigurumi so enjoyable. Every gnome you make has its own charm, ensuring that the crafting experience never becomes repetitive.
Crocheting amigurumi can be straightforward, but a few extra tips can help you achieve a polished, professional finish for your Amigurumi Spring Gnome with Flower Hat.
First, always keep your tension consistent. Amigurumi relies on tight, even stitches to create a solid structure that holds its shape. If your stitches are too loose, the stuffing may peek through, while overly tight stitches can make it difficult to insert the hook.
Second, use stitch markers to track your rounds. Because amigurumi is usually crocheted in continuous spirals, it’s easy to lose count. A simple marker placed at the start of each round will save you frustration later.
Third, stuff the gnome gradually as you go. Adding small amounts of fiberfill at different stages prevents lumps and ensures a smooth, even shape. Pay extra attention to the nose and body, as these areas define the character’s overall appearance.
Fourth, take your time with assembly. Sewing the beard, nose, and hat carefully is key to making the gnome look neat and symmetrical. A yarn needle and invisible stitches work best for joining pieces seamlessly.
Fifth, block or shape the flower petals on the hat if needed. This step helps them stand out and look more realistic, adding to the springtime appeal.
Finally, don’t be afraid to add your own creative touch. Crocheting is as much about expression as it is about following a pattern, so enjoy the process and let your imagination guide you.
1. What skill level is needed to make the Amigurumi Spring Gnome with Flower Hat?
This pattern is beginner-friendly and suitable for those familiar with basic crochet stitches like single crochet, increases, and decreases.
2. How long does it take to complete one gnome?
On average, it may take 6 to 8 hours, depending on your speed and level of detail added.
3. Can I use different yarn weights for this project?
Yes, but keep in mind that using thicker yarn and larger hooks will make a bigger gnome, while thinner yarn will make a smaller one.
4. Do I need safety eyes for the gnome?
Safety eyes are optional. You can also embroider eyes with yarn or thread for a child-safe version.
5. How do I keep the flower hat in place?
Sew it securely to the gnome’s head, and consider adding extra stitches around the brim for stability.
6. Can I wash the gnome once it’s finished?
Hand washing is recommended to preserve the shape and details of your amigurumi.
The Amigurumi Spring Gnome with Flower Hat – FREE Crochet Pattern is a charming and creative way to celebrate the season. From gathering materials to adding unique embellishments, every step of the process is both fun and rewarding. This project is perfect for beginners who want to improve their skills while creating something meaningful and decorative.
Now that you’ve explored this tutorial, why not try making your own version? Share your experience, leave a sincere opinion, and let us know your suggestions for future crochet patterns. Your feedback helps build a stronger crafting community and inspires others to create their own Amigurumi Spring Gnome with Flower Hat.


