
Macrame Heart Bracelet - Free Tutorial

If you are looking for the perfect handmade gift for a newborn, BABY knitted booties STEP BY STEP – Video tutorial is exactly what you need.
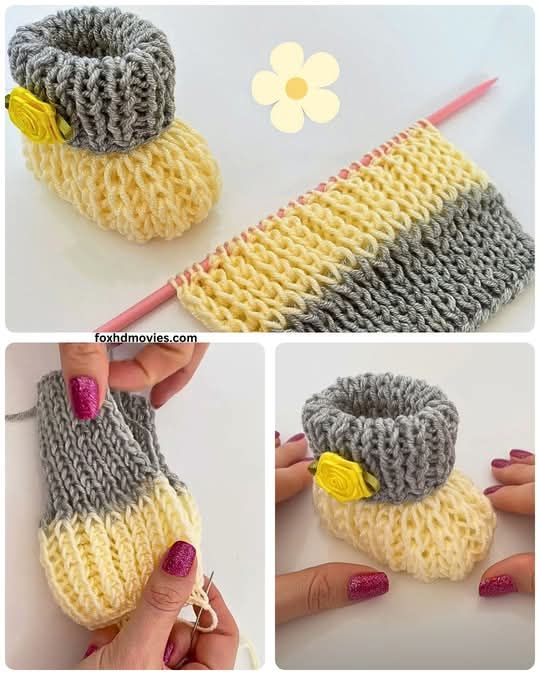
Knitting baby booties is not only a heartwarming project but also a practical one. These tiny shoes are both adorable and functional, keeping little feet warm and cozy.
In this article, you will find everything you need to create these charming BABY knitted booties STEP BY STEP – Video tutorial.
Whether you’re an experienced knitter or just getting started, this guide will walk you through the process in a clear and simple way. By following the instructions carefully, you’ll soon have a beautiful pair of baby booties ready to gift or use.
Throughout this guide, you will also learn valuable tips and techniques to make your knitting easier. With a focus on clear explanations and the help of the BABY knitted booties STEP BY STEP – Video tutorial, you’ll gain the confidence to complete this lovely project successfully. Let’s dive in and start this creative journey together.
Before starting the BABY knitted booties STEP BY STEP – Video tutorial, it’s essential to gather all the necessary materials. Having the right tools will make the process smoother and much more enjoyable.
First, choose the perfect yarn. For baby booties, soft and hypoallergenic yarn is recommended. Cotton blends or baby-specific acrylic yarns are ideal because they are gentle on the baby’s sensitive skin.
Next, you’ll need the right knitting needles. Depending on the yarn weight, most baby booties require needles sized between US 2 (2.75 mm) and US 5 (3.75 mm). Always check the yarn label for the recommended needle size.
You’ll also need some basic tools, such as scissors, a yarn needle for sewing the pieces together, and stitch markers to help track your rows if needed. These simple tools are vital for ensuring accuracy.
Consider having a measuring tape on hand to double-check the booties’ size. Babies grow quickly, so getting the right fit is important. This is especially useful if you are adjusting the pattern for different ages.
Optional materials include cute embellishments like small buttons, ribbons, or pom-poms. Just be sure that anything added is securely attached to avoid choking hazards.
Finally, don’t forget to set aside a comfortable workspace where you can follow the BABY knitted booties STEP BY STEP – Video tutorial without interruptions. A cozy corner with good lighting will make your knitting time much more enjoyable.
The BABY knitted booties STEP BY STEP – Video tutorial uses simple techniques suitable for beginners. Understanding these basic stitches will help you complete the project with ease.
The main stitch used is the knit stitch. This is the foundation of most knitting projects and forms the majority of the booties’ texture. If you’re unfamiliar with it, practicing this stitch before starting is highly recommended.
The purl stitch is another essential technique. Alternating between knit and purl stitches creates different textures and patterns, adding charm to the baby booties.
Casting on is how you start your project. This process forms the first row of stitches on your needle. The BABY knitted booties STEP BY STEP – Video tutorial demonstrates this in detail, making it easy to follow.
Binding off, also known as casting off, is the method for finishing your knitting. It secures the stitches so the fabric doesn’t unravel. This step is clearly shown in the video tutorial for better understanding.
Seaming is crucial for assembling the booties. Once the knitting is complete, you’ll use a yarn needle to sew the pieces together. Learning the mattress stitch can create invisible seams for a neater look.
Increases and decreases are simple techniques used to shape the booties. These methods allow the fabric to curve and form the foot’s shape, ensuring a snug and comfortable fit for the baby.
Let’s walk through the process of making the BABY knitted booties STEP BY STEP – Video tutorial, starting from the sole up to the cuff.
Start by knitting the sole. This part is generally a flat oval shape. Following the video, you’ll knit a certain number of rows back and forth until the desired sole length is achieved.
Next, you’ll begin shaping the sides of the booties. This involves picking up stitches along the edge of the sole and knitting upwards to form the walls that surround the baby’s foot.
Once the sides are complete, it’s time to create the instep. This part covers the top of the baby’s foot and requires a bit of shaping with increases or decreases, depending on the pattern shown in the video.
The heel construction comes next. Carefully follow the instructions to form the back of the bootie, ensuring it’s comfortable and snug without being too tight.
After finishing the heel, you’ll move on to the cuff. The cuff can be simple or decorative, often done in ribbing (alternating knit and purl stitches) to help it stay snug on the baby’s ankle.
Finally, assemble all the parts. Use the yarn needle to sew the seams as demonstrated in the BABY knitted booties STEP BY STEP – Video tutorial. Double-check that all seams are secure, and weave in any loose ends for a polished finish.
Achieving the best results with the BABY knitted booties STEP BY STEP – Video tutorial involves a few helpful tips that make the process smoother.
Always make a gauge swatch before starting. This small square of knitting helps ensure that your stitches match the pattern size, preventing the booties from turning out too small or too large.
If you’re struggling with tight stitches, try using slightly larger needles or adjusting your tension. Relaxing your hands can also help your knitting flow more smoothly.
Pay close attention to stitch counts. Keeping an accurate count ensures that the booties will be symmetrical and properly shaped. Use stitch markers to help if needed.
Practice the seaming technique before sewing the actual booties. A neat seam greatly improves the overall look and durability of your project.
Wash and block the finished booties gently. This step evens out the stitches and softens the fabric, giving the booties a professional appearance. Make sure to use baby-safe detergent.
If adding embellishments like buttons or bows, sew them on very securely. Safety is always the priority when creating items for babies. The BABY knitted booties STEP BY STEP – Video tutorial includes safe suggestions for decorations.
1. What size are the baby booties in this pattern?
The standard size fits newborns to 3 months. However, the pattern can be easily adjusted by changing the yarn weight or needle size as explained in the video.
2. Can beginners follow the BABY knitted booties STEP BY STEP – Video tutorial?
Absolutely! The tutorial is designed with beginners in mind, offering clear instructions and demonstrations for every step.
3. How long does it take to knit a pair of baby booties?
On average, it takes about 3 to 5 hours to complete a pair, depending on your knitting speed and experience.
4. What type of yarn is best for baby booties?
Soft, hypoallergenic yarn like cotton blends or baby-specific acrylic yarn is highly recommended to ensure comfort and safety for the baby.
5. Can I use double-pointed needles instead of regular needles?
Yes, double-pointed needles can be used if you prefer working in the round, although the video primarily demonstrates flat knitting.
6. Is the bootie pattern suitable for gifts?
Definitely! Handmade baby booties are a cherished gift for baby showers, birthdays, or special occasions.
7. How do I clean the knitted baby booties?
Hand wash with baby-safe detergent and lay flat to dry. Avoid harsh washing to maintain the booties’ softness and shape.
8. Can I sell the booties made from this pattern?
Yes, you can sell the finished products, but the pattern itself should not be redistributed. Always mention that they are handmade.
9. What if I make a mistake during knitting?
Don’t worry! The video covers common mistakes and how to fix them, such as dropping stitches or incorrect counts.
10. How can I adjust the pattern for larger babies?
Simply use thicker yarn, larger needles, or add extra rows and stitches as guided in the video tutorial.
Making adorable baby footwear with the BABY knitted booties STEP BY STEP – Video tutorial is a fulfilling and enjoyable experience. This guide has walked you through the materials needed, essential knitting techniques, a clear step-by-step process, and valuable tips for success. The FAQ section addressed common concerns to help you feel even more prepared.
We hope this article has inspired you to create your own pair of baby booties. If you followed this BABY knitted booties STEP BY STEP – Video tutorial, please leave a sincere comment below sharing your experience, suggestions, or questions. Your feedback helps others and motivates us to continue providing useful content for fellow crafters!


