
Macrame Heart Bracelet - Free Tutorial

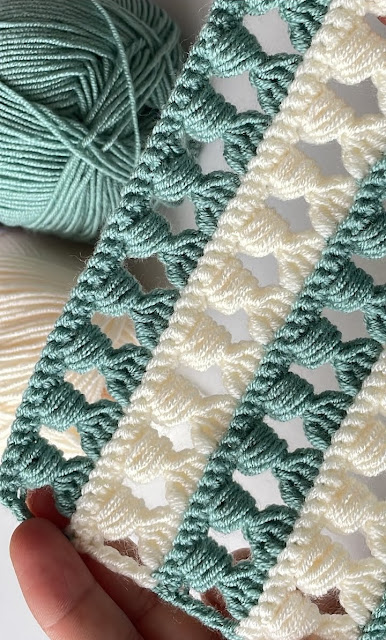
The Bead Stitch – Free Crochet Pattern is a unique and versatile stitch that adds texture and elegance to any crochet project. Known for its bead-like appearance, this stitch creates a beautiful fabric that is perfect for scarves, shawls, blankets, and even accessories.
Whether you’re new to crochet or have some experience, the Bead Stitch is an excellent choice to enhance your creations with its visually striking design. This guide will walk you through the steps of working with this stitch, providing a free pattern that you can try out immediately.
Crocheting the Bead Stitch adds a delightful texture that gives your work a luxurious feel, making it stand out in any project. This stitch involves creating a series of elongated loops and securing them with a slip stitch, which results in a stunning, beaded effect.
You can experiment with different yarns and colors to create different looks, from subtle and elegant to bold and dramatic. The versatility of the Bead Stitch makes it a favorite for many crochet enthusiasts.
If you’ve been wanting to try out the Bead Stitch, you’ve come to the right place! In this article, we will teach you how to work this stitch from start to finish, including a free pattern to help you get started.
Along the way, you’ll learn how to make the stitch part of your regular crochet repertoire and add it to your future projects with ease.
The Bead Stitch is a textured crochet stitch that mimics the appearance of beads. It is worked by creating elongated loops, followed by securing them with a slip stitch, which forms a bead-like shape in the fabric. This stitch is ideal for adding interest and dimension to your projects without adding excessive bulk.
To create the Bead Stitch, you typically work into the front loop of the stitch below, pulling up a long loop. Then, you hold this loop while completing the next part of the stitch, which is to make another elongated loop in the following stitch. The two loops are then closed with a slip stitch to create a “bead” that stands out from the rest of the fabric. This creates a striking texture that is perfect for a variety of crochet items.
The beauty of the Bead Stitch lies in its simplicity. While the final effect may look intricate, the process is quite straightforward and easy to master. With practice, you’ll be able to incorporate this stitch into any crochet design to create a rich, three-dimensional texture that catches the eye.
In addition to its aesthetic appeal, the Bead Stitch also adds a certain amount of stretch and flexibility to the fabric, making it an excellent choice for items that need to have some give, such as blankets and shawls.
Before you start your project using the Bead Stitch, it’s important to gather all the necessary materials. The right tools will make the process smoother and help you achieve the best results. Here’s what you’ll need to get started.
First, you’ll need a crochet hook in the appropriate size for your yarn. The size of the hook will depend on the thickness of the yarn you’re using. For most standard yarns, a 5.5 mm (I-9) hook is a good choice. However, if you’re using thinner or thicker yarn, adjust the hook size accordingly.
Next, choose a yarn that complements the bead-like texture of this stitch. You can use any type of yarn, but it’s recommended to use a medium-weight yarn (like worsted weight) to ensure that the beads are visible and stand out nicely. Cotton and acrylic yarns are great options for creating a durable and smooth finish. If you’re using a lighter yarn, make sure to use a smaller hook to keep the stitches tight.
You’ll also need a tapestry needle to weave in any loose ends after finishing your project. A stitch marker can be helpful if you’re working in the round or need to keep track of specific stitch counts. Lastly, ensure that you have a comfortable workspace where you can easily access your materials.
Once you have all your materials ready, you can dive right into learning how to crochet the Bead Stitch and begin working on your project!
Now that you have everything you need, let’s dive into the process of crocheting the Bead Stitch. The following steps will guide you through the process, from beginning to end.
Start by making a foundation chain, which should be a multiple of two plus one. For example, chain 21 to create a foundation row that is divisible by two with an extra chain at the end for turning. Once you’ve completed the foundation chain, turn your work around to begin the first row.
To begin the first row of the Bead Stitch, skip the first chain from your hook, and in the second chain, work a half double crochet. Then, yarn over and pull up a long loop in the next stitch. Hold this loop with your finger and pull up another loop in the next stitch. Once you have two loops, use a slip stitch to close them together. This creates the first bead.
Repeat this process across the row, creating one Bead Stitch for each set of two stitches. Once you reach the end of the row, turn your work and begin the next row. The process will be the same, except you’ll crochet into the top of the previous row’s beads, creating a consistent pattern across the fabric.
Be sure to keep your stitches consistent in length to maintain the bead-like effect. If the beads are too tight, they won’t stand out, and if they’re too loose, they may not hold their shape. Practice a few rows to get the hang of the stitch, and soon you’ll be able to work the Bead Stitch smoothly.
As you continue, experiment with different yarn colors to create varying effects. You can also combine the Bead Stitch with other crochet stitches to add variety to your project.
The Bead Stitch is a versatile stitch that can be used in a wide range of crochet projects. It adds texture, interest, and a sophisticated touch to your creations. Here are some popular project ideas where you can incorporate the Bead Stitch:
Feel free to experiment with the Bead Stitch and make it your own by adding other crochet techniques. Combine it with lace stitches, shells, or clusters to create intricate designs.
Join our VIP broadcast list and gain access to exclusive patterns, all for free. As a VIP member, you’ll receive the best patterns daily, delivered directly to your device. ✨📱 It’s a unique opportunity to stay up-to-date with the latest trends and designs, curated just for you. Don’t miss out on enhancing your projects and discovering new inspirations with the best patterns every day! 🎨🔝
In this guide, you’ve learned everything you need to know about the Bead Stitch – Free Crochet Pattern. We’ve covered the materials needed, step-by-step instructions, and various ways to incorporate this versatile stitch into your crochet projects. Whether you’re making scarves, blankets, or garments, the Bead Stitch adds a beautiful, textured effect that enhances the overall design of your work.
We hope this guide inspires you to experiment with the Bead Stitch in your next crochet project. Feel free to share your thoughts and suggestions in the comments below, and happy crocheting!


