
Crochet Multi-Purpose Blouse, Shawl, Runner Model

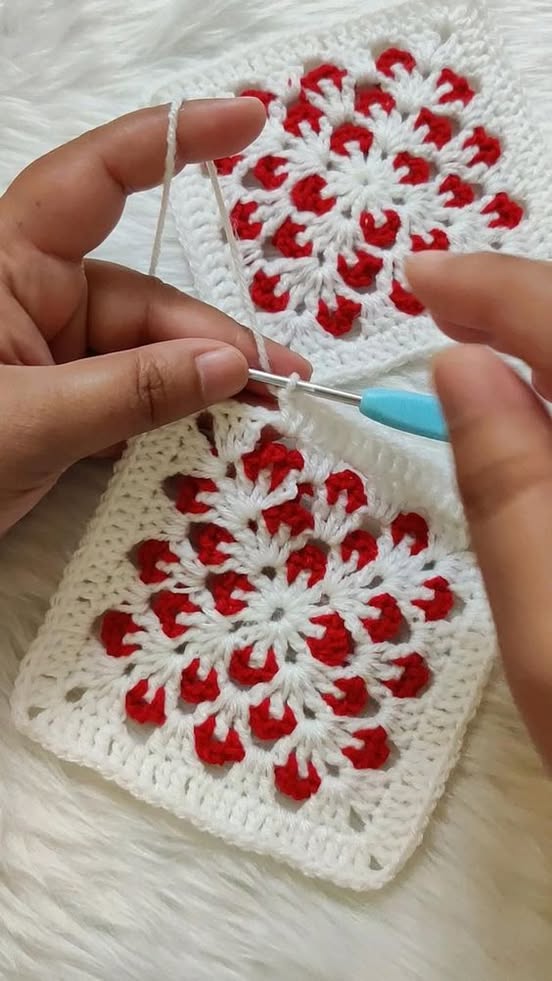
The Beautiful Granny Square – FREE PATTERN is a classic crochet design that has stood the test of time. Whether you’re a seasoned crocheter or just starting your crochet journey, learning to create a granny square is a must.
Not only is it an essential crochet skill, but it also opens up a world of possibilities for creating unique and personalized items. From cozy blankets to stylish accessories, the granny square is the foundation for many crochet projects.
This beautiful granny square pattern is perfect for those who love to experiment with colors and textures. By changing the yarn colors for each round or incorporating different stitch techniques, you can create endless variations.
The best part is that it’s a versatile design, so you can use it for various projects, ranging from small, decorative items to large, intricate designs. Whether you’re looking for a simple and relaxing project or something more challenging, the granny square can easily meet your needs.
In this article, we will take you through the process of creating a beautiful granny square from start to finish. We’ll discuss the materials you’ll need, explain the basic crochet stitches involved, and provide tips for customizing your granny square.
We’ll also explore how you can combine these squares to make larger projects like blankets, pillows, and even garments. Let’s begin!
Before you begin creating your beautiful granny square, it’s important to gather the right materials. The choice of yarn and crochet hook will have a significant impact on the final result, so let’s take a look at what you’ll need.
Start with your yarn selection. For the granny square, choose a yarn that is comfortable to work with and gives a nice stitch definition. Acrylic yarn is an excellent option because it’s soft, durable, and comes in a variety of colors. It’s also easy to care for, making it ideal for crochet projects that will be washed frequently. If you prefer a more natural feel, cotton yarn is also a great choice, especially for lighter-weight projects like bags or shawls.
When selecting yarn, consider the thickness of the yarn. A medium-weight yarn (such as worsted weight) works best for this pattern as it will provide a sturdy structure and make the stitches easier to see. It’s important to match your yarn to the recommended crochet hook size for the best results. A 5mm or 6mm hook is usually ideal for worsted weight yarn, but always check the yarn label for recommended hook sizes.
Other essential materials include a yarn needle for weaving in ends, stitch markers for keeping track of your rounds, and scissors. Make sure you have a comfortable workspace with good lighting, as this will help you see your stitches clearly and keep your tension even.
A beautiful granny square is typically made up of basic crochet stitches, and understanding these is key to mastering the pattern. The primary stitches used are chain stitch, slip stitch, double crochet, and treble crochet.
Start by making a small loop with your yarn and securing it with a chain stitch. This will form the foundation ring where all your stitches will be worked. From there, you’ll begin working double crochet stitches into the ring. The double crochet stitch is what gives the granny square its height and texture, so it’s important to maintain an even tension as you work.
In many granny square patterns, you will also use treble crochet stitches to create a more open, airy texture in certain rounds. These taller stitches are perfect for adding visual interest and dimension to your square. To work a treble crochet, yarn over twice and insert your hook into the space, then pull up a loop and finish the stitch as you would a regular double crochet.
As you progress through the pattern, you will make a combination of double and treble crochet stitches in various configurations. The exact stitch sequence will depend on the specific design you’re following, but these stitches are the building blocks of a beautiful granny square.
Now that you understand the basic stitches, let’s move on to the step-by-step instructions for creating your beautiful granny square. Follow these simple steps to create a classic granny square, which you can then use in various projects.
One of the best parts about the beautiful granny square is the endless possibilities for customization. You can experiment with different color combinations, stitch patterns, and even shapes to create a truly unique design.
Color choices: Changing the colors for each round or creating gradients can add a lot of visual interest to your squares. You can choose a color palette based on your home decor, personal preferences, or seasonal themes. Try using complementary or contrasting colors for a bold look, or go for soft pastels for a more delicate feel.
Stitch variations: In addition to the basic stitches, you can use textured stitches like puff stitches, shell stitches, or popcorn stitches to add dimension and richness to your square. These can be incorporated in various rounds to create unique patterns within your squares.
Square size: Granny squares don’t have to be the traditional size. You can make larger or smaller squares depending on the project. Simply adjust the number of rounds or the size of the stitches to achieve the desired effect.
Joining squares: Once you’ve made several granny squares, it’s time to join them together. There are several methods for joining squares, including whip stitch, slip stitch, and the mattress stitch. The joining method you choose will affect the overall look of your finished project, so experiment with different techniques to find the one that works best for you.
1. What is the best yarn for crocheting granny squares?
Acrylic or cotton yarn is ideal for granny squares. Acrylic yarn is soft, affordable, and comes in many colors, while cotton yarn is breathable and great for lightweight projects.
2. How can I change colors in a granny square?
To change colors, simply finish the last stitch of the old color and start the new color in the same stitch. Cut the old yarn and pull it through to secure it. Make sure to weave in any loose ends afterward.
3. How do I make my granny square bigger?
To make your granny square larger, simply add more rounds. Each round is worked into the chain two spaces from the previous round, so continue this process until the square reaches the desired size.
4. Can I make a granny square with different shapes?
Yes! While traditional granny squares are square-shaped, you can also create granny triangles, hexagons, or octagons for more variety in your projects.
5. How do I join granny squares together?
There are various methods for joining granny squares, including whip stitch, slip stitch, or the invisible join. Choose the method that gives you the desired look for your project.
6. What can I make with granny squares?
Granny squares are incredibly versatile. You can use them to make blankets, scarves, shawls, pillow covers, bags, and even clothing like cardigans and skirts.
Join our VIP broadcast list and gain access to exclusive patterns, all for free. As a VIP member, you’ll receive the best patterns daily, delivered directly to your device. ✨📱 It’s a unique opportunity to stay up-to-date with the latest trends and designs, curated just for you. Don’t miss out on enhancing your projects and discovering new inspirations with the best patterns every day! 🎨🔝
The beautiful granny square is a timeless crochet pattern that offers endless creative opportunities. Whether you’re a beginner or an expert, this pattern is easy to master and perfect for creating personalized, colorful items. By selecting the right materials, learning the basic stitches, and customizing your granny squares, you can create a wide variety of beautiful projects.
We hope this article has inspired you to start crocheting your own beautiful granny squares. If you have any questions or suggestions, please feel free to leave a comment below. Happy crocheting!


