
Macrame Heart Bracelet - Free Tutorial

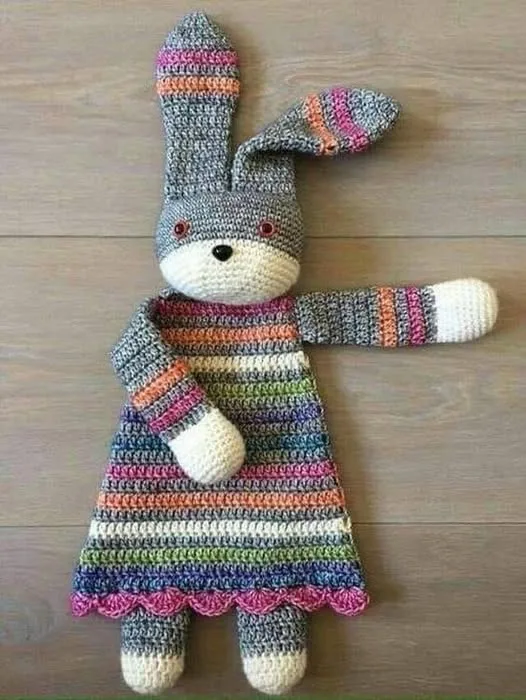
If you’ve been searching for a sweet and beginner-friendly project, the Bunny Ragdoll – Crochet Pattern is exactly what you need. This charming little bunny is not only adorable but also the perfect handmade gift for babies, children, or anyone who loves cute décor.
Whether you are crocheting for fun, for gifts, or even for your small business, this pattern is a wonderful choice.
The Bunny Ragdoll – Crochet Pattern combines the best features of a plush toy and a flat ragdoll, making it soft, cuddly, and easy for small hands to hold.
Its simple construction and use of basic stitches make it approachable for beginners while still being enjoyable for experienced crocheters.
In this comprehensive guide, we’ll walk you through all the steps needed to create your own Bunny Ragdoll – Crochet Pattern. From materials and tools to step-by-step instructions and creative customization ideas, you’ll find everything you need to bring this adorable bunny to life.
To begin your Bunny Ragdoll – Crochet Pattern, gathering the right materials is essential. Choosing the correct supplies ensures your bunny is soft, safe, and durable.
Start with soft, high-quality yarn. Cotton yarn or hypoallergenic acrylic is ideal because it’s gentle on the skin and easy to maintain.
You’ll need a crochet hook that matches your yarn’s weight. For most worsted-weight yarns, a 4mm (G) or 4.5mm (7) hook works perfectly.
Other essential tools include stitch markers to help you track your rounds, a yarn needle for sewing parts together, and scissors for trimming.
Safety eyes are commonly used to give your bunny a cute, polished look. If the toy is intended for young children or babies, consider embroidering the eyes for added safety.
Polyester fiberfill stuffing is necessary to give the head and ears their fluffy, plush shape, while keeping the body flat as characteristic of a ragdoll.
Finally, you may want to prepare a little ribbon, button, or fabric scrap to add a charming accessory, like a bow around the bunny’s neck.
Creating the Bunny Ragdoll – Crochet Pattern is both fun and rewarding. The pattern typically consists of crocheting the head, ears, arms, and a flat body, which are then stitched together.
Start with the bunny’s head. Use the magic ring method to crochet in the round, increasing stitches evenly to form a smooth sphere.
Once the head is shaped, crochet two long ears. These are often made using simple single crochet (SC) stitches, shaped with increases and decreases to get that cute, floppy appearance.
The arms are small and simple. They are usually worked in the round, just like the head, but stuffed lightly so they remain flexible yet hold shape.
For the ragdoll body, crochet a flat panel. This is often a large square or rectangle, made using rows of single crochet (SC) or double crochet (DC) stitches, creating a soft, blanket-like texture.
After crocheting all parts, it’s time to assemble. Attach the head to the top center of the flat body, then sew the ears on each side of the head and the arms at the upper corners of the body.
Finish your Bunny Ragdoll – Crochet Pattern by adding facial features. You can use safety eyes, embroider a little nose and mouth, and add any decorative elements like a bow or a tiny flower.
Getting the best result from your Bunny Ragdoll – Crochet Pattern comes down to a few simple but important tips.
Always check your tension. Consistent tension makes the bunny look neat and ensures that stuffing doesn’t poke through.
When making the body, be sure to count your stitches regularly. A straight, even edge will give your ragdoll a polished appearance.
For a softer ragdoll, use a larger hook than recommended. This will make the fabric looser and more flexible.
Choose colors thoughtfully. Classic white, cream, or gray are popular bunny colors, but pastel shades like pink, blue, and mint add a playful touch.
Secure the safety eyes well. If the bunny is for a baby, skip plastic eyes and embroider them instead to avoid any choking hazards.
Don’t rush assembly. Carefully position the head and ears to achieve symmetry, and make sure all seams are secure so the bunny withstands lots of cuddles.
One of the best things about the Bunny Ragdoll – Crochet Pattern is how easily it can be customized to suit your taste or match the recipient’s style.
Try using variegated or ombre yarn for a unique multicolor effect on the bunny’s body.
Add fun embellishments like a crocheted flower crown, a mini scarf, or even tiny clothes to give your bunny extra personality.
Make themed bunnies for holidays. Use red and green for Christmas, or pastel colors for Easter with little embroidered eggs on the body.
Personalize the bunny by embroidering a child’s name or initials onto the ragdoll body, making it a thoughtful and meaningful gift.
Change the shape of the ears. You can make them shorter and rounder for a more cartoonish bunny or longer for a classic floppy-eared look.
Experiment with textures. Try incorporating puff stitches or bobble stitches into the body for a playful and tactile feel.
Is the Bunny Ragdoll – Crochet Pattern beginner-friendly?
Yes, this pattern is designed with beginners in mind. It uses basic stitches like single crochet and double crochet and simple shaping techniques.
What size will the finished bunny be?
Typically, the finished bunny measures around 12 to 15 inches tall, depending on the yarn and hook size used.
Can I use different yarn types?
Absolutely! Just remember that the yarn weight will affect the bunny’s final size. Thicker yarn makes a larger bunny, while thinner yarn makes it smaller.
Is it safe for babies?
If making the bunny for a baby, avoid safety eyes and instead embroider the eyes and mouth to ensure it’s safe and free from choking hazards.
How long does it take to complete the Bunny Ragdoll – Crochet Pattern?
On average, it takes about 6 to 8 hours to complete, but this varies depending on your speed and experience level.
Can I sell bunnies made from this pattern?
Yes, you are welcome to sell finished bunnies made from this pattern. Just remember to credit the pattern designer when possible.
The Bunny Ragdoll – Crochet Pattern is an incredibly fun and rewarding project that results in a soft, adorable, and meaningful handmade toy. Whether you’re crocheting for a loved one, preparing gifts for holidays, or adding items to your craft shop, this bunny ragdoll is sure to bring smiles.
In this article, we’ve covered everything you need—from the list of materials and step-by-step instructions to valuable tips and creative customizations. I hope this guide helps you create a bunny that’s as unique and special as you are.
If you enjoyed this tutorial, please leave your honest opinion in the comments. Your feedback is so helpful and inspires future patterns and content. What would you like to see next? Let me know!


