
If you love cats and crochet, you’re going to be thrilled with this Cat Face Crochet Blanket – Beginner Tutorial. This project is perfect for beginners who want to create something adorable, cozy, and full of character.
By following this complete guide, you’ll be able to make a charming cat-themed blanket that’s ideal for gifts, kids, or your own home décor.
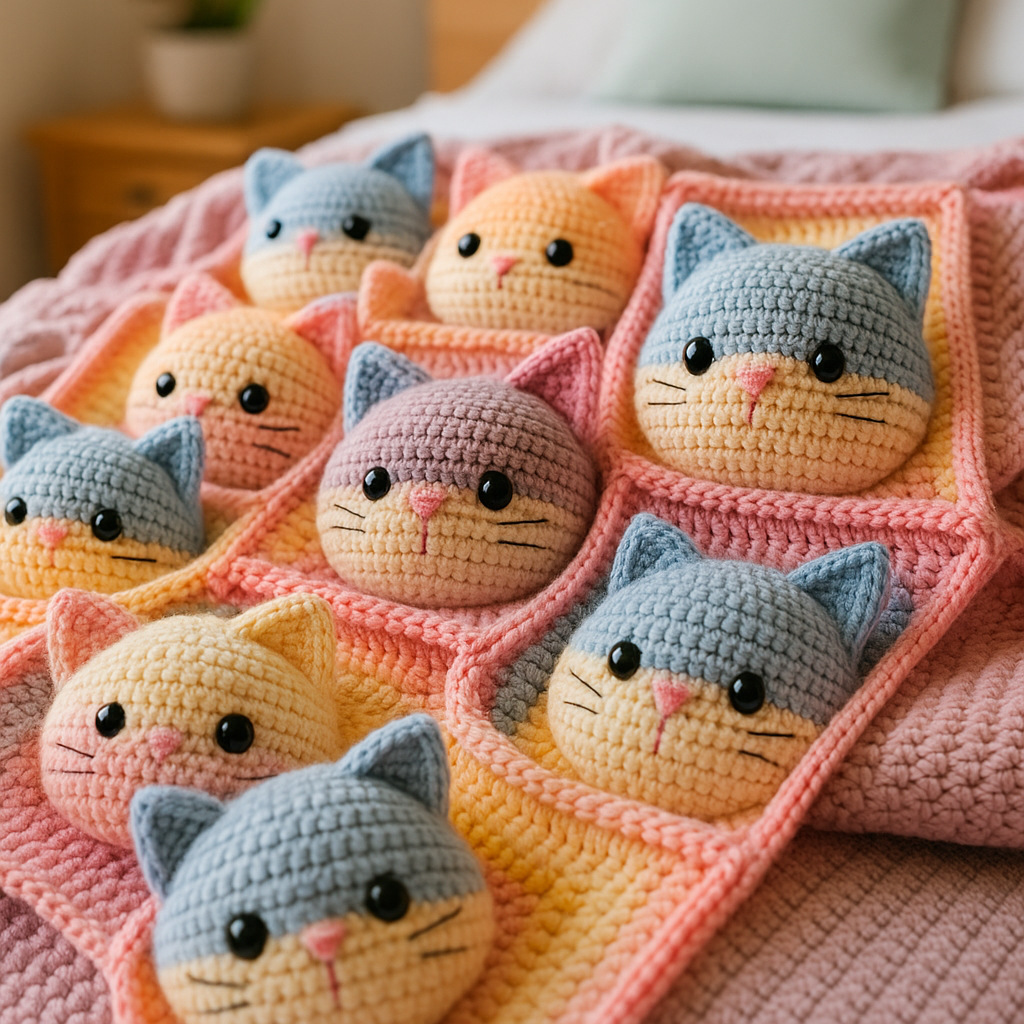
The beauty of the Cat Face Crochet Blanket – Beginner Tutorial lies in its simplicity. Using basic stitches and simple color changes, you can crochet playful cat faces onto each block.
Then, when you join all the blocks together, you’ll have a warm, whimsical blanket that’s guaranteed to bring smiles.
This blanket project is designed with beginners in mind. You don’t need to know complicated stitch patterns or techniques. All you need is a little patience, a few crochet essentials, and your love for crafting. Let’s dive into everything you’ll need to know to bring your Cat Face Crochet Blanket to life!
1. Materials You’ll Need for Your Cat Face Crochet Blanket
Before you begin the Cat Face Crochet Blanket – Beginner Tutorial, make sure you have all your materials ready. This project doesn’t require fancy tools, making it perfect for those just starting their crochet journey.
First, you’ll need worsted-weight yarn in several colors. Typically, you’ll want a main color for the blanket background, a contrasting color for the cat faces, and small amounts of black and pink for features like whiskers and noses.
A crochet hook that matches the yarn weight is essential. Most worsted-weight yarns recommend a 5.0 mm (H-8) hook, but always check your yarn label for guidance. A comfortable hook can make a big difference in how much you enjoy crocheting.
You’ll also need a pair of sharp scissors and a yarn needle. The needle is especially important for sewing the facial features and weaving in ends neatly when you finish your blocks.
Optional but helpful tools include stitch markers to keep track of rows and small embroidery hoops if you want extra precision when stitching on the faces. These extras can make your crafting experience smoother.
Lastly, prepare a clean, well-lit space where you can spread out your materials. Having a comfortable setup will make your crocheting more enjoyable and help you keep organized as you work through this delightful project.
2. How to Crochet the Cat Face Squares
Starting your first square in the Cat Face Crochet Blanket – Beginner Tutorial is exciting! You’ll begin by crocheting a simple base square, which forms the canvas for your adorable cat face design.
Work a basic square using double crochet stitches. Chain enough stitches to form a small foundation, then build up your square by adding rows of double crochet. Keep your tension consistent to make sure each square comes out the same size.
Once your base square is complete, it’s time to add the cat face. Using a contrasting yarn color, crochet two small circles for the cat’s eyes and a triangle for the nose. These shapes are simple enough for beginners and add tons of personality.
Next, use a yarn needle to embroider small details like the cat’s mouth and whiskers. Don’t worry about making them perfect — a little variation gives each cat face its own character!
If you’d like to add even more detail, try crocheting small triangular ears separately and sewing them onto the top corners of the square. This 3D element brings extra charm and makes your blanket even cuter.
Repeat this process for as many squares as you need for your blanket. You can make all the faces identical or mix it up by changing colors and expressions for a fun, playful look.
3. Joining Your Cat Face Squares Together
After you’ve made a good stack of cat face squares following the Cat Face Crochet Blanket – Beginner Tutorial, it’s time to join them into a complete blanket. This step brings everything together into a cozy, finished piece.
Lay out all your squares on a clean surface to plan the arrangement. You might want to organize them by color, expression, or even create patterns with your squares to make the finished blanket more interesting.
The easiest method for joining squares is the whip stitch. Place two squares with their right sides facing each other and stitch them together along the edges using a yarn needle and matching yarn.
Alternatively, if you want a visible join that adds texture, use single crochet to connect the squares. This method creates a raised seam that frames each cat face beautifully.
Be sure to keep your tension even as you join the squares. Uneven tension can cause puckering or rippling, which can distort the shape of your finished blanket.
Once all squares are joined into rows, and then all rows are joined into a complete blanket, weave in all loose ends carefully. Taking the time to finish neatly will give your project a polished, professional appearance.
If your blanket feels a little uneven or wrinkly after joining, a light blocking session can help it lay flat and smooth. Just be sure to use gentle techniques appropriate for your yarn type.
4. Adding the Final Touches to Your Cat Face Crochet Blanket
Congratulations! You’ve joined all your squares into a blanket using the Cat Face Crochet Blanket – Beginner Tutorial. Now it’s time to add those finishing details that make your creation truly special.
Consider adding a border around the entire blanket. A simple single crochet or half-double crochet border in a neutral or contrasting color will frame your cat faces beautifully and tie the whole design together.
You might want to add more decorative elements, such as tiny crochet paws or yarn appliqués. These small details can give the blanket a unique flair and make it even more charming.
If you want a softer edge, you can add a scalloped or picot border. These borders are beginner-friendly and only require a few extra stitches to create a delicate, lacy look around the edges.
Double-check that all facial features are securely sewn down. Especially if the blanket will be used by small children or pets, you want to make sure no small pieces can come loose.
Finally, if you’re planning to gift the blanket, consider attaching a handmade tag or label. It’s a sweet touch that shows the love and effort that went into your crochet creation.
Enjoy your finished Cat Face Crochet Blanket! Whether you keep it for yourself or gift it to someone special, your handmade blanket will surely bring warmth, comfort, and lots of smiles.
FAQ – Cat Face Crochet Blanket – Beginner Tutorial
Is the Cat Face Crochet Blanket suitable for complete beginners?
Yes! This blanket uses basic stitches and simple shapes, making it perfect for beginners. The Beginner Tutorial guides you step-by-step.
How long does it take to complete the Cat Face Crochet Blanket?
Depending on your pace and how many squares you make, it can take anywhere from a few days to a few weeks to complete.
Can I customize the cat faces with different expressions?
Absolutely! You can easily change the eyes, mouths, and whiskers to give each cat face a unique personality.
What yarn is best for the Cat Face Crochet Blanket?
Worsted-weight acrylic or cotton yarns work best because they are durable, soft, and easy to wash.
Do I need to block my blanket after finishing?
Blocking is optional but recommended to help the blanket lay flat and look more professional, especially if your squares aren’t perfectly even.
Can I use the same technique to make other animal face blankets?
Definitely! Once you master the basic square and face techniques, you can create blankets featuring other animals like dogs, bears, or even foxes.
Conclusion
We hope this Cat Face Crochet Blanket – Beginner Tutorial has inspired you to pick up your hook and create something adorable! From gathering your materials to crocheting cat face squares, joining them together, and adding final touches, you now have all the knowledge you need.
This project is not only beginner-friendly but also highly customizable and perfect for gifting. Whether you make a small lap blanket or a large throw, your Cat Face Crochet Blanket will be a treasured, handmade piece.
We’d love to hear your thoughts! Please leave a sincere comment below sharing your experience with this tutorial or any suggestions you have for future projects. Happy crocheting!


