
Macrame Heart Bracelet - Free Tutorial

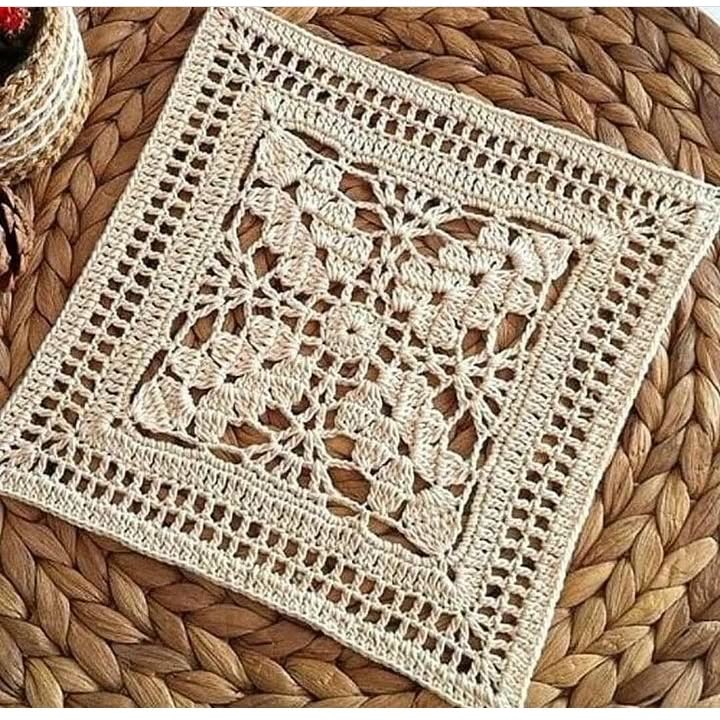
The Classic Lace Crochet Square – Tutorial is a perfect starting point for crocheters who love elegant, vintage-inspired designs. Whether you’re creating a timeless afghan, decorative pillow covers, or a stunning table runner, lace squares provide beauty and flexibility.
This step-by-step guide is crafted especially for those who want to explore the charm of lace without feeling overwhelmed.
The beauty of the Classic Lace Crochet Square – Tutorial lies in its intricate yet achievable stitches. Designed with balance in mind, this pattern uses common techniques arranged in a way that mimics classic lace motifs. Even if you’re just moving past beginner level, you’ll find this pattern enjoyable, relaxing, and rewarding to complete.
Throughout this article, we’ll explore the supplies needed, provide a breakdown of the stitches and steps, offer creative ways to use your squares, and share troubleshooting tips for common mistakes.
With our humanized, clear explanations, you’ll gain confidence and skills while making something truly special. Now, let’s begin this lovely project together.
Before diving into the Classic Lace Crochet Square – Tutorial, let’s review the basic materials you’ll need. Most of these are standard tools, making this project accessible for many crafters without extra investment.
First, choose your yarn. A lightweight cotton or bamboo yarn is ideal for lace projects. These yarns provide excellent stitch definition, which is important when showcasing delicate lacework. White, cream, and pastel colors are traditional choices, but feel free to experiment.
Next, select the right hook. A size 2.5 mm to 3.5 mm hook works best with lightweight yarns to create the fine texture needed in a lace square. Always check your yarn label for suggestions.
You’ll also want a pair of sharp scissors and a yarn needle. The yarn needle helps you weave in ends neatly, which is crucial for a polished look in lacework.
For best results, consider using a stitch marker, especially if the pattern includes rounds or complex repeats. This tool helps you stay on track and avoid extra counting.
A blocking mat and pins are useful, especially in lace projects, to help the square hold its shape. After crocheting, blocking allows the lace to open up and lay flat, revealing its detailed beauty.
Lastly, if you’re new to lace crochet, have patience with yourself. Working slowly and reading each instruction carefully will make a big difference as you learn and grow with this tutorial.
Let’s now go through the Classic Lace Crochet Square – Tutorial in a clear and structured way. This pattern works in rounds and uses a mix of chain spaces, double crochets, and picots to create the lace effect.
Start with a magic ring or chain 5 and slip stitch to form a ring. This will serve as the center of your square. Chain 3 to begin the first round.
Round 1: Work 12 double crochets into the ring and join with a slip stitch to the top of the starting chain. This forms the solid center foundation.
Round 2: Chain 3, skip one stitch, double crochet in the next stitch, chain 1. Repeat from * to * around. This creates the initial lace spacing.
Round 3: In each chain space, work (1 double crochet, chain 2, 1 double crochet). This creates the beginning of the lace corners and side spaces.
Round 4: Chain 4, skip 1 chain space, single crochet in the next chain space. Continue around. You’ll start seeing the square shape forming clearly now.
Round 5: In each chain-4 space, work (2 double crochets, chain 2, 2 double crochets) to form the corners, and chain 1 between each set on the sides. This gives your square strong corners while keeping the lace look.
Fasten off your yarn, weave in the ends, and block your square for the best result. Your square should now look delicate, symmetrical, and rich with detail.
The Classic Lace Crochet Square – Tutorial provides more than just a practice piece—it opens up a world of possibilities for handmade items. These squares are incredibly versatile and can be incorporated into a variety of projects.
Sew several squares together to create a lace afghan or baby blanket. This is an ideal gift for weddings, baby showers, or anniversaries and will be cherished for years.
Make a set of lace coasters or doilies using just one square per piece. Add a subtle edge trim and you’ve got a complete set for your dining table.
Turn your lace squares into decorative wall art. Attach them to canvas or frame them for a minimalist yet handcrafted home décor option.
For a more wearable approach, join a few squares to form a lace scarf or wrap. This adds a vintage touch to any outfit and showcases your crochet skills.
Use the lace squares as pockets or accents on clothing, tote bags, or even fabric pillows. A small lace detail can elevate a simple item.
Lastly, create lace bookmarks or wedding favors by starching the squares and adding ribbon or beading. These make elegant and thoughtful handmade gifts.
While the Classic Lace Crochet Square – Tutorial is beginner-friendly, there are a few common pitfalls to avoid and techniques to enhance your final result.
Watch your tension. Too tight, and the lace won’t open up. Too loose, and your square may not hold its shape. Aim for even, gentle tension throughout.
Don’t skip blocking. Lace needs blocking to look its best. Wet block or steam your square gently, pin it in shape, and let it dry fully before using or joining.
Check your stitch count often. Losing track of stitches can throw off the symmetry of your lace. Use markers or count each round before proceeding.
If your corners are curling or ruffling, reassess your stitch placement. Proper corner increases are key to keeping the square flat and neat.
Practice picot stitches and chain spaces before starting the pattern. These stitches give lace its elegant look, and practicing them improves consistency.
Finally, don’t be discouraged by early mistakes. Lace crochet requires focus, but the rewards are beautiful. Each attempt builds skill and confidence.
Q: Can I use thicker yarn for this lace square?
A: You can, but the lace effect may be less delicate. Use a larger hook with bulky yarns and be prepared for a different texture.
Q: How many squares do I need for a blanket?
A: It depends on the finished size of your square and the desired blanket dimensions. On average, you may need 36 to 64 squares for a throw.
Q: Do I need to block each square before joining?
A: Yes, blocking helps ensure each square is uniform in size, making the joining process easier and more professional-looking.
Q: Can beginners really follow this lace pattern?
A: Absolutely. The tutorial breaks the pattern down into manageable steps with familiar stitches, making it beginner-friendly with practice.
Q: What if my square isn’t coming out symmetrical?
A: Recheck your stitch count at each round and ensure you’re placing corner stitches consistently. Slight adjustments in tension can also help.
Q: How do I join lace squares together?
A: You can whip stitch or crochet them together using slip stitches or single crochet along the edges, depending on your desired look.
The Classic Lace Crochet Square – Tutorial is a gentle yet rewarding introduction to the world of lace crochet. Through this article, we’ve covered the materials you’ll need, step-by-step instructions, inspiring project ideas, and essential tips to help you succeed.
Lace crochet may seem intimidating at first, but with patience and guidance, you can create timeless pieces that showcase your craftsmanship and creativity. These elegant squares are perfect for gifts, décor, or personal enjoyment.
We’d love to hear from you! Share your thoughts in the comments below—tell us how your square turned out, what you plan to make, or ask questions. Your feedback helps others learn and inspires us to keep sharing beautiful patterns. Happy crocheting!


