
The Crochet Baby Hatching Dragon – Pattern is one of the most adorable and imaginative crochet projects you can create, combining fantasy charm with practical crafting skills. This pattern captures the magical moment of a baby dragon emerging from its egg, making it a perfect gift for children, dragon enthusiasts, or collectors of whimsical handmade items.
Whether you are a beginner with some basic crochet knowledge or an advanced crocheter looking for a fun and creative challenge, this project will bring joy not only in the making but also in the final display.
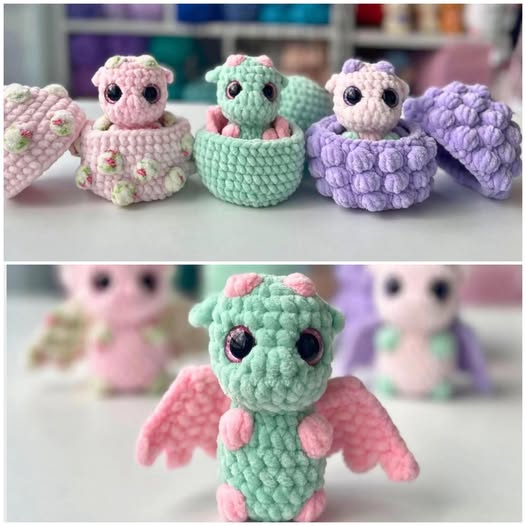
What makes the Crochet Baby Hatching Dragon – Pattern so unique is the combination of textures, shapes, and details that bring the creature to life. The rounded egg, the delicate cracks showing the baby dragon’s face, and the small claws peeking out create a sense of movement and storytelling.
This is not just a crochet piece — it’s a conversation starter and a keepsake that will be treasured for years. It also offers endless opportunities for customization, from playful color schemes to unique embellishments that reflect your personal style.
If you love crochet projects that tell a story, then this is the perfect pattern for you. The Crochet Baby Hatching Dragon – Pattern lets you experiment with different yarn weights, stitch variations, and assembly techniques while keeping the process accessible.
By following a clear step-by-step approach, you’ll be able to craft your own magical creature and even create a series of dragons in different poses or colors. Before we dive into the detailed sections, let’s explore the essential aspects you need to know to start this enchanting project.
1. Materials and Tools Needed for the Crochet Baby Hatching Dragon – Pattern
When starting the Crochet Baby Hatching Dragon – Pattern, choosing the right materials is essential for achieving the perfect look and durability.
First, you’ll want to select soft yet sturdy yarn. Acrylic yarn is an excellent choice because it holds shape well, is widely available, and offers a variety of vibrant colors to bring your dragon to life. Cotton yarn is another good option for a smooth finish and easy maintenance.
For the hook size, follow the recommendation on your yarn label, but many crafters prefer using a slightly smaller hook than suggested to achieve a tighter stitch. This prevents stuffing from showing through and helps maintain the dragon’s form. A 2.5mm to 3.5mm hook works well for amigurumi-style projects like this.
Stuffing is another crucial material. Use high-quality polyester fiberfill to make your dragon plush and huggable. Make sure to stuff evenly so the shape stays consistent. You will also need safety eyes or embroidered features for the dragon’s face, as these add personality and charm.
A yarn needle will be needed for sewing parts together, as well as stitch markers to help you keep track of your rounds. If you plan to add extra decorative details like glittery wings or tiny beads, have them ready before you start assembling.
Lastly, don’t forget your scissors and a comfortable working space with good lighting. Crocheting detailed projects like the Crochet Baby Hatching Dragon – Pattern requires attention to detail, and having everything prepared will make the process smoother.
2. Step-by-Step Process to Create the Baby Hatching Dragon
The Crochet Baby Hatching Dragon – Pattern is made up of several small parts that come together to form the final magical piece.
Begin by crocheting the dragon’s body. Start at the base, working in continuous rounds using single crochet stitches. As you build up the body, you will increase and decrease stitches to shape the torso and head.
Once the body is complete, create the limbs and tail separately. The arms and legs can be simple cylindrical shapes with slight shaping at the ends to suggest claws. The tail can be long and slightly curved for a whimsical look.
The dragon’s head is one of the most important parts because it sets the tone for the whole piece. Create it separately, ensuring the snout and eye area are well-defined. Adding safety eyes or sewing on eyes before attaching the head helps you position them perfectly.
The egg is crocheted in two separate pieces: the base and the cracked top. The base should be large enough to hold the dragon’s lower body, while the top will rest around its head, creating the hatching effect. Add some irregular edges to the top part to mimic cracked eggshells.
Assembly comes next. Position the dragon inside the egg, sewing the body securely into place. Attach the head, limbs, and tail carefully so that they appear to be breaking through the shell. This is where you can also add small details like embroidered nostrils, blush on the cheeks, or tiny felt wings.
Finish by weaving in all loose ends and checking that the stuffing is evenly distributed. At this stage, your Crochet Baby Hatching Dragon – Pattern will come to life as a unique handmade creation.
3. Creative Customization Ideas for Your Baby Hatching Dragon
One of the joys of making the Crochet Baby Hatching Dragon – Pattern is that you can personalize it to suit different themes or occasions.
If you want a fantasy-inspired look, choose shimmering yarns in metallic shades like gold, silver, or emerald green. You can also add small fabric wings or glittery felt accents to enhance the magical feel.
For a softer, more whimsical look, pastel colors work beautifully. A light pink dragon in a cream-colored egg would make a perfect baby shower gift. Adding a tiny ribbon around the egg can make it even more charming.
You can also create themed dragons for holidays. A red and green dragon for Christmas, a pastel dragon for Easter, or even a spooky black and purple dragon for Halloween can be a fun twist. The possibilities are endless, and each customization makes your project truly unique.
Another creative idea is to make a family of dragons. Create several in different sizes and colors, each with slightly different facial expressions or egg designs. This could make for an impressive display or a set of gifts.
Experiment with textures as well. Mixing smooth yarn with fuzzy yarn for certain parts, like the tail or head, can add visual interest. You can also use embroidery to add scales, patterns, or decorative details on the egg.
Ultimately, your Crochet Baby Hatching Dragon – Pattern should reflect your creativity and style. The more personal touches you add, the more special the finished piece will feel.
4. Tips for Success and Common Mistakes to Avoid
Even if you’re an experienced crocheter, there are some tips to keep in mind when working on the Crochet Baby Hatching Dragon – Pattern.
First, work with tight stitches. Loose stitches can make the project look less polished and allow stuffing to peek through. If your stitches are too loose, try using a smaller hook size.
Always use a stitch marker when working in the round. It’s easy to lose track of where a round begins, especially when making small pieces like arms and legs. This simple tool can save you a lot of time and frustration.
When assembling the dragon, pin the pieces in place before sewing. This allows you to adjust positioning and ensures the final figure looks balanced and proportionate.
Avoid overstuffing or understuffing. Overstuffing can distort the shape, while understuffing can make the dragon look limp. Aim for a firm but flexible feel.
Take breaks during the process. Detailed projects can strain your hands and eyes, so resting every hour will help maintain accuracy and comfort.
Finally, remember that practice makes perfect. If your first attempt at the Crochet Baby Hatching Dragon – Pattern isn’t exactly as you imagined, use it as a learning experience and try again. Every project improves your skills and boosts your confidence.
FAQ – Crochet Baby Hatching Dragon – Pattern
1. Is the Crochet Baby Hatching Dragon – Pattern suitable for beginners?
Yes, but basic crochet knowledge is recommended. If you know how to single crochet, increase, decrease, and work in the round, you can follow this pattern successfully.
2. How long does it take to complete this project?
It depends on your skill level and pace. On average, it may take between 6 to 10 hours spread over a few days.
3. Can I sell finished dragons made from this pattern?
Yes, as long as you credit the original designer if required. Handmade versions can be popular at craft fairs and online shops.
4. What yarn type is best for this project?
Acrylic yarn is ideal for durability and variety of colors, but cotton yarn is great for a smooth, clean finish.
5. How can I make the egg look more realistic?
Use a combination of off-white and light beige yarns, and add uneven edges to the cracked top for a natural effect.
6. Can I wash the finished dragon?
Yes, but hand washing is recommended to preserve the shape and details.
Conclusion
The Crochet Baby Hatching Dragon – Pattern is a delightful project that combines storytelling, creativity, and crochet skills. From choosing your materials to adding the final details, every step is an opportunity to bring your own magic to life.
Whether you make it as a gift, a decoration, or a collectible, it’s sure to charm anyone who sees it. I’d love to know your thoughts — share your honest opinion and suggestions so we can make future crochet creations even more enchanting.


