
Crochet Baby Shoe – Free Pattern is one of the most charming and rewarding projects you can create for a little one. Whether you’re a beginner or an experienced crocheter, making tiny shoes for babies is a heartwarming experience.
These adorable shoes are not only practical but also make thoughtful handmade gifts for baby showers, newborn photos, or everyday wear. With this Crochet Baby Shoe – Free Pattern, you’ll learn how to make soft, comfortable, and stylish baby footwear that showcases your creativity and love. The best part is that you can customize the size, color, and style to fit any baby perfectly.
Crocheting baby shoes is an excellent way to use up leftover yarn from previous projects while creating something truly special. From classic booties to modern sneaker-style designs, there are endless possibilities to explore.
You can choose from pastel colors for a traditional baby look or bold shades for a playful touch. These shoes are lightweight, easy to make, and require only a small amount of yarn. Once you get the hang of the pattern, you’ll be able to make pairs in different sizes and colors for every occasion.
Besides being adorable, handmade crochet baby shoes carry sentimental value. Many parents treasure them as keepsakes that mark their child’s early months. Unlike store-bought options, these shoes are made with care and can be customized to suit any preference.
Whether you add tiny bows, buttons, or embroidery details, each pair becomes a unique creation that reflects your love for the craft. Let’s explore step by step how to make your own pair using this Crochet Baby Shoe – Free Pattern that’s perfect for beginners and seasoned crocheters alike.
1. Materials and Tools You’ll Need
Before you begin working on your Crochet Baby Shoe – Free Pattern, it’s essential to gather the right materials and tools. Fortunately, you won’t need much to complete this adorable project, and most of these items are already part of a basic crochet kit.
Start with a soft baby-friendly yarn. Cotton yarn is an excellent choice because it’s gentle on the skin, breathable, and easy to wash. You can also use acrylic yarn for durability and elasticity. For a newborn size, light or DK-weight yarn works perfectly. If you’re making larger sizes, opt for medium-weight yarn to provide extra thickness and comfort.
You’ll need a crochet hook that matches your yarn’s weight, usually between 3.0 mm and 4.0 mm. Using the right hook size ensures your stitches are tight enough to create a secure and comfortable shoe shape. Also, have scissors, a yarn needle, and optional stitch markers handy to keep track of your rounds.
If you want to personalize your shoes, gather small embellishments such as buttons, bows, ribbons, or appliqués. Just make sure all decorative items are securely attached to prevent choking hazards for babies. Safety always comes first when crafting for little ones.
Having your materials well-prepared before starting helps keep your work smooth and enjoyable. It’s also a good idea to make a gauge swatch before beginning to ensure your final shoe size turns out as expected. Once your tools are ready, you can start crocheting your adorable baby shoes.
2. Step-by-Step Crochet Baby Shoe – Free Pattern
Now that your materials are ready, it’s time to dive into the Crochet Baby Shoe – Free Pattern. The process is simple and can be completed in just a couple of hours, depending on your skill level.
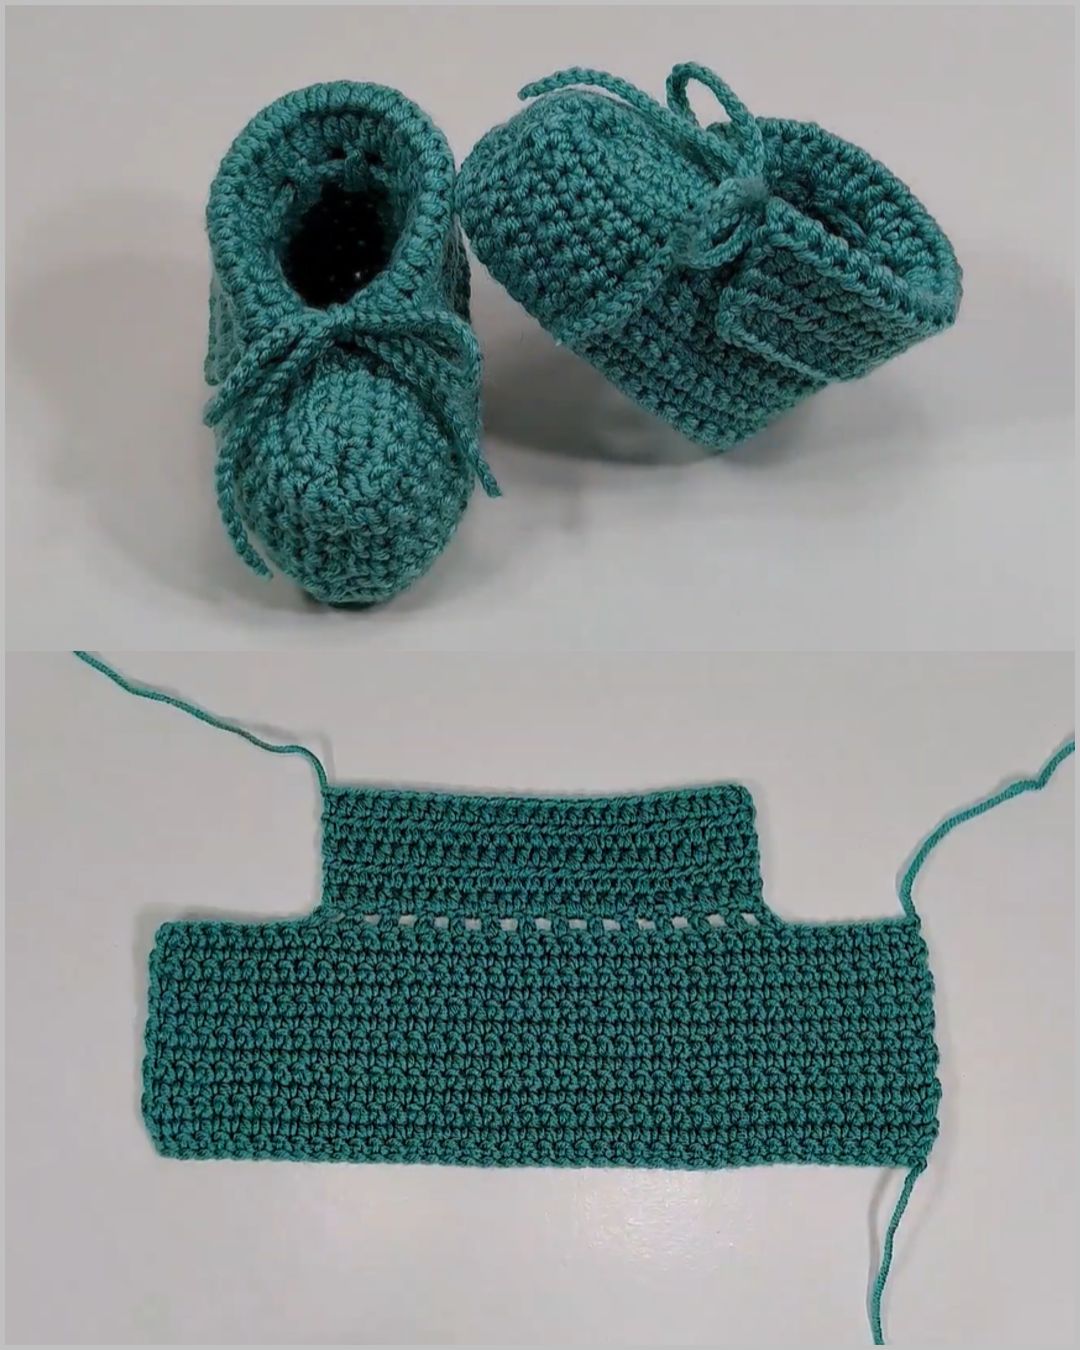
Begin by making the sole of the shoe. Start with a foundation chain, usually between 10 and 14 stitches, depending on the desired shoe length. Work single crochet and half double crochet stitches around the chain, increasing at both ends to form an oval shape. Continue crocheting in rounds, following the pattern until the sole reaches the desired size for the baby’s foot.
Once the sole is complete, you’ll build up the sides of the shoe. Work single crochet stitches around the edge of the sole without increasing, which will naturally cause the edges to curve upward. This forms the base of your baby shoe.
Next, you’ll shape the toe area. You can decrease stitches gradually at the front to create a snug, rounded shape. Depending on the design, you might add a strap, a small bow, or a button closure to make the shoe more secure and stylish.
For the final touch, weave in all loose ends carefully using your yarn needle. Make sure there are no exposed threads that could irritate the baby’s skin. Repeat the same process to make the second shoe, ensuring both match in size and shape.
Once you’ve completed the pair, you’ll be amazed by how cute and professional your crochet baby shoes look. They make a lovely handmade addition to any baby outfit or a heartfelt gift for a new parent.
3. Design Variations and Creative Ideas
One of the best things about this Crochet Baby Shoe – Free Pattern is how easy it is to customize. Once you master the basic pattern, you can experiment with endless creative variations.
Try making boot-style shoes for cooler months by adding extra rows around the ankle and finishing with a soft ribbed cuff. For a more playful look, create sneaker-inspired baby shoes with contrasting colors for the sole and upper part. You can even use variegated yarn to achieve a beautiful multicolored effect without changing skeins.
If you prefer a more elegant touch, crochet a delicate scalloped edge or add lace trim around the opening. This gives your baby shoes a dainty, vintage-inspired charm. Adding small bows, buttons, or tiny flowers also enhances their overall look while keeping them soft and comfortable.
Another idea is to match the shoes with other crochet baby accessories, such as hats, mittens, or blankets. This creates a coordinated gift set that’s perfect for baby showers. Parents will love the handmade touch, and your project will stand out as something truly special.
You can also experiment with textures by mixing stitch types. Try combining half double crochet, puff stitches, or front post stitches to add dimension and interest. Each pair becomes a new opportunity to explore creativity while practicing different crochet techniques.
With so many customization options, you’ll never get bored making these crochet baby shoes. Each design feels fresh and unique, and the joy of gifting or keeping them never fades.
4. Tips for Perfect Results and Care Instructions
To achieve the best results with your Crochet Baby Shoe – Free Pattern, pay attention to a few important details during the process. Proper technique and finishing touches make all the difference between an average and a beautifully crafted piece.
First, always check your gauge. Even a small difference in tension can change the final size of your baby shoes. If your stitches are too tight, use a slightly larger hook; if too loose, go down one size. This ensures the shoes fit comfortably.
Keep your tension consistent throughout the project. Uneven stitches can cause the shoe to lose its shape or appear lopsided. Practicing on small swatches before starting can help you gain control over your yarn and hook.
When finishing the shoes, weave in ends securely but neatly. Avoid knots that might press against the baby’s skin. You can also block your shoes gently by stuffing them with tissue paper and letting them rest overnight, helping them hold a perfect shape.
To maintain your crochet baby shoes, wash them gently by hand using mild detergent and cold water. Avoid wringing or twisting the fabric—simply press out excess water and let them air dry flat. This keeps their structure and softness intact.
If you plan to gift your crochet baby shoes, consider wrapping them beautifully in a small box or cloth bag. Handmade packaging adds a special touch and shows care for your craft. Each detail makes your creation feel even more personal and meaningful.
Following these tips ensures your finished shoes are not only beautiful but also safe and comfortable for babies to wear.
FAQ About Crochet Baby Shoes
1. Are crochet baby shoes safe for newborns?
Yes, as long as you use soft, breathable yarn and avoid small detachable embellishments that could pose a choking hazard.
2. What size hook should I use for crochet baby shoes?
Typically, a 3.0 mm to 4.0 mm crochet hook works best for DK-weight yarn, depending on your tension and desired shoe size.
3. How long does it take to make a pair of crochet baby shoes?
Most crocheters can finish a pair in about 1 to 2 hours, depending on complexity and experience level.
4. Can I make crochet baby shoes without a specific pattern?
Once you understand basic construction, yes! You can freestyle designs using standard shaping techniques for soles and toes.
5. What type of yarn is best for baby shoes?
Soft cotton or baby-specific acrylic yarns are ideal because they’re gentle on the skin and easy to wash.
6. Can I add soles to make them suitable for walking babies?
Yes, you can attach soft leather or non-slip fabric soles for babies who are starting to walk, providing extra safety and durability.
7. Are crochet baby shoes suitable for gifts?
Absolutely! They make perfect handmade gifts for baby showers, birthdays, and holidays, often becoming cherished keepsakes.
8. How do I adjust the pattern for different sizes?
You can increase or decrease the starting chain length and add or reduce rounds in the sole to achieve different sizes.
Conclusion
Making your own Crochet Baby Shoe – Free Pattern is a joyful and fulfilling experience that brings warmth and creativity into every stitch. These tiny shoes not only showcase your crochet skills but also carry sentimental value that families will cherish for years. With simple materials and a little patience, you can create unique designs that are both functional and adorable.
Through this guide, you learned how to choose the right yarn, follow easy steps to shape your shoes, customize their design, and care for them properly. Whether you’re crafting for your own child or gifting them to a loved one, handmade crochet baby shoes always spread love and comfort.
Now it’s your turn to give this project a try! Share your experiences and opinions in the comments—your thoughts help inspire others to start their crochet journey and create something beautiful with their hands.


