
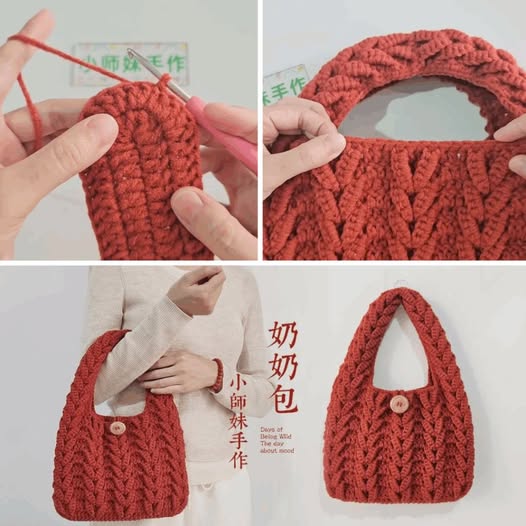
The Crochet bag with delicate stitches – free pattern is a charming and functional project for any crochet lover looking to combine style and practicality.
From intricate textures to elegant finishes, this bag is both fashionable and useful. Whether you’re making it for yourself, a friend, or to sell at craft fairs, the appeal of a beautifully handmade bag is undeniable.
Crocheting your own accessories, like a Crochet bag with delicate stitches, not only gives you creative freedom but also ensures a unique and personalized item.
Delicate stitch work adds sophistication, making the final product look refined and professional. Even beginners can try this pattern with a bit of patience and the right guidance.
In this article, you’ll find a free pattern, useful tips, and a breakdown of the most important steps to successfully create your own Crochet bag with delicate stitches. We’ll go through materials, stitch recommendations, detailed instructions, and style ideas so you can confidently complete your next favorite accessory.
1. Choosing Materials and Preparing Your Workspace
Before you begin your Crochet bag with delicate stitches – free pattern, selecting the right materials is essential. Your yarn choice will significantly influence the texture and durability of the bag. A cotton blend or sturdy acrylic yarn is ideal for strength and shape retention.
Hooks are just as important. Depending on the thickness of your yarn, you’ll likely use a 3.5 mm to 4.5 mm hook. The size you choose will impact the tightness of the stitches, which is especially important for bags that need to hold their shape.
You’ll also need stitch markers, a yarn needle for weaving in ends, and a pair of sharp scissors. Optional items include a fabric liner for the interior of the bag and a zipper or button closure.
Make sure your workspace is clean and well-lit. A comfortable chair and enough table space for your materials will make your crochet sessions more enjoyable.
Reading through the entire free pattern before starting is a smart move. It allows you to understand the structure of the bag and anticipate any challenging parts ahead of time.
Finally, practice the delicate stitches on a small swatch. This helps you gain confidence in your technique and lets you see how your yarn behaves with those particular stitches.
2. Stitch Guide and Pattern Structure
The heart of the Crochet bag with delicate stitches – free pattern lies in the stitch choices. Combining textured stitches like the puff stitch, shell stitch, or crossed double crochet creates that delicate look. These stitches give the bag its intricate appearance while still being functional.
Begin the base with a magic circle and work in rounds using single crochet or half double crochet stitches. This gives the bottom of the bag a sturdy foundation that supports the rest of the design.
Once the base is established, move to the body of the bag. Alternate rows of textured stitches and simple stitches help create contrast and visual interest. Be sure to count your stitches regularly to maintain consistency.
For the handles, you can choose between crocheting sturdy straps or attaching leather handles for a modern twist. Both options work well and depend on the final aesthetic you’re aiming for.
The top border of the bag can be finished with a row of slip stitches or a decorative edge like a picot or crab stitch. This neatens the top and gives it a polished finish.
If you want to line your bag, now is the time to sew the fabric insert. Cut and stitch the liner to fit the bag’s shape, and then attach it to the inside using a yarn needle or sewing machine.
3. Customization and Design Variations
The beauty of the Crochet bag with delicate stitches – free pattern is how easily it can be customized. Whether through color, size, or embellishments, you can make your bag truly one-of-a-kind.
For a classic look, choose neutral tones like cream, taupe, or gray. These colors work well with any wardrobe and highlight the texture of the stitches beautifully. Bold, vibrant hues can create a more playful and statement accessory.
Size adjustments are simple. Increase or decrease the number of stitches in your foundation chain to make the bag larger or smaller. Just ensure that any stitch patterns used will still work across your new stitch count.
Adding embellishments like buttons, wooden beads, or tassels brings personality to your crochet bag. These small details can complement the delicate stitching and elevate the overall design.
For seasonal variations, consider using different yarn weights. Lightweight yarns make for elegant spring and summer bags, while chunkier yarns are great for cozy, structured winter designs.
You can also create themed bags by combining color schemes and motifs. For example, pastel yarns and floral embroidery for spring or dark jewel tones and gold buttons for a festive holiday version.
4. Step-by-Step Instructions to Make the Bag
Step 1: Start with a magic circle and crochet 6 single crochets into it. Pull tight to close and join with a slip stitch. This forms the center of your base.
Step 2: Increase in rounds using single or half double crochet until you achieve your desired base diameter. Typically, 8–10 inches wide is a good size for everyday use.
Step 3: Begin the body by switching to your chosen textured stitch. Alternate between 2–3 rows of puff stitches and 1 row of single crochet for structure.
Step 4: Continue working in the round, building up the height. Stop when the bag reaches about 10–12 inches tall or your preferred height.
Step 5: Make the handles. Chain 50 (or adjust for preferred length) and attach to opposite sides using slip stitches or sc stitches. Reinforce the connection with an extra row if needed.
Step 6: Finish the top edge with a decorative stitch and weave in all ends. If desired, attach a lining or closure before using your bag.
FAQ – Frequently Asked Questions
Can beginners make this crochet bag pattern? Yes! While it includes delicate stitches, the pattern is beginner-friendly with step-by-step guidance. Practicing individual stitches beforehand is helpful.
What type of yarn is best for this project? A medium-weight cotton or acrylic yarn works best. It should be strong enough to support the bag’s structure but soft enough to allow delicate stitches.
How long does it take to make the bag? Depending on your skill level and available time, it can take anywhere from 6 to 12 hours in total.
Do I need to line the bag? Lining is optional but recommended for extra durability and a clean finish, especially if you plan to carry small items.
Can I make the bag larger or smaller? Absolutely! You can adjust the size by modifying the stitch count in the base and body. Just ensure the stitch pattern repeats correctly.
Are there alternative stitches I can use? Yes, you can substitute with your favorite textured stitches. Just test them out on a swatch to see how they look and behave with your chosen yarn.
What closure works best for this type of bag? Buttons, zippers, or magnetic snaps all work well. Choose one that fits the style and use of your bag.
Can I sell bags made from this pattern? Yes, feel free to sell finished bags. Just avoid reselling the pattern itself.
How do I wash the finished bag? Hand wash with mild detergent and lay flat to dry. Avoid wringing out to keep its shape.
What should I do if the stitches look uneven? Practice makes perfect. Blocking the finished bag can help even out the stitches for a more professional look.
Conclusion
The Crochet bag with delicate stitches – free pattern is a fun and rewarding project that allows crocheters to express creativity while crafting something functional. From choosing your materials to adding final touches, this guide has walked you through each step with tips and suggestions.
You now have the tools to create a beautiful and personalized crochet bag that showcases your skills. Whether you keep it or gift it, the care and detail in every stitch will be appreciated.
VIDEO TUTORIAL
If you enjoyed this tutorial or have suggestions, please leave a sincere comment below. We’d love to hear about your experience and ideas for future projects!


