
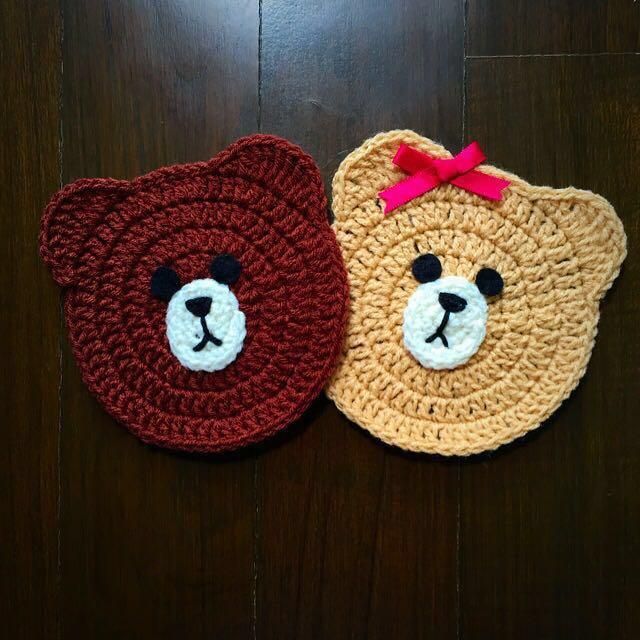
The Crochet Bear Coaster – Free Pattern is a charming and practical way to add a touch of personality to your table or gift set. Whether you’re looking for a beginner-friendly crochet project or a handmade item to brighten up a space, this pattern is a delightful choice. With its adorable bear face and customizable colors, this coaster is as functional as it is cute.
Crocheting small home accessories like coasters is a great way to practice stitches, use up leftover yarn, and create thoughtful gifts. The Crochet Bear Coaster – Free Pattern works up quickly and makes excellent use of basic techniques, making it suitable for both beginners and experienced crafters.
Plus, with so many creative possibilities, each coaster you make can be uniquely yours.
In this article, we’ll walk you through everything you need to know to make your own Crochet Bear Coaster, from choosing the right yarn to shaping the ears and adding details. Get your hooks ready, because this fun and cozy project is about to become your new favorite.
1. Materials and Tools for the Crochet Bear Coaster
To start working on your Crochet Bear Coaster – Free Pattern, gather a few essential materials. One of the best things about this project is how budget-friendly and accessible it is. Most supplies are already in a typical crocheter’s stash!
You’ll need a medium-weight cotton yarn in your choice of bear colors—light brown, beige, or even pastel tones for a whimsical touch. Cotton is ideal for coasters since it’s absorbent and durable. You can also add contrasting colors for the nose, ears, and facial features.
A 3.5mm to 4mm crochet hook is recommended for a tight and neat stitch. You’ll want your stitches to be firm to create a flat, functional surface. A loose gauge might make the coaster floppy, so adjusting your tension is important.
Other necessary tools include a yarn needle for weaving in ends, small scissors, and stitch markers if you like to keep track of rounds. Safety eyes can be used for the bear’s eyes, or you can embroider them using black yarn for a child-friendly version.
Optional additions include felt backing for extra sturdiness or a touch of essential oil added to the yarn for a sweet scent. These small choices can elevate your Crochet Bear Coaster from simple to spectacular.
Before starting, it’s a good idea to create a gauge swatch to ensure your coaster ends up the right size. A standard size is around 4-5 inches in diameter, perfect for mugs and small bowls.
2. Step-by-Step Instructions for the Crochet Bear Coaster
To create your Crochet Bear Coaster – Free Pattern, begin by crocheting a flat circle, which will form the base of the bear’s face. This is typically made using a magic ring and working in rounds, increasing evenly.
Start with a magic ring and crochet 6 single crochets (SC) into it. In the next round, work 2 SC into each stitch to reach 12 stitches. Continue increasing by 6 in each round until you reach your desired size, usually around 36–42 stitches depending on your yarn and hook.
Once you’ve created the circular base, it’s time to shape the ears. You can crochet small half-circles separately and sew them on, or you can crochet them directly into the edge of the last round for a seamless design. Two ears positioned symmetrically will give your coaster a balanced and cute appearance.
Next comes the face. Use black yarn to embroider eyes, or attach small safety eyes. For the nose, a small oval or triangle shape can be added with contrasting yarn, sewn tightly to the surface. Add a gentle smile with a curved line of stitching for extra charm.
Don’t forget to weave in all loose ends and block the coaster if necessary to ensure it lies flat. Blocking is especially helpful if your stitches are slightly uneven or if the coaster curls at the edges.
Repeat the process with different yarn colors and ear positions to create a whole family of bear coasters—each with its own personality!
3. Customization Ideas and Creative Uses
The Crochet Bear Coaster – Free Pattern is incredibly versatile. Once you’ve mastered the basic shape, there are countless ways to make it your own. From yarn color to facial expressions, this is a perfect pattern for personalization.
For example, you can change the yarn color to create a polar bear, panda, or even a whimsical rainbow bear. Add small embellishments like bows, flowers, or tiny crocheted accessories to match seasonal themes or a child’s birthday.
Another fun idea is to turn the coaster into a hanging ornament by adding a loop at the top. These can be used for nursery decor, car mirrors, or even as part of a mobile. It’s a wonderful way to showcase your crochet work in different settings.
If you enjoy themed gifts, a set of Crochet Bear Coasters makes a perfect handmade housewarming present. Wrap them with a ribbon or include them in a cozy tea-time basket for an extra special touch.
Teachers, friends, and family members will love receiving these as small gifts. And since they work up quickly, you can create them in bulk for markets or charity donations.
You can also turn the coaster into a mini face cloth or scrubbie by using scrubby yarn or thicker cotton. It’s an adorable yet practical way to use the same pattern.
Whether for yourself or someone else, this pattern brings joy and a handmade charm to everyday life.
4. Tips for Beginners and Pattern Troubleshooting
If you’re new to crochet, don’t worry—the Crochet Bear Coaster – Free Pattern is beginner-friendly and a great introduction to working in the round. Start slowly, focus on consistent tension, and practice your basic stitches before diving in.
One common issue beginners face is curling edges. This is usually caused by too much tension or uneven increases. Make sure you’re counting your stitches accurately and using a stitch marker to note the start of each round.
If the coaster looks wavy or ruffled, you might be increasing too quickly. Try spacing out your increases or adjusting your hook size for better results.
Ears can be tricky to place evenly. Use pins to mark the placement before sewing them on. This ensures a symmetrical and neat look.
Another tip is to weave in your ends as you go. Don’t wait until the end of the project. Weaving them in gradually helps maintain structure and saves time.
If you’re struggling with facial details, try drawing them lightly on paper first to get the placement right. You can also practice embroidery techniques on a swatch before working on the final piece.
And finally, remember to have fun with it! The charm of handmade crochet lies in its small imperfections and personality. Each Crochet Bear Coaster you make will be unique—and that’s something truly special.
Frequently Asked Questions (FAQ)
What type of yarn is best for the Crochet Bear Coaster?
Cotton yarn is the best choice because it’s absorbent, durable, and holds its shape well. Worsted weight cotton works perfectly for coasters.
Can I sell items made with this free pattern?
Yes, typically handmade items made from a Crochet Bear Coaster – Free Pattern can be sold, especially if you credit the original designer. Always check for any specific licensing notes if using a published pattern.
How long does it take to make one coaster?
On average, it takes about 30–45 minutes to complete one coaster, depending on your skill level and how detailed you make the face.
Are these coasters washable?
Yes, if made with cotton yarn, they are machine washable on a gentle cycle. Lay flat to dry for best results.
What size should the finished coaster be?
The typical size is 4 to 5 inches in diameter, which is perfect for cups, mugs, or small bowls.
Can I make this pattern using chunky or bulky yarn?
You can, but the coaster will be larger and possibly less firm. For functional coasters, stick with DK or worsted cotton yarn for best results.
Conclusion
The Crochet Bear Coaster – Free Pattern is a joyful project that brings together simplicity, creativity, and function. With a few basic stitches and some playful details, you can create adorable bear coasters for any occasion. Whether you’re crocheting for fun, gifts, or even sales, this pattern offers endless possibilities.
We hope you enjoyed this step-by-step guide! If you try this pattern, please leave a sincere comment below—share your results, ideas, or suggestions for other animals you’d like to see. Happy crocheting!


