
Macrame Heart Bracelet - Free Tutorial

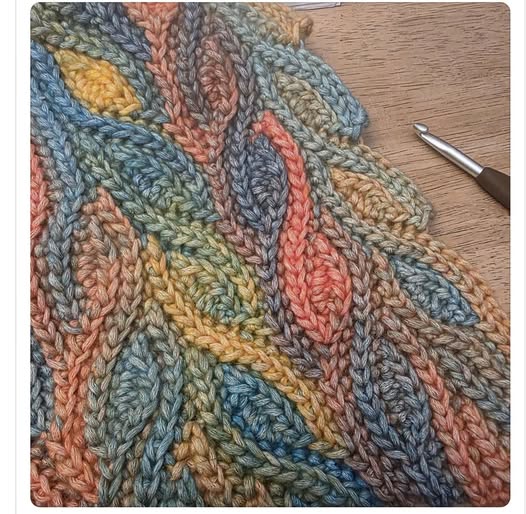
The Crochet Brioche Free Textured Pattern is a stunning and unique technique that combines the beauty of traditional crochet with the depth and richness of textured stitches. For those who love experimenting with patterns that bring out intricate details, the brioche style in crochet offers a modern and cozy twist.
This technique creates soft, raised textures that are ideal for scarves, blankets, cushions, and other decorative or wearable pieces. Its layered design gives the illusion of knitting while maintaining the versatility of crochet. Whether you are an experienced crafter or just starting, this pattern will inspire you to explore new stitches and color combinations.
One of the reasons why the Crochet Brioche Free Textured Pattern has gained so much popularity is because it looks sophisticated yet can be learned by beginners with patience and practice. The process involves working in alternating stitches, creating depth and shadow that enhances the look of any yarn.
This pattern works beautifully with solid, gradient, or contrasting colors, making it suitable for any style or mood. The fabric that results is thick, warm, and soft, perfect for cozy winter accessories or stylish home décor. Once you master the basics, the pattern becomes repetitive and relaxing, making it a wonderful project to unwind after a long day.
Another great benefit of the Crochet Brioche Free Textured Pattern is its adaptability. You can customize the size, color, and texture to suit your needs. From delicate pastel throws to bold, statement cushions, this technique allows creativity to flow freely. Plus, it’s a fantastic way to use leftover yarn and mix textures for unique results.
The brioche effect highlights each color strand beautifully, creating a reversible design that looks just as good on the back as it does on the front. Once you understand the stitch rhythm, you can easily modify it to create intricate motifs or larger blanket sections with minimal effort.
To start working with the Crochet Brioche Free Textured Pattern, it’s essential to understand how this stitch works. Unlike traditional crochet, the brioche technique relies on working multiple loops together, often using front and back post stitches to build the texture. The result is a fabric that has pronounced ridges and valleys, giving the illusion of depth and movement. This technique also uses color layering, where one color dominates the front while another subtly appears in the background, making it perfect for two-tone projects.
Beginners may find it slightly challenging at first, but once you grasp the rhythm of alternating between front and back post stitches, it becomes intuitive. The key is maintaining consistent tension throughout, ensuring that the ridges form evenly. Using a slightly larger hook than usual helps prevent tight stitches, making it easier to work subsequent rows. Choosing yarns that glide smoothly on the hook, such as cotton blends or soft acrylics, also makes the learning process more comfortable.
You can use this technique to create various items such as shawls, beanies, or even pillow covers. The thick and squishy nature of the brioche fabric makes it especially appealing for cold-weather accessories. Some crocheters also use this technique to mimic knitting brioche designs, giving their pieces a modern and elegant finish. The beauty of the Crochet Brioche Free Textured Pattern lies in its simplicity — it only takes a few rows to notice the 3D texture forming, and from there, it’s pure satisfaction as you see your fabric come to life.
The most important thing when starting is to practice the stitch pattern on a small swatch. This allows you to understand the direction and flow of stitches before committing to a larger piece. Once you feel comfortable, you can experiment with color changes and yarn weights to see how the texture behaves differently. It’s a rewarding process that lets you truly explore the creative side of crochet.
Another tip is to count your stitches carefully at the end of each row. Because of the textured nature of brioche crochet, it’s easy to lose track, which may alter the pattern alignment. Marking your rows or using stitch markers can prevent frustration later. Remember, every project is a learning experience, and with the Crochet Brioche Free Textured Pattern, each row adds more character and beauty to your piece.
Finally, don’t be afraid to personalize your brioche crochet creations. The pattern works well with decorative borders, tassels, or even a contrasting trim for extra flair. Whether you’re making a gift or a piece for your own home, the result will always stand out as a unique handmade treasure.
To make the most of your Crochet Brioche Free Textured Pattern, choosing the right materials is key. The texture of brioche crochet relies heavily on the yarn’s softness and flexibility. Yarn that is too stiff won’t allow the raised stitches to form properly, while yarn that’s too slippery can make your stitches uneven. Medium-weight yarns, such as worsted or DK, are ideal for beginners to achieve balance and definition.
When selecting colors, consider how they will interact with the texture. Solid shades emphasize the depth of the ridges, while variegated or gradient yarns add a flowing color transition that enhances the visual interest. For two-tone brioche patterns, use contrasting colors to highlight the 3D effect. Classic combinations like cream and navy or mustard and gray are timeless, while bold pairings can create modern and striking pieces.
The hook size also plays an important role in the finished texture. A slightly larger hook than what the yarn label recommends helps create looser stitches, allowing the texture to breathe. For example, if the yarn suggests a 4 mm hook, try using a 4.5 mm or 5 mm hook. Always make a small test swatch to see how the fabric feels and adjusts your tension accordingly.
Other useful tools include stitch markers, a tapestry needle for weaving in ends, and a pair of sharp scissors. Blocking tools may also be handy if you want your project to have crisp edges and defined texture. Gently blocking the piece with steam or water can enhance the brioche pattern’s appearance, making it look more polished and professional.
Choosing high-quality yarn also ensures your finished item will last longer and maintain its shape. Natural fibers like cotton or wool blend beautifully, while acrylic options are budget-friendly and easy to maintain. Each yarn type adds its own charm to the Crochet Brioche Free Textured Pattern, so feel free to explore until you find your favorite combination.
Finally, keep your workspace comfortable and well-lit. Working on textured stitches requires focus and attention to detail, so proper lighting helps you see each loop clearly. Having all your tools organized will also make your crocheting sessions more enjoyable and productive.
Begin your Crochet Brioche Free Textured Pattern by creating a foundation chain with an even number of stitches. This ensures the brioche texture aligns properly. Once your chain is ready, start your first row using basic single crochet stitches to establish a strong base. This step is crucial for maintaining structure throughout your project.
Next, you’ll begin alternating between front and back post double crochets. These stitches are what create the raised ridges characteristic of brioche crochet. Always remember to yarn over and insert your hook around the post of the stitch instead of the top loops. This technique brings forward or pushes back the stitch, forming the textured pattern.
As you move along, keep checking that your stitches are even and consistent. Uneven tension can disrupt the smooth rhythm of the brioche effect. Don’t rush—this pattern rewards patience and precision. The good news is that once you complete a few rows, the texture becomes very visible and satisfying.
Experimenting with color changes can elevate your design even further. Try alternating colors every two rows for a striped brioche look. The contrast adds definition and dimension, making the pattern stand out beautifully. When changing colors, always carry the yarn up the side neatly to avoid bulk.
If you want to create a reversible piece, use two contrasting yarns and alternate them between front and back post stitches. This method results in a double-sided pattern that’s equally stunning on both sides. Perfect for scarves and blankets, it gives your crochet work a luxurious finish.
Lastly, remember to take breaks and stretch your hands. Textured crochet patterns can be more demanding on your fingers, especially when maintaining tension. Enjoy the process, and celebrate every row you complete—each one brings you closer to a beautifully textured masterpiece.
Once your Crochet Brioche Free Textured Pattern piece reaches the desired size, it’s time to focus on finishing touches. Start by carefully weaving in all loose ends with a tapestry needle. Make sure to do this neatly to maintain the clean look of the pattern. For best results, weave the ends along the ridges so they blend into the texture naturally.
Blocking your project can make a significant difference. Gently wet block or steam block it to relax the fibers and enhance the definition of the ridges. Once dry, your piece will have a professional and polished look, perfect for gifting or displaying in your home.
You can also add embellishments like fringes, pom-poms, or lace borders to personalize your item. If you’re making a blanket or a scarf, a tassel border adds playful movement and charm. For cushions or home décor, consider adding decorative buttons or a contrasting edge to complete the look.
Creative variations of the Crochet Brioche Free Textured Pattern include mixing different yarn textures, like combining cotton with fluffy mohair or wool with metallic threads. These combinations create fascinating contrasts that enhance the brioche effect. Each variation gives your work a distinct personality and uniqueness.
For those who love experimenting, try integrating brioche panels into other crochet projects. You can insert them as decorative sections in sweaters, bags, or even rugs. The possibilities are endless when you let creativity lead the way.
Finally, don’t forget to label and store your patterns. Keeping notes of your stitch counts, yarn types, and hook sizes helps you recreate or adjust the project later. This habit also improves your skills over time, turning each project into a learning journey.
1. Is the Crochet Brioche pattern suitable for beginners?
Yes, beginners can learn this pattern with patience. Start with small projects and focus on understanding front and back post stitches before moving to larger items.
2. What type of yarn works best for this technique?
Medium-weight yarns such as DK or worsted cotton blends are ideal because they hold the texture well and are easy to handle.
3. Can I make the brioche crochet reversible?
Absolutely! By using two contrasting colors, you can create a beautiful reversible design that looks great on both sides.
4. How do I keep my stitches even?
Maintain consistent tension and use a slightly larger hook to avoid tight stitches. Practice on swatches to gain confidence before starting your main project.
5. Can I use this pattern for clothing?
Yes, the brioche texture adds warmth and structure, making it great for sweaters, cardigans, and accessories like scarves and hats.
6. How do I block my finished piece?
Use gentle steam or wet blocking to shape your work and define the ridges without flattening the texture.
The Crochet Brioche Free Textured Pattern offers a perfect balance of creativity, texture, and relaxation. Its intricate appearance may seem challenging at first, but once you get into the rhythm, it becomes a soothing and rewarding project.
Whether you’re making cozy scarves, decorative throws, or stylish home décor, this technique adds depth and beauty to any piece. Remember to enjoy each step, experiment with colors and yarns, and make it your own. We hope this guide inspired you to try the brioche crochet technique—share your thoughts and suggestions in the comments, and tell us about your experience with this beautiful pattern!


