
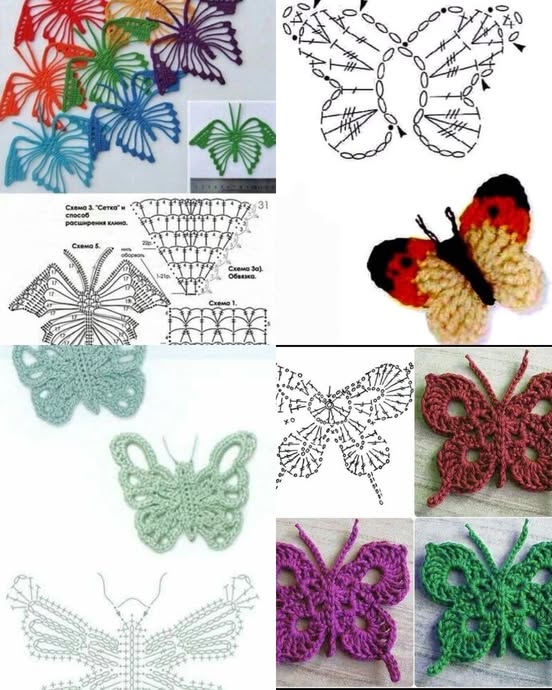
If you love crochet and want to add a touch of whimsy to your creations, Crochet Butterfly Designs – Tutorial is the perfect way to do so. Butterflies are a beautiful symbol of transformation and freedom, making them a popular choice in crochet projects.
Whether you’re a beginner or an experienced crocheter, learning how to create your own crochet butterfly designs can be a fun and fulfilling challenge. In this step-by-step guide, we’ll walk you through how to create a stunning crochet butterfly, offering tips and techniques along the way.
Crochet butterflies can be made in a variety of ways and come in many different styles, from simple and delicate to large and intricate. You can use these butterflies to decorate scarves, blankets, or even wear them as embellishments on clothing or accessories.
The best part about Crochet Butterfly Designs is the freedom they give you to experiment with different yarns and colors, allowing you to create a design that is uniquely yours.
In this tutorial, we will cover the basics of creating a crochet butterfly, including the essential stitches you’ll need to know, how to shape the butterfly’s wings, and how to add any finishing touches that will make your butterfly design stand out. Let’s get started and learn how to crochet this beautiful design from start to finish!
1. Materials You’ll Need for Your Crochet Butterfly Design
Before diving into the Crochet Butterfly Designs – Tutorial, it’s essential to gather the materials you’ll need for the project. Having everything ready will make the process smoother and more enjoyable. Here’s what you’ll need:
- Yarn: Choose a yarn that works well with your crochet hook. For a delicate butterfly, lightweight yarn such as a sport weight or worsted weight is ideal. Pick a color that speaks to you, whether it’s a bright and vibrant hue or a soft pastel tone. You can also use variegated yarn for a beautiful, multicolored effect.
- Crochet Hook: Select a crochet hook that matches your yarn choice. Typically, a hook size of 3.5mm to 5mm works well for most butterfly designs, but you can adjust depending on your yarn and desired tension.
- Tapestry Needle: This is necessary for weaving in ends and adding finishing touches to your butterfly once it’s complete.
- Scissors: A sharp pair of scissors will make cutting your yarn a breeze.
- Stitch Markers: These are optional but can help keep track of your rounds or when you are working on complex parts of the butterfly’s wings.
- Button or Bead (Optional): Some crocheters like to add a small button or bead in the center of their butterflies for an extra touch of detail. This is an optional step, but it can add an interesting element to your design.
Now that you have your materials gathered, you can begin creating your Crochet Butterfly Design.
2. Basic Stitches You’ll Need for the Crochet Butterfly
To begin with, you should familiarize yourself with the basic stitches that will be used in this Crochet Butterfly Design – Tutorial. While the pattern itself may vary, most butterfly designs rely on a few essential stitches. Here are the primary stitches to know:
- Chain Stitch (ch): The foundation of many crochet projects, the chain stitch creates the base of your butterfly’s wings. This stitch is easy to learn and creates the foundation for your design.
- Slip Stitch (sl st): Slip stitches are used to join or close off sections. It’s also helpful for moving between rounds without adding bulk to your design.
- Single Crochet (sc): Single crochet is a basic stitch that helps create solid, compact fabric. It is often used to form the butterfly’s wings and body.
- Double Crochet (dc): Double crochet creates taller stitches and is typically used for shaping the wings. This stitch gives the butterfly’s wings a delicate yet textured look.
- Half Double Crochet (hdc): The half double crochet is a versatile stitch that falls between single and double crochet. It’s used for creating a nice balance in the butterfly’s design.
- Treble Crochet (tr): Treble crochet is used in some butterfly designs to add height and texture, especially in the wings. It’s a bit taller than double crochet and helps give the butterfly an airy, light feel.
By mastering these basic stitches, you’ll be well on your way to creating your own crochet butterfly masterpiece.
3. Creating the Wings of the Crochet Butterfly
The wings are the focal point of your Crochet Butterfly Design – Tutorial, and getting the shape and texture right is key. Here’s how to create the wings for your butterfly:
- Make the Wing Base: Start by creating a foundation chain, depending on the size of the butterfly you want. Once you’ve made your foundation, use double crochet or treble crochet to create the wing’s shape. Work in a circular or oval shape for a more traditional butterfly wing.
- Add Color and Texture: After you’ve made the first layer of your wings, you can add texture by using different stitches, such as half double crochet or even adding puff stitches. You can also change colors to create beautiful gradients or stripes on your wings, giving your butterfly more character.
- Work in Rounds: When making the wings, continue working in rounds, turning the work at the end of each round, until you’ve reached the desired size. You may want to increase stitches towards the outer edge to make the wings larger and more dramatic.
- Shaping the Wings: To shape the wings, you can use slip stitches to create curved edges or work additional rounds to make the wings flare outwards. It’s important to shape the wings in a way that mimics the delicate curves found in real butterfly wings.
- Finish the First Wing: Once one wing is complete, repeat the process for the second wing. Be sure to keep the sizes of both wings symmetrical for a balanced look.
- Joining the Wings: Once both wings are made, join them together at the center using a slip stitch or a few single crochet stitches. Make sure the wings are evenly spaced for a perfect butterfly shape.
Now that your wings are complete, it’s time to move on to the butterfly’s body.
4. Assembling the Butterfly’s Body and Finishing Touches
The final step in the Crochet Butterfly Design – Tutorial is to assemble the body and add any finishing touches to make your butterfly truly come alive. Here’s how to complete your butterfly:
- Create the Body: Using a darker color of yarn, create a small chain and then work single crochet stitches to form the butterfly’s body. The body should be slightly tapered at the ends to give it a natural shape. You can also add texture by using a combination of stitches.
- Attach the Wings to the Body: Once the body is finished, attach each wing by sewing or crocheting them to either side of the body. Make sure they are securely attached and in the right position.
- Add Antennas: You can add antennas to your butterfly by creating small chains and folding them in half. Attach them to the top of the butterfly’s head using a slip stitch.
- Weave in Ends: Use a tapestry needle to weave in any loose yarn ends from your project. Make sure all the ends are hidden for a neat finish.
- Add Decorative Elements: If you like, you can sew on a small button or bead in the center of the butterfly’s wings for added detail. This is optional but can enhance the overall look.
- Final Press: To make your butterfly crisp and even, lightly press it with an iron on a low setting. This will help set the stitches and give your butterfly a clean finish.
Now your Crochet Butterfly Design is complete and ready to be added to your project!
Frequently Asked Questions (FAQ)
1. What size crochet hook should I use for a butterfly design?
The size of the crochet hook depends on the yarn you’re using. A 3.5mm to 5mm hook is typically a good choice for most yarns, but adjust based on the thickness of your yarn and desired tension.
2. Can I use any type of yarn for the butterfly?
Yes, you can use any yarn you like. However, thinner yarns such as sport weight or worsted weight work well for creating delicate butterflies. You can also experiment with variegated yarn for a beautiful, colorful effect.
3. How do I make my butterfly wings more intricate?
To create more intricate wings, use different crochet stitches such as puff stitches or shell stitches. You can also add more rounds or change colors to make the wings stand out.
4. How do I attach the butterfly to my project?
You can sew your butterfly onto your project using a tapestry needle and matching yarn. Alternatively, you can crochet the butterfly directly onto your piece if you prefer.
5. Can I make a butterfly larger or smaller?
Yes, you can adjust the size of your butterfly by changing the size of the foundation chain and the number of rounds you work. For larger butterflies, simply increase the number of stitches in each round.
6. Can I add beads or sequins to my butterfly?
Absolutely! Adding beads, sequins, or even embroidery thread to the butterfly’s wings can give it extra flair. Be sure to attach any embellishments securely for a durable design.
Join our VIP broadcast list and gain access to exclusive patterns, all for free. As a VIP member, you’ll receive the best patterns daily, delivered directly to your device. ✨📱 It’s a unique opportunity to stay up-to-date with the latest trends and designs, curated just for you. Don’t miss out on enhancing your projects and discovering new inspirations with the best patterns every day! 🎨🔝
Conclusion
In this Crochet Butterfly Designs – Tutorial, we’ve covered everything you need to know to create your own beautiful butterfly. From gathering materials to creating the wings and body, we’ve walked you through each step in detail.
With a little practice, you can create butterflies in various sizes, colors, and designs. We hope this tutorial has inspired you to add these charming butterflies to your crochet repertoire.
Please share your thoughts, feedback, and any suggestions in the comments below! Happy crocheting!


