
Macrame Heart Bracelet - Free Tutorial

Creating a Crochet Button Butterfly – Step-by-Step Tutorial is a delightful way to combine charm, creativity, and practicality in a small and joyful project.
This simple yet elegant pattern transforms leftover yarn and spare buttons into beautiful butterflies that can be used for decorating, gifting, or accessorizing. Ideal for beginners and seasoned crocheters alike, this tutorial will walk you through each step with clarity and encouragement.
The Crochet Button Butterfly – Step-by-Step Tutorial introduces a whimsical and beginner-friendly design that uses basic stitches and a cute button as the focal point.
The result is a compact butterfly motif that can be made in a variety of colors and sizes. These crochet butterflies are perfect for embellishing baby blankets, bags, headbands, or even adding a special touch to greeting cards and keychains.
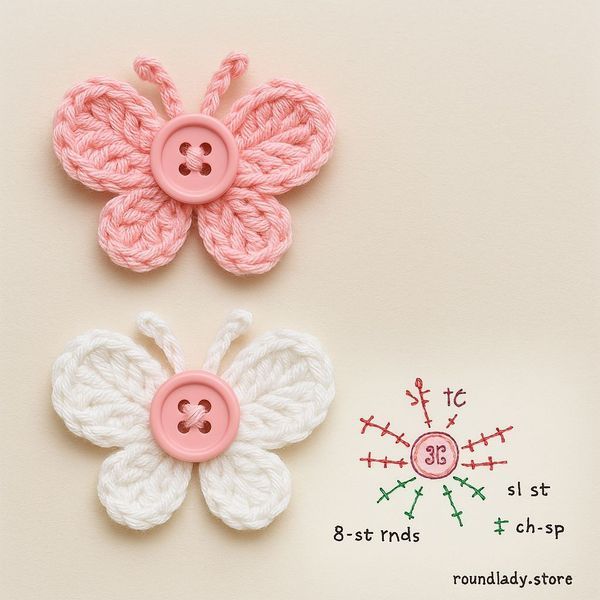
Throughout this tutorial, you’ll learn how to create wings using double crochets, form the body around a button, and finish with antennae that bring your butterfly to life. This project is not only fun and fast to complete but also great for using up yarn scraps. With just a small amount of yarn and a button, you’ll make something truly magical with this Crochet Button Butterfly – Step-by-Step Tutorial.
To begin your Crochet Button Butterfly – Step-by-Step Tutorial, gather the right materials. You will need small amounts of yarn in at least two colors—one for the wings and another for the body. Cotton or acrylic yarns in light or medium weights work best for this type of decorative project.
Next, choose a button to form the center of your butterfly. A standard 0.5 to 1-inch round button works beautifully. The button will serve as the body of the butterfly and help secure the wings in place. Clear, wood, pearl, or colorful buttons each give a different feel to the final piece.
You’ll also need a crochet hook appropriate for your yarn, usually between sizes 3.5mm and 4.5mm. Using a smaller hook can help keep the stitches tighter and give your butterfly a neater finish.
A tapestry needle will be used for weaving in the ends and attaching the button if necessary. Some crafters prefer to sew the button on after crocheting the wings, while others crochet directly around the button to secure it in place.
Keep scissors nearby for trimming any excess yarn and a few stitch markers if you want to track wing segments. While not required, a blocking mat and pins can help shape your butterfly wings more symmetrically if you desire a more polished look.
Once all your materials are ready, you’re set to start the Crochet Button Butterfly – Step-by-Step Tutorial. Having everything within reach makes the process smoother and more enjoyable.
The wings of your butterfly are created first and are typically worked in two separate parts—top and bottom wings. Begin by making a magic ring and crocheting a series of double crochets into the ring. This forms the upper wings of the butterfly.
Use about 8–10 double crochets into the ring, then chain and slip stitch to complete a semi-circle. This gives the top wings their curved, delicate shape. Repeat the process on the opposite side of the magic ring for the bottom wings, using slightly fewer double crochets for a smaller curve.
After completing both sets of wings, you can chain a few stitches and fasten off, leaving a tail to sew or tie the wings to the button. These two wing sets give your butterfly a full and balanced appearance.
Color choice plays a huge role in how your butterfly will look. Try using variegated yarn for a natural, multi-tone effect or contrasting solid colors for a playful finish. You can even add a touch of glitter yarn for a sparkling accent.
To keep the wings even, count your stitches carefully and mirror the same number of stitches on both sides. Consistent stitch tension also helps your butterfly sit flat when finished.
When both wings are complete, you’re ready to bring them together around the button body—the centerpiece of your Crochet Button Butterfly – Step-by-Step Tutorial.
The button is what transforms your wings into a butterfly. Start by threading the long tail of your yarn through a tapestry needle and positioning the button between the two wing sets. Stitch through the holes of the button and pull the wings tight around it to create the butterfly’s body.
Some prefer to crochet a small band that wraps around the wings and the button, securing all the elements together without sewing. This creates a more flexible and removable design.
Once the button is secured, double-check the positioning of the wings. They should flare out evenly on both sides, resembling a real butterfly in flight. Adjust as needed before tying off the thread or yarn securely.
For the antennae, cut a small piece of yarn, fold it in half, and knot it at the fold. Insert the loop through the top of the button or stitch it in place, letting the loose ends stick up like little feelers.
Trimming the antennae to your desired length gives a polished final touch. If you’re using cotton yarn, you can slightly stiffen them using a drop of fabric glue or starch.
At this point, your Crochet Button Butterfly is complete and ready for display or attachment to other crochet projects. It’s amazing how a simple button and yarn can come together in such a creative way.
Now that your Crochet Button Butterfly is finished, let’s talk about how to use it! These charming butterflies are perfect for embellishments. Add them to the corners of blankets, the ends of scarves, or along the border of pillows for a fun and whimsical effect.
They make adorable appliqués on children’s clothing, especially hats and cardigans. Just be sure to sew the button securely so it stays in place during wear. Always supervise babies if used on accessories.
Craft enthusiasts love attaching these butterflies to keychains or zipper pulls. Just add a split ring and lobster clasp, and you have a handmade gift in minutes.
Another great use is for scrapbooking and card making. Hot glue the butterfly onto a card or journal cover for a 3D decorative accent. Lightweight and colorful, they add texture and personality to any paper craft.
If you enjoy home décor, consider gluing several Crochet Button Butterflies onto a wreath base or garland for a seasonal decoration. Mix different colors and sizes for a garden-themed display.
Lastly, these butterflies are wonderful for teaching beginners the basics of crochet in a playful way. They involve basic stitches, creative assembly, and offer nearly instant gratification, making them perfect for workshops or group projects.
Can I make this butterfly with just one yarn color?
Yes! While two colors enhance the effect, using one solid color can still make a beautiful butterfly.
What size button is best?
A button between 0.5 and 1 inch works best. Make sure it has two or four holes to sew through.
Can I use hot glue instead of sewing?
You can use hot glue for attaching the butterfly to crafts, but sewing is more secure for wearable items.
Is this pattern suitable for beginners?
Absolutely. It uses basic stitches like double crochet and slip stitch and is perfect for those learning crochet.
What if my wings look uneven?
Check your stitch count and tension. Use a blocking mat to help shape the wings symmetrically.
Can I wash the butterfly?
Hand wash gently if needed, especially if using natural fibers or delicate buttons.
In this Crochet Button Butterfly – Step-by-Step Tutorial, we explored how to create a simple yet beautiful butterfly using yarn and a button. From choosing the right materials to shaping wings and assembling the body, every part of the process was designed to be accessible and fun.
You now know how to make something lovely from scraps of yarn, with endless customization options. Whether you use your butterfly to decorate a bag, brighten a gift, or bring joy to a friend, the possibilities are endless.
Have you tried this pattern? We’d love to hear your thoughts! Leave a comment below with your honest opinion and suggestions on how to personalize or improve the Crochet Button Butterfly. Let’s inspire each other with creativity!


