
Macrame Heart Bracelet - Free Tutorial

The Crochet Camellia Flower Pattern is a beautiful and versatile project that can be incorporated into many different types of crochet projects.
Whether you’re looking to embellish a scarf, add some charm to a hat, or create a stunning brooch, this delicate flower is perfect for the task. The crochet camellia flower is not only visually striking but also easy to make, which makes it a popular choice for crocheters of all skill levels.
Creating a camellia flower through crochet allows you to explore various techniques, such as working in rounds and using different stitch combinations.
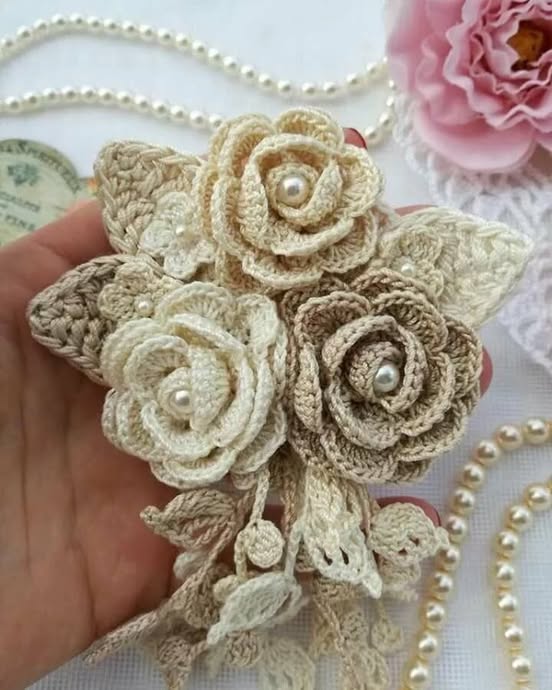
In addition to its intricate beauty, the Crochet Camellia Flower Pattern can be customized with various yarn colors and finishes, making it a highly personalized project. The vibrant, layered petals of the flower give it a realistic look, and with the right technique, you can create a flower that looks just as stunning as the real thing.
In this article, we’ll guide you through the process of making your own Crochet Camellia Flower Pattern. We’ll cover everything you need, from materials to step-by-step instructions. By the end of this tutorial, you will be able to crochet your own camellia flower, adding a touch of handmade beauty to any project.
Before diving into the steps for crocheting a Crochet Camellia Flower Pattern, it’s important to gather all the necessary materials. Having everything on hand will make the process more efficient and enjoyable. Below is a list of the basic supplies you’ll need:
Once you have all the materials ready, you’re good to go! Let’s now move on to the step-by-step process of crocheting the Crochet Camellia Flower Pattern.
Creating the Crochet Camellia Flower Pattern is a fun and rewarding process. Below is a simple, step-by-step guide that will take you through the various stages of the project. You’ll be crocheting the petals, layering them, and finally assembling the flower.
Once the petals are completed, carefully shape them to give the flower a more realistic look. Gently fold and curl the petals outward, ensuring that each petal is evenly spaced and layered.
Crocheting a Crochet Camellia Flower Pattern may seem straightforward, but there are several tips you can use to ensure that your flower turns out beautifully. Here are some helpful hints:
Q1: Can I use this pattern to make other flowers?
Yes, the technique used in the Crochet Camellia Flower Pattern can be applied to make other types of flowers. By adjusting the petal shapes and size, you can create different flowers like roses, daisies, and more.
Q2: What should I do if my flower looks too flat?
If your flower isn’t looking as three-dimensional as you’d like, try adding more layers of petals or use a smaller crochet hook to make the stitches tighter. You can also experiment with different yarn textures to create more volume.
Q3: Can I use this pattern for crochet projects other than flowers?
Absolutely! You can use the camellia flower pattern to embellish a variety of crochet projects. Try adding it to scarves, bags, hats, or even using it as a decoration for a blanket or pillow.
Q4: How do I ensure the petals are evenly spaced?
To ensure your petals are evenly spaced, take your time when attaching them to the center of the flower. Use a yarn needle to carefully position each petal, and pin them in place before sewing to make sure they are evenly distributed.
Q5: Can I crochet the camellia flower without a decorative center?
Yes, you can crochet the flower without adding a button or bead in the center. This will give your flower a more minimalist look, but it will still be lovely and charming.
Join our VIP broadcast list and gain access to exclusive patterns, all for free. As a VIP member, you’ll receive the best patterns daily, delivered directly to your device. ✨📱 It’s a unique opportunity to stay up-to-date with the latest trends and designs, curated just for you. Don’t miss out on enhancing your projects and discovering new inspirations with the best patterns every day! 🎨🔝
The Crochet Camellia Flower Pattern is a perfect project for crocheters looking to create a beautiful and detailed flower. By following the steps outlined in this article, you can make a flower that’s perfect for adding to scarves, bags, hats, or any other crochet creation. Whether you use it for personal projects or as a gift for someone special, the crocheted camellia flower is sure to impress.
We hope this guide has inspired you to start crocheting your own camellia flower. If you have any questions or suggestions, feel free to leave a comment below. We’d love to hear your thoughts and see your finished flowers!


