
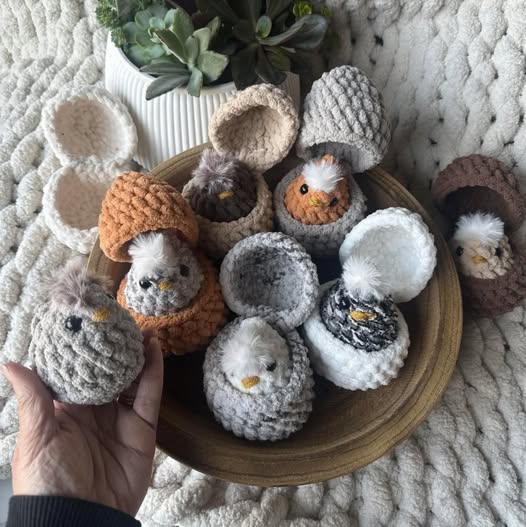
Crochet Chick in Egg – Pattern projects are among the most delightful and joyful items to make, especially when spring or Easter is around the corner.
These tiny, adorable creations are not only beginner-friendly but also incredibly charming, making them perfect as gifts, decorations, or even keepsakes. With their combination of playful design and simple stitches, these projects offer a perfect balance of fun and creativity.
Creating a Crochet Chick in Egg – Pattern is an excellent way to bring out your inner child while practicing important crochet techniques. It’s a compact project, meaning it doesn’t require a lot of yarn or time, but it delivers high-impact cuteness.
Whether you want to make one as a festive décor item or several to hand out as springtime surprises, this pattern brings a cheerful touch to any crochet collection.
In this article, we’ll walk through all the steps needed to create your very own Crochet Chick in Egg, discuss materials, stitches, design options, and answer some of the most common questions crafters have.
This tutorial-style guide will keep things simple yet detailed, ensuring that even if you’re just starting out with amigurumi, you’ll feel confident with your hook in hand.
1. Getting Started with the Crochet Chick in Egg
Before diving into the pattern itself, it’s essential to understand what you’ll need. Preparing your materials ahead of time ensures a smooth crocheting experience from start to finish.
The Crochet Chick in Egg – Pattern typically requires worsted weight yarn in yellow for the chick, white for the eggshell, and a small amount of orange for the beak. You’ll also need safety eyes, stuffing, a yarn needle, and a 3.5mm or 4.0mm crochet hook depending on your tension.
This is a great stash-busting project. If you have leftover yarn from other makes, a little goes a long way here. Just make sure the yarn weights are consistent so your pieces fit together nicely.
Basic crochet stitches are all you need. You’ll use magic ring, single crochet, increases, decreases, and slip stitches throughout. If you’re new to amigurumi, this project is an excellent way to build your skills while making something cute and seasonal.
Gauge isn’t too crucial for amigurumi. What’s more important is that your stitches are tight enough to prevent the stuffing from peeking through. Use a hook that gives you a dense, compact fabric.
When working on the Crochet Chick in Egg – Pattern, it helps to divide your project into two parts: making the chick, and making the egg. Both components are constructed separately and then combined at the end.
2. Creating the Chick Body
Now that you have your supplies, let’s get started by crocheting the chick’s body. This is the core of your Crochet Chick in Egg – Pattern, and it forms the foundation for all the detailing.
Start with a magic ring and work in continuous rounds. This technique keeps your stitch lines smooth, especially for round or oval shapes like amigurumi bodies.
After creating the base, begin increasing each round to shape the body. You’ll notice your chick beginning to take form as you reach the widest part of the body. This roundness gives it that irresistible chubby look.
Once you reach the desired size, you’ll start decreasing. The decreases close off the top of the chick. Before sealing it completely, remember to stuff your chick. Use polyester fiberfill for a soft, huggable shape.
Add the beak using a tiny triangle of orange yarn or embroider it directly onto the face. Secure safety eyes firmly between rounds. These details give your chick personality and charm.
Optionally, you can add small wings by creating tiny ovals and stitching them to each side of the chick. These are purely decorative but elevate the overall appearance.
Don’t forget a little tuft of yarn on top of the head. It’s a small detail that adds an extra layer of cuteness and makes your chick look playful and whimsical.
3. Making the Egg Shell
The eggshell is the signature feature that makes the Crochet Chick in Egg – Pattern stand out. It frames your chick and adds a surprise element to the design.
Begin the bottom half of the egg in the same way as the chick—with a magic ring. Work in rounds to gradually increase the size and height of the shell.
Use white or off-white yarn for the classic egg look. You can also get creative with pastel shades for a more playful or seasonal effect.
As you build the sides of the egg, keep checking the fit around the chick. It should nestle comfortably without squeezing too tightly or falling out.
The top part of the eggshell is optional but highly recommended. Some makers create a jagged edge to give the illusion of a cracked egg, which adds character and storytelling to the design.
You can either permanently attach the chick to the bottom shell or leave it detachable. This makes it more interactive, especially for children who like to play with their crochet friends.
Once you’ve completed both parts, place the chick inside the egg and admire your work! You now have a cheerful little ornament that captures the spirit of spring and handmade love.
4. Customization and Gift Ideas
The best thing about the Crochet Chick in Egg – Pattern is how versatile it is. With just a few tweaks, you can make each chick unique and personalized.
Change up the colors to match seasonal themes or favorite palettes. Pastel shades are ideal for Easter, while bright, bold colors can make it a year-round favorite.
Add embellishments like tiny bows, mini hats, or even a mini crochet flower crown. These small additions can make your chick suitable for birthdays, baby showers, or holidays.
Use your chick and egg as part of an Easter basket filler, nursery decoration, or table centerpiece. Its compact size makes it ideal for multiple uses without taking up too much space.
If you enjoy gifting handmade items, these make wonderful, heartfelt presents. You can even include them in a gift box with other crochet goodies like bunnies or baby booties.
For those who sell their crochet items, this pattern is perfect for spring craft fairs and online shops. It’s quick to make, adorable, and appealing to a wide audience.
Lastly, consider using organic cotton or baby-safe yarns if your chick will be used by young children. Always secure small parts like eyes and beaks firmly to avoid choking hazards.
FAQ – Frequently Asked Questions
What size is the finished Crochet Chick in Egg?
Most finished chicks measure around 3 to 4 inches tall, depending on yarn and hook size used. The egg shell adds about another inch in height.
Can beginners make this pattern?
Absolutely. The stitches involved are basic and beginner-friendly. If you’re new to amigurumi, this is a great first project with minimal shaping and sewing.
Do I need safety eyes or can I embroider the eyes?
You can do either. Safety eyes offer a polished look, but embroidery is a safer option for babies or small children.
Is this pattern suitable for gift giving?
Yes! The Crochet Chick in Egg – Pattern is perfect for Easter baskets, baby showers, or even as a springtime ornament.
Can I sell items made from this pattern?
If you created the chick using your own work and not from a copyrighted pattern, yes. Many crocheters sell items made from free or self-created designs.
How long does it take to make one?
On average, it takes about 2-3 hours depending on your speed. More experienced crocheters might finish faster, while beginners should take their time and enjoy the process.
Conclusion
The Crochet Chick in Egg – Pattern is a joyful project that brings warmth, charm, and creativity into your crochet journey. From selecting your yarn to adding those final details, every step is filled with opportunities to personalize and play. Whether you’re making it for a loved one, a customer, or yourself, this adorable chick is guaranteed to bring smiles.
We’ve covered all the essentials to help you get started, stay on track, and complete your project with confidence. Now it’s your turn to pick up your hook and try it out for yourself. We would love to hear your thoughts—please leave a sincere opinion and share your suggestions below. Happy crocheting!


