
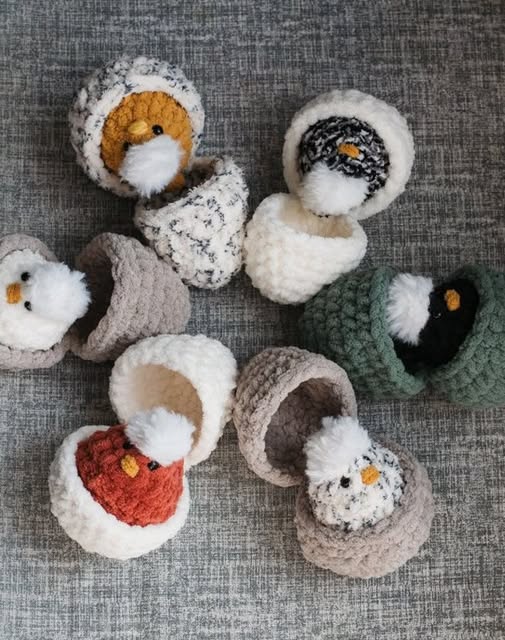
The Crochet Chick in Egg – Tutorial is a delightful project that combines the charm of amigurumi with the creativity of seasonal crafting. Whether you’re preparing for Easter, spring decorations, or simply want to bring a touch of cuteness into your home, this tutorial will walk you through every step.
This adorable chick peeking out of its eggshell is perfect for all ages and makes a thoughtful handmade gift. Best of all, it’s a pattern that’s both beginner-friendly and enjoyable for experienced crocheters.
When working on the Crochet Chick in Egg – Tutorial, you’ll learn how to make a soft, round chick and a decorative eggshell using basic crochet stitches. The process is broken down into manageable steps with detailed explanations, so even if you’re new to crochet, you can follow along with confidence.
You’ll also find tips on selecting the right yarn, stuffing materials, and how to finish the project with polish and personality.
This project encourages creativity, offering you the chance to experiment with colors, sizes, and embellishments. Use pastel yarns for a traditional springtime look, or choose bold and fun hues to match a child’s favorite colors.
The Crochet Chick in Egg – Tutorial not only teaches the mechanics of the craft but also opens the door to personalization, allowing every crafter to make it their own.
1. Materials You’ll Need
To begin your Crochet Chick in Egg – Tutorial, gather all the necessary materials for a smooth crafting experience.
Start with worsted weight yarn in yellow for the chick and white or light pastels for the egg. Acrylic yarn is budget-friendly and holds shape well.
You’ll need a 3.5mm to 4mm crochet hook, depending on your tension and yarn choice. A smaller hook helps prevent holes in the work.
Add a pair of safety eyes or use black embroidery floss for the chick’s eyes. Felt or stitched eyes are ideal for baby-safe versions.
Stuff the chick with polyester fiberfill, giving it a soft and squeezable feel. Fill it moderately to maintain shape without stretching the stitches.
Use a yarn needle for weaving in ends and assembling the chick and egg pieces. Stitch markers are helpful for counting rounds in amigurumi.
Optional items include decorative ribbons, small buttons, or a bit of blush (fabric-safe) to add charm to your finished chick.
2. How to Crochet the Chick
Now let’s begin crocheting the chick portion of your Crochet Chick in Egg – Tutorial, which forms the heart of this charming design.
Start with a magic ring, placing 6 single crochets into it. Pull tight to close the center, and begin working in spirals to avoid seams.
Increase in the next rounds to form a growing sphere. Typically, you’ll work 2 single crochets in each stitch, then space out increases as you build.
Continue in even rounds without increases to create the body. This portion should resemble a plump egg shape before decreasing.
When nearing the top, insert the fiberfill stuffing to give the chick shape. Be sure not to overstuff, which can stretch the fabric.
Begin decreasing by skipping stitches in an evenly spaced manner, then fasten off and weave in the end with a yarn needle.
Make small wings and a beak separately. Simple ovals or triangles work well. Attach them securely, and finish the face with eyes and a smile.
3. How to Crochet the Eggshell
The next part of the Crochet Chick in Egg – Tutorial focuses on the eggshell, which will cradle the chick adorably in its lower half.
Begin the egg bottom with a magic circle, working in continuous rounds to form a shallow bowl. Use white or light-colored yarn for a classic look.
Work increases in each round until the diameter fits snugly around the chick’s lower body. Make sure it’s deep enough to hold the chick halfway.
Once you reach the desired size, crochet a few rounds without increases to create the sides of the shell.
To add a cracked eggshell effect, use a zigzag pattern: alternate between chains and decreases, or work shells and picots for texture.
Fasten off and weave in your ends carefully. You can shape the shell while blocking to enhance the design.
Optionally, make a top half of the egg that sits loosely on the chick’s head or sew it slightly tilted for extra charm.
4. Assembly and Finishing Touches
With all the pieces complete, the final step of the Crochet Chick in Egg – Tutorial is assembly and decorating your chick for personality.
Insert the chick’s lower half into the egg base. It should sit snugly without sewing, or you can stitch it in for added stability.
Position the wings symmetrically and sew them securely. The beak should sit between the eyes, slightly raised for a 3D effect.
Add blush using fabric-safe crayons or embroidery thread for cheeks. You can also stitch a tiny smile beneath the beak.
Attach a bow, tiny felt flower, or embroidery on the shell for personalization. These small details bring the chick to life.
If you made a top half of the egg, attach it off-center for a “hat” effect, or leave it removable for playability.
Once everything is attached, double-check your stitches, trim any loose threads, and fluff the chick before gifting or displaying.
FAQ – Crochet Chick in Egg
What type of yarn is best for this project?
Acrylic yarn is ideal for its affordability and structure, but cotton yarn gives a nice, clean look. Use worsted weight for the recommended size.
Can I make this chick larger or smaller?
Yes! Use thicker yarn and a larger hook for a bigger chick, or finer yarn for a miniature version.
Is this pattern suitable for beginners?
Absolutely. The Crochet Chick in Egg – Tutorial uses basic stitches like single crochet, increases, and decreases, which are great for beginners.
What if I don’t have safety eyes?
You can embroider eyes with black yarn or felt to make the toy baby-safe and still adorable.
Can I use this for Easter gifts?
Yes! These make perfect Easter basket stuffers, handmade gifts, or classroom giveaways.
How long does it take to complete?
It usually takes 2–4 hours, depending on your speed and whether you’re adding extra details.
Conclusion
The Crochet Chick in Egg – Tutorial is a fun and rewarding project that brings joy to both the maker and the recipient. Throughout this tutorial, you’ve learned how to gather materials, crochet the chick and its eggshell, and assemble everything with personality and polish. Whether you’re making one or a dozen, each little chick will carry your creative signature.
We hope this guide has inspired you to create your own adorable amigurumi chick! If you enjoyed this tutorial, please leave a sincere comment below with your thoughts, suggestions, or even a picture of your creation. Your feedback helps us grow and keeps this crafting community vibrant and joyful.


