
Crochet Clover Keychains – Tutorial are a wonderful and easy DIY project to bring some handmade charm and luck into your life. These little accessories are not only beautiful but also symbolize good fortune, making them a perfect gift or a personal addition to your keyring.
Whether you’re an experienced crocheter or just getting started, creating a crochet clover keychain is a fun and simple project that anyone can enjoy. In this tutorial, we’ll guide you step-by-step through the process of making your own lucky crochet clover keychain.
Making your own crochet clover keychain is a great way to add a personal touch to everyday items. These keychains are customizable, allowing you to experiment with different yarn colors and sizes to create a unique accessory.
What’s more, this project doesn’t require many materials, making it an affordable and quick crochet project to do at home or as a gift for loved ones.
By following this tutorial, you’ll not only learn how to crochet a clover shape, but you’ll also get tips on how to turn your creation into a keychain that you can carry around with you or gift to someone special.
Crochet clover keychains can be made using a variety of yarn colors, and they also offer a great opportunity for beginners to practice basic crochet techniques.
The clover is a symbol of luck, and each petal can represent something special to the person who receives it. Ready to create your own lucky accessory? Let’s dive into this Crochet Clover Keychain – Tutorial.
1. Materials Needed to Create Crochet Clover Keychains
Before you start crocheting, it’s essential to gather all the materials you’ll need. For this Crochet Clover Keychain – Tutorial, you don’t need a lot of tools or supplies, but you do need to ensure you have the right crochet materials to create a professional-looking keychain.
The first thing you’ll need is crochet yarn. Choose a yarn that is durable yet soft enough to work with. You can opt for cotton or acrylic yarn, both of which are easy to handle and perfect for small projects like keychains. Make sure to select yarn in the color of your choice for the clover, as well as a contrasting color for the keychain loop.
You’ll also need a crochet hook that matches the yarn you’ve selected. A size G-6 (4mm) hook works well for most yarns, but you can adjust depending on the thickness of your yarn. A smaller or larger hook will create different results, so choose the one that best suits your project.
To complete the keychain, don’t forget a keychain ring or keychain clip. This will be the part that attaches your crochet clover to your keys or bag. You can easily find these keychain rings at craft stores or online.
Additionally, you may want a tapestry needle to weave in any loose ends once you’ve finished crocheting the clover. Having a pair of scissors on hand to cut the yarn when needed is also important for clean, polished results.
2. Step-by-Step Instructions for Making Crochet Clover Keychains
Now that you have all your materials ready, it’s time to start crocheting your clover. This section of the Crochet Clover Keychain – Tutorial will walk you through each step so you can create a beautiful and lucky clover keychain.
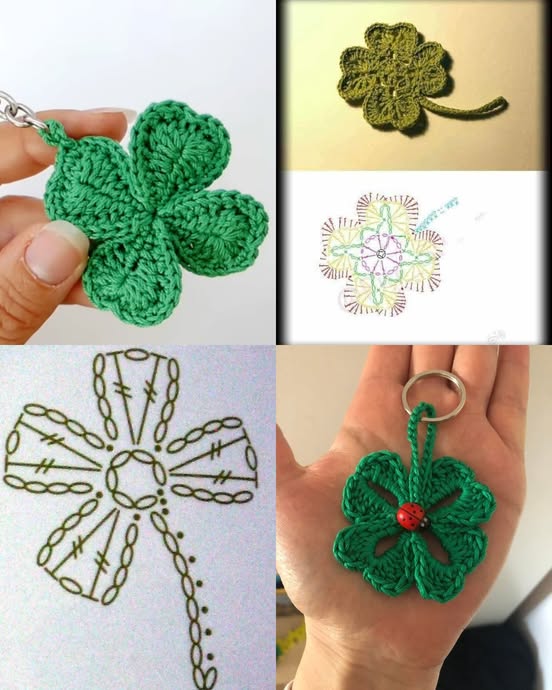
Start by creating a slip knot and placing it on your crochet hook. The first round of the clover is a simple chain stitch. Create a chain of 4 stitches and join them with a slip stitch to form a loop. This will be the base of your clover.
Next, you’ll need to crochet the petals of the clover. Start by making 6 double crochet stitches into the loop you’ve just formed. Once you’ve completed the first petal, join it with a slip stitch to close it off. Repeat this process until you have four petals, each made with 6 double crochet stitches. The key here is to make sure that each petal is even and consistent.
After completing the four petals, you will want to cut the yarn, leaving a small tail. Using your tapestry needle, weave in the loose ends, ensuring that the crochet clover maintains its shape.
To make the keychain loop, simply chain 12 stitches and then attach the loop to the top of your clover with a slip stitch. This loop will allow you to easily attach your clover to a keyring or keychain clip.
3. Attaching the Keychain Ring and Final Touches
Once your crochet clover is complete, the next step in the Crochet Clover Keychain – Tutorial is to attach the keychain ring. This is where your clover becomes a functional and stylish accessory.
Begin by threading the loop you created through the keychain ring. Carefully pull the loop tight so that the ring is securely attached to the clover. If you prefer a keychain clip, you can easily attach it to the loop instead of a traditional keyring.
Once the keychain ring is attached, take a moment to ensure that all the petals are evenly spaced and the clover looks symmetrical. If necessary, you can adjust the petals to give them a more balanced appearance.
For extra durability, you can add a small drop of fabric glue where the keychain ring attaches to the loop. This ensures that your keychain stays intact and doesn’t come apart over time. Allow the glue to dry fully before using your new accessory.
4. Customizing Your Crochet Clover Keychains
One of the best things about making crochet clover keychains is that you can customize them in a variety of ways. Whether you want to add a personal touch or experiment with different colors, there are endless possibilities for customization.
Consider using different yarn colors to create unique variations of the clover. For example, you could use green yarn for the petals to represent the traditional color of a lucky clover, or you could mix it up with pastel shades for a more playful look. You could even add small beads to the center of the clover for extra flair.
Another way to personalize your keychain is by adding small embellishments like buttons or charms. These can be sewn onto the petals or the loop of the keychain for a one-of-a-kind accessory. Don’t be afraid to get creative and make your crochet clover keychain truly unique!
If you’re giving the keychain as a gift, consider adding a personalized tag or attaching a small note explaining the symbolism behind the clover. This thoughtful gesture will make the keychain even more special.
Lastly, try making matching sets of clover keychains in different sizes for friends and family. This way, each person can have their own lucky charm, and you can share the joy of this fun crochet project with others.
FAQ: Frequently Asked Questions about Crochet Clover Keychains
1. How long does it take to make a crochet clover keychain?
The time it takes to create a crochet clover keychain depends on your skill level and the complexity of your design. On average, it should take around 30 to 45 minutes for a beginner.
2. Can I use different types of yarn for crochet clover keychains?
Yes! You can experiment with various yarn types like cotton, acrylic, or wool. The texture and appearance may vary, but the keychain will still turn out beautifully.
3. Is this tutorial suitable for beginners?
Absolutely! This Crochet Clover Keychain – Tutorial is perfect for beginners who are just learning the basics of crochet. It uses simple stitches and is a great way to practice.
4. Can I make larger clover keychains?
Yes, you can make larger clover keychains by using thicker yarn and a larger crochet hook. Just adjust the number of stitches for the petals accordingly.
5. How can I make my crochet clover keychain more durable?
To make your keychain more durable, consider using a stronger yarn and ensuring that all your ends are securely woven in. Adding a small amount of fabric glue to the keychain ring can also help.
6. What other uses can I give to crochet clover shapes?
Besides keychains, you can use crochet clover shapes for embellishing bags, hats, or scarves. They can also be sewn onto greeting cards or used as appliqués for quilts or blankets.
Join our VIP broadcast list and gain access to exclusive patterns, all for free. As a VIP member, you’ll receive the best patterns daily, delivered directly to your device. ✨📱 It’s a unique opportunity to stay up-to-date with the latest trends and designs, curated just for you. Don’t miss out on enhancing your projects and discovering new inspirations with the best patterns every day! 🎨🔝
Conclusion
In this Crochet Clover Keychain – Tutorial, you’ve learned how to create a beautiful and lucky crochet accessory that’s both simple and customizable.
From gathering your materials to adding the finishing touches, this project is perfect for anyone looking to try their hand at crochet or create a meaningful gift. Remember, the best part of crafting your own keychain is that you can personalize it in any way you like.
We’d love to hear your thoughts! Please leave a sincere opinion or any suggestions you have about this tutorial. Your feedback is always welcome!


