
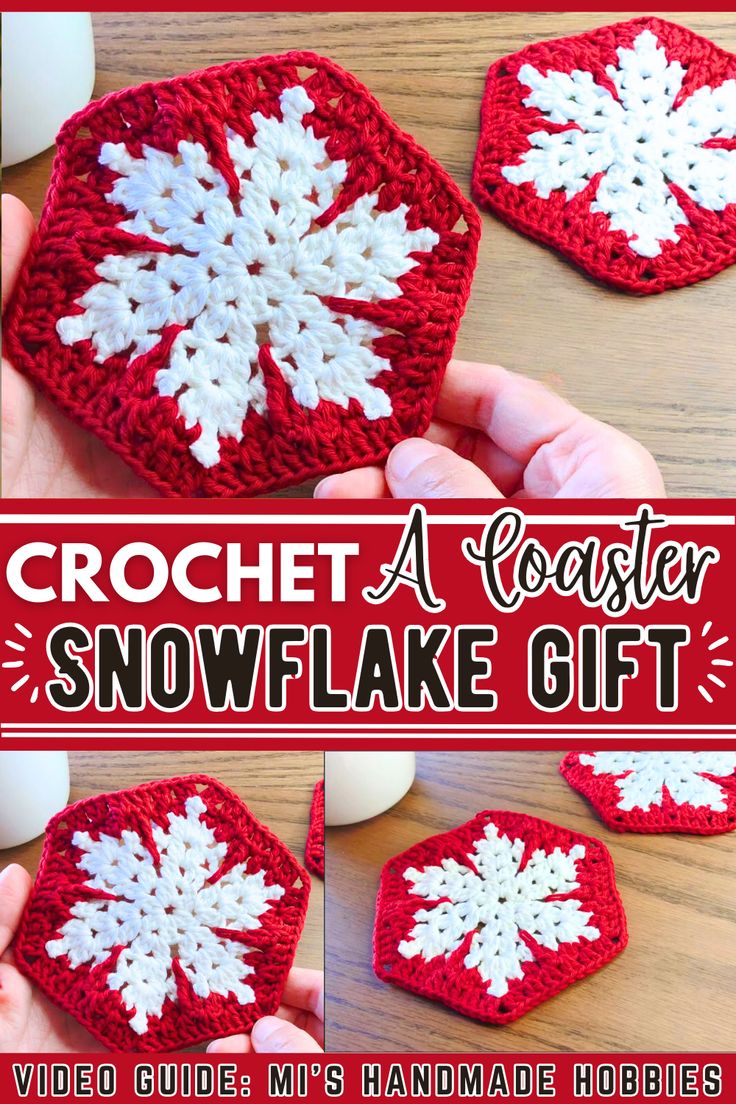
Crochet Coaster Snowflake – TUTORIAL: If you’re looking for a beautiful and functional crochet project to elevate your winter decor, then you’re in the right place!
Snowflake coasters are a perfect choice for beginners and experienced crocheters alike, offering charm and utility in one.
These handmade pieces are ideal for your coffee table during the holiday season or as thoughtful gifts for friends and family.
The best part? This project is quick, easy, and highly customizable. You can choose your favorite yarn colors, experiment with sizes, and even add embellishments to make each piece truly unique.
In this Crochet Coaster Snowflake – TUTORIAL, we will take you step by step through the process, ensuring you can create stunning snowflake coasters with confidence.
Follow along as we break the project into manageable steps. With clear instructions, helpful tips, and a focus on quality, you’ll soon have beautiful coasters to enjoy or share. Let’s get started!
1. Materials and Tools You Will Need
Before you begin your Crochet Coaster Snowflake – TUTORIAL, gathering the right materials is essential. Using appropriate tools will make your crocheting smoother and more enjoyable.
- Yarn: Choose lightweight or medium-weight yarn for this project. Cotton yarn is highly recommended as it offers durability and a polished finish.
- Crochet Hook: For most snowflake coasters, a hook size between 3.5mm (E) and 4.5mm (G) works best. The hook size will determine the final size of your snowflake.
- Scissors: A sharp pair of scissors will help you cut yarn cleanly and avoid frayed edges.
- Tapestry Needle: This tool will be used for weaving in the yarn ends to finish off your project neatly.
- Stitch Markers: Optional, but helpful for marking specific points, especially for beginners.
- Blocking Tools: Blocking your snowflake coasters will give them a professional look. Use blocking pins, a foam board, and some spray starch to stiffen the coasters.
By having these materials ready, you’ll ensure a smooth crocheting experience without interruptions. Using quality tools also improves the finished product’s durability and aesthetic appeal.
2. Basic Crochet Stitches for Snowflake Coasters
Before diving into this Crochet Coaster Snowflake – TUTORIAL, it’s important to master the basic stitches that will form the foundation of your snowflake design.
- Chain Stitch (ch): This is the simplest crochet stitch and serves as the base for most projects. To create a chain stitch, yarn over (YO) and pull through the loop on your hook.
- Slip Stitch (sl st): Used to join rounds or finish sections neatly, the slip stitch creates a seamless connection between stitches.
- Single Crochet (sc): Insert the hook into the stitch, yarn over, pull through, yarn over again, and pull through both loops. This stitch provides a tight and compact structure.
- Double Crochet (dc): Yarn over, insert the hook, yarn over, pull through, yarn over, pull through two loops, and yarn over again to pull through the remaining two loops. This stitch adds height and texture.
- Picot Stitch: Often used for decorative edges, the picot stitch involves creating small loops that give snowflakes a delicate, intricate appearance.
- Magic Ring: This technique is essential for starting circular patterns, such as snowflakes, and ensures there is no visible hole in the center.
By practicing these basic stitches, you’ll be well-prepared to tackle the snowflake pattern with confidence. Combining these stitches allows you to create texture, detail, and shape in your coaster design.
3. Step-by-Step Instructions for the Snowflake Coaster
Now let’s dive into the main part of this Crochet Coaster Snowflake – TUTORIAL. Follow these simple steps to create a beautiful and functional snowflake coaster.
- Step 1: Start with the Magic Ring: Begin with a magic ring and secure it with a slip stitch. This will form the foundation of your coaster.
- Step 2: Round 1 – Form the Center: Work 12 double crochet stitches into the magic ring. Close the round with a slip stitch into the first double crochet. Tighten the magic ring to close the center.
- Step 3: Round 2 – Create Petals: In each stitch around the center, work one chain stitch and one double crochet. Repeat this pattern around the entire circle to form the first layer of snowflake petals.
- Step 4: Round 3 – Add Decorative Details: Use a combination of picot stitches and chain loops to create points on each snowflake petal. This step adds the intricate, delicate details that make snowflake coasters stand out.
- Step 5: Finishing the Edges: Add a final round using slip stitches to outline the snowflake and reinforce its shape. This helps ensure the coaster is durable.
- Step 6: Blocking Your Coaster: Pin your finished snowflake to a foam board and spray with starch. Allow it to dry completely to stiffen the coaster and maintain its shape.
Congratulations! You now have a beautiful handmade snowflake coaster. Repeat the steps to make a set of coasters for yourself or to gift to loved ones.
4. Tips for Customizing Your Snowflake Coasters
The beauty of this Crochet Coaster Snowflake – TUTORIAL lies in its versatility. Here are tips to customize your snowflake coasters:
- Experiment with Colors: While white or off-white yarn is classic for snowflakes, you can experiment with blues, reds, or even metallic yarns to suit your decor.
- Add Beads or Embellishments: Sew small beads onto the points of your snowflake for a sparkling effect. Beads add a festive and elegant touch to your coasters.
- Change the Yarn Weight: Using bulkier yarn will result in larger coasters, while thinner yarn creates delicate and smaller pieces.
- Create Matching Sets: Make a set of snowflake coasters in different colors or sizes for a coordinated, handmade look.
- Use Different Stitches: Replace double crochet stitches with half-double or treble stitches for a unique texture and appearance.
- Make It a Garland: Attach multiple snowflakes together using a chain stitch to create a festive garland for your home.
Customizing your crochet project makes it even more special and allows you to create one-of-a-kind pieces that reflect your personal style.
FAQ: Frequently Asked Questions
1. How long does it take to make one crochet snowflake coaster?
On average, it takes about 30-45 minutes to crochet one snowflake coaster, depending on your experience level and stitch speed.
2. Can I use wool yarn instead of cotton?
Yes, you can use wool, but cotton yarn is recommended for durability, especially if you plan to use the coaster for hot drinks.
3. How do I clean my crochet snowflake coasters?
Hand wash gently with mild soap, reshape, and lay flat to dry to maintain the coaster’s shape.
4. What if my snowflake doesn’t lay flat?
Blocking the snowflake is essential. Pin it down and use spray starch to stiffen and flatten the shape.
5. Can beginners make these snowflake coasters?
Absolutely! This tutorial breaks down the process step by step, making it beginner-friendly.
Join our VIP broadcast list and gain access to exclusive patterns, all for free. As a VIP member, you’ll receive the best patterns daily, delivered directly to your device. ✨📱 It’s a unique opportunity to stay up-to-date with the latest trends and designs, curated just for you. Don’t miss out on enhancing your projects and discovering new inspirations with the best patterns every day! 🎨🔝
Conclusion
In this Crochet Coaster Snowflake – TUTORIAL, we covered everything you need to create beautiful and functional snowflake coasters.
From gathering the right materials to mastering basic stitches and following the step-by-step instructions, you now have all the tools to succeed. These handmade coasters are perfect for decorating your home or gifting during the holiday season.
We hope you enjoyed this tutorial! Please leave a sincere opinion and any suggestions in the comments below. Happy crocheting!


