
Crochet Cookies Tutorial – Free Pattern is the perfect starting point for crafters who want to combine creativity, relaxation, and a touch of sweetness in their projects. Making crochet cookies is not just about following stitches; it is about bringing handmade joy into your home and creating charming gifts for family and friends.
In this article, we will explore everything you need to know about creating your own crochet cookies, using the Crochet Cookies Tutorial – Free Pattern to guide you step by step. Whether you are a beginner or an experienced crocheter, these delightful treats will add a whimsical flair to your craft collection.
Using the Crochet Cookies Tutorial – Free Pattern allows you to create realistic, adorable designs that resemble your favorite baked goodies. They are perfect for home décor, play food for children, or even as small gifts for cookie lovers.
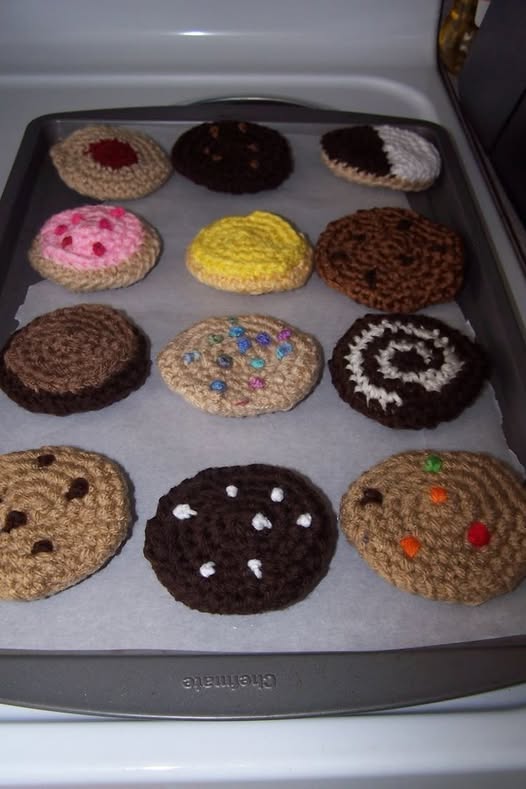
With the right yarn colors and stitch techniques, you can replicate chocolate chip cookies, sugar cookies, or even sandwich-style treats without turning on an oven. The best part is that these crochet cookies will never go stale, making them a timeless addition to your projects.
Before diving into the detailed instructions, take a moment to gather your materials and prepare your workspace. To make the most of the Crochet Cookies Tutorial – Free Pattern, you will need soft cotton yarn in cookie-like shades, a crochet hook suited to your yarn size, and some fiberfill for shaping.
A pair of scissors, a yarn needle, and optional embellishments like beads or embroidery thread for “sprinkles” will also be handy. Setting up your space ensures you can focus entirely on your stitches and enjoy the process without interruptions.
1. Materials and Preparation for Crochet Cookies
First, choose yarn colors that mimic your favorite cookie flavors. Light beige or tan yarn works wonderfully for sugar or chocolate chip cookies, while brown yarn creates a deep chocolate look. Cotton yarn is recommended because it holds its shape well and offers a soft texture. Selecting quality materials at this stage will help your cookies look neat and professional once complete.
Second, select a crochet hook size that matches your yarn. A 3.5 mm or 4 mm hook is a popular choice for amigurumi-style cookies. A hook that is too large may create gaps in your stitches, while one that is too small can make crocheting unnecessarily difficult. Following the hook recommendation on your yarn label is a great starting point.
Third, prepare your fiberfill stuffing. While these cookies are relatively small, adding just a touch of stuffing between the two crochet layers gives them a plump, realistic appearance. Avoid overstuffing, which can distort the cookie shape, and focus on even distribution for a smooth finish.
Fourth, consider embellishments. Small black beads or French knots created with embroidery thread are perfect for replicating chocolate chips. Colorful beads or tiny scraps of yarn can serve as “sprinkles” for sugar cookies or frosted designs. These details add character to your cookies and make them truly unique.
Fifth, set up a comfortable workspace. Good lighting, a stable surface, and a relaxed environment make the process more enjoyable. Place all your tools within reach so you can keep your focus on following the Crochet Cookies Tutorial – Free Pattern without interruptions.
Finally, review basic crochet stitches such as single crochet, slip stitch, and working in the round. Being familiar with these techniques before you begin ensures the process flows smoothly, especially if you are still developing your crochet skills.
2. Step-by-Step Guide to Making the Crochet Cookies
Begin by creating a magic ring and working single crochet stitches into it. This technique is the foundation for making flat, round shapes that will form the cookie layers. Tighten the ring to close the hole completely—this gives your cookie a clean, professional start.
Next, continue crocheting in the round, increasing your stitches evenly to create a flat circle. This will be one side of your cookie. Use a stitch marker to keep track of your rounds if needed. Working evenly prevents the cookie from becoming wavy or uneven.
Once you reach your desired cookie diameter, crochet a second identical circle. This will serve as the back of your cookie. Consistency between the two sides is essential for a polished look, so count your stitches carefully.
Place the two circles together with their wrong sides facing inward. Begin crocheting around the edges using single crochet stitches to join them. Before closing the circle entirely, add a small amount of fiberfill stuffing to give your cookie its plump shape.
After stuffing, continue crocheting to close the edge completely. Secure your yarn with a slip stitch and weave in the ends neatly using a yarn needle. This creates a smooth finish and ensures your cookie holds its shape.
Finally, embellish your cookie. Sew on beads for chocolate chips, embroider sprinkles, or add frosting details with contrasting yarn. These small additions elevate your crochet cookies from simple circles to charming replicas of real treats.
3. Creative Uses for Your Crochet Cookies
One popular use for crochet cookies is home décor. Arrange them in a decorative bowl on your coffee table or kitchen counter for a whimsical touch that adds warmth to any space. They are especially fun as seasonal decorations for holidays or tea parties.
Another idea is to create play food for children. Crochet cookies are safe, soft, and perfect for imaginative play kitchens. They encourage creative role-playing without the mess of real food, making them a hit with both kids and parents.
Crochet cookies also make thoughtful gifts. Pair a set of cookies with a handmade mug cozy or a recipe card for a unique, personalized present. They are an excellent choice for birthdays, housewarming parties, or holiday stockings.
Additionally, these cookies can serve as cute photography props. Use them in flat lays for social media or as part of a craft showcase. Their bright, playful appearance adds charm to any photo composition.
Crafters may also sell their crochet cookies at craft fairs or online shops. Handmade items like these often attract buyers looking for unique, artisanal goods. Just be sure to credit the Crochet Cookies Tutorial – Free Pattern if you are following a specific design shared by another creator.
Lastly, consider using crochet cookies as keychains or bag charms. Attach a small loop and a metal keyring to transform your cookie into an accessory you can carry everywhere. This is a simple way to showcase your crafting skills daily.
4. Tips for Perfecting Your Crochet Cookies
Pay attention to tension while crocheting. Consistent tension ensures your stitches are uniform and your cookie edges are smooth. Uneven stitches can cause your cookie to look lopsided or bumpy.
Use stitch markers to track your rounds, especially if you are new to crocheting in the round. This prevents miscounts and keeps your cookies symmetrical.
Experiment with different yarn textures and colors. For example, using a slightly fuzzy yarn can give your cookie a soft, crumbly appearance, while shiny yarn can mimic glazed frosting.
Practice joining techniques for a clean finish. When crocheting the two cookie sides together, keep your stitches even and avoid gaps. A neat join makes the final product look professional.
Don’t rush the embellishments. Adding details like sprinkles or frosting takes time, but these finishing touches make your cookies stand out. Small beads or yarn scraps can transform a simple circle into a delightful treat.
Finally, always block your crochet cookies if needed. Lightly steaming or shaping them can help smooth out any uneven edges, ensuring your cookies look as polished as possible.
FAQ
Q: What skill level is needed for the Crochet Cookies Tutorial – Free Pattern?
A: This project is perfect for beginners. Basic knowledge of single crochet, slip stitch, and working in the round is all you need to get started.
Q: What type of yarn works best for crochet cookies?
A: Cotton yarn is recommended because it holds its shape well and gives a smooth finish, but you can experiment with acrylic or blended yarns for different textures.
Q: Can I make different cookie designs using this tutorial?
A: Absolutely! Change yarn colors, add beads or embroidery, or adjust the size to create sugar cookies, chocolate chips, or even macarons.
Q: How long does it take to make one crochet cookie?
A: Most crocheters can complete a cookie in 30 to 60 minutes, depending on their skill level and added embellishments.
Q: Can crochet cookies be washed?
A: Yes, but it’s best to hand wash them gently and air dry to maintain their shape and details.
Q: Are crochet cookies safe for small children?
A: They are safe as long as you avoid small embellishments like beads that could pose a choking hazard. For young children, embroider the details instead of using beads.
In conclusion, the Crochet Cookies Tutorial – Free Pattern provides an easy and fun way to create adorable crochet treats. We covered everything from gathering materials and crafting the cookies to creative uses and finishing tips.
With a bit of practice and creativity, you can make a variety of cookies that look good enough to eat—without the calories! Share your experiences and leave a sincere opinion or suggestions about your own crochet cookie creations. Your feedback will inspire and guide other crafters on their crochet journey.


