
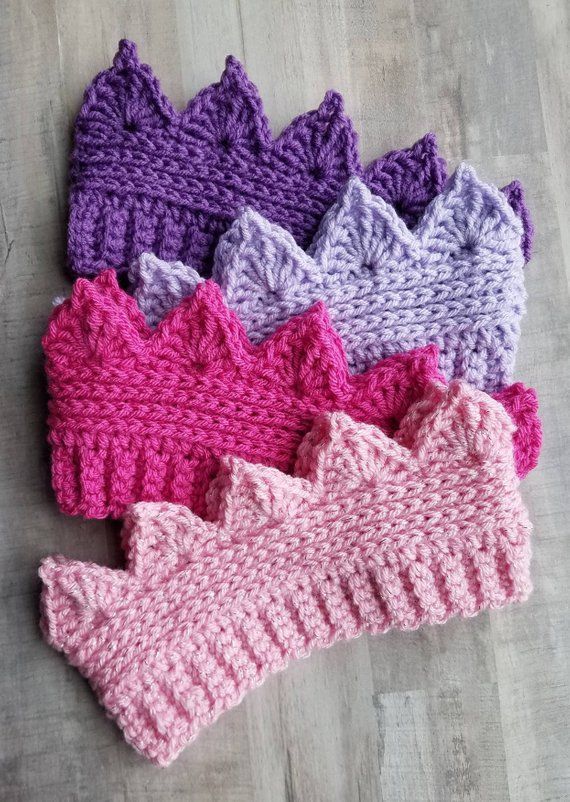
Creating a Crochet Crown – FREE PATTERN is a delightful way to add a royal touch to your handmade accessories. Whether for a costume, a themed party, or simply as a unique gift, a crochet crown is a charming project. In this tutorial, we will guide you through every step to help you craft a beautiful and intricate crown with ease.
Crocheting a crown is not only a fun and creative project but also a great way to practice different crochet stitches. With the right materials and techniques, you can make an elegant and sturdy crown that will be cherished for years. This guide will provide detailed instructions, helpful tips, and tricks to ensure your crochet crown turns out perfect.
By following this Crochet Crown – FREE PATTERN, you will learn the best yarn choices, ideal hook sizes, and step-by-step directions to create a stunning crown. Whether you are a beginner or an experienced crocheter, this tutorial will help you achieve a beautiful result.
1. Materials and Tools Needed
Before starting your Crochet Crown – FREE PATTERN, it’s essential to gather the right materials. Having the appropriate tools will ensure a smooth and enjoyable crocheting experience.
- Yarn Selection: Choose a medium-weight yarn for a structured and durable crown. Cotton or acrylic yarn works well.
- Crochet Hook: A 3.5mm to 4.5mm crochet hook is ideal for creating firm stitches.
- Tapestry Needle: Used for weaving in the ends and adding embellishments.
- Scissors: A sharp pair of scissors is necessary for cutting the yarn.
- Beads and Embellishments: If you want to add a decorative touch to your crown.
Choosing the right materials will ensure the crown maintains its shape and durability. Experiment with different yarn textures to achieve the desired look.
2. Step-by-Step Instructions
Now that you have your materials ready, let’s begin crocheting your beautiful crown. Follow these simple steps to create your Crochet Crown – FREE PATTERN.
- Step 1: Create the Foundation Chain Start by making a foundation chain that fits around the head. Ensure it is a multiple of six stitches for the pattern to align correctly.
- Step 2: Join to Form a Loop Slip stitch the last chain to the first one to form a ring. Be careful not to twist the chain.
- Step 3: Work the First Row Use single crochet stitches to create a firm base. This will provide the necessary structure for the crown.
- Step 4: Create the Crown Peaks Work a series of picot or shell stitches to form the peaks of the crown. Adjust the stitch count for a more detailed design.
- Step 5: Add Embellishments If desired, sew beads or small pearls onto the peaks to give a royal touch.
- Step 6: Finish and Secure Ends Weave in all loose ends with a tapestry needle to complete your project neatly.
3. Customizing Your Crochet Crown
Personalizing your Crochet Crown – FREE PATTERN is a fun way to make it unique. Here are some ideas to customize your design:
- Color Variations: Use different colors to create a vibrant and eye-catching crown.
- Different Stitch Patterns: Try lace, shell, or bobble stitches for a distinctive look.
- Add Ribbons or Pearls: Sew or attach decorative elements to enhance the elegance.
- Size Adjustments: Modify the initial chain count to create crowns for babies, children, or adults.
- Use Metallic Yarn: A metallic or glitter-infused yarn will add a luxurious touch.
- Create a Matching Set: Make a matching scepter or wand to complete the royal ensemble.
4. Care and Maintenance
To keep your crochet crown looking its best, follow these simple care instructions:
- Hand Wash Only: Use mild detergent and cold water to prevent damage.
- Lay Flat to Dry: Avoid wringing out the crown; instead, lay it flat on a towel to air dry.
- Store Properly: Keep it in a cool, dry place to maintain its shape.
- Avoid Heavy Handling: Handle the crown gently to preserve its intricate stitches.
- Steam Blocking: Use steam to gently reshape the peaks if they lose their form.
- Reinforce Stitches: If any stitches come loose, secure them with a needle and matching yarn.
FAQ: Frequently Asked Questions
Q: Can I make this crochet crown for a baby?
A: Yes! Simply adjust the initial chain count and use a soft baby-friendly yarn.
Q: How long does it take to crochet a crown?
A: It depends on your skill level, but typically, it takes 2 to 3 hours.
Q: Can I use thicker yarn for the crown?
A: Yes, but ensure your hook size matches the yarn weight to maintain structure.
Q: Is this pattern suitable for beginners?
A: Absolutely! The pattern includes basic stitches, making it ideal for all skill levels.
Q: How do I make the crown stiff?
A: Use starch spray or a diluted glue mixture to stiffen the crown if needed.
Q: Can I sell crochet crowns made from this pattern?
A: Yes! Handmade crochet crowns make beautiful gifts and sell well at craft fairs.
Join our VIP broadcast list and gain access to exclusive patterns, all for free. As a VIP member, you’ll receive the best patterns daily, delivered directly to your device. ✨📱 It’s a unique opportunity to stay up-to-date with the latest trends and designs, curated just for you. Don’t miss out on enhancing your projects and discovering new inspirations with the best patterns every day! 🎨🔝
Conclusion
This Crochet Crown – FREE PATTERN is a fun and rewarding project that allows for creativity and personalization. Whether you are making it for a child’s birthday, a themed event, or simply as a beautiful handmade accessory, this guide provides everything you need to create a stunning crown.
We hope you found this tutorial helpful! If you try this pattern, please leave a comment below with your thoughts, suggestions, or photos of your finished creation. Happy crocheting!


