
Macrame Heart Bracelet - Free Tutorial

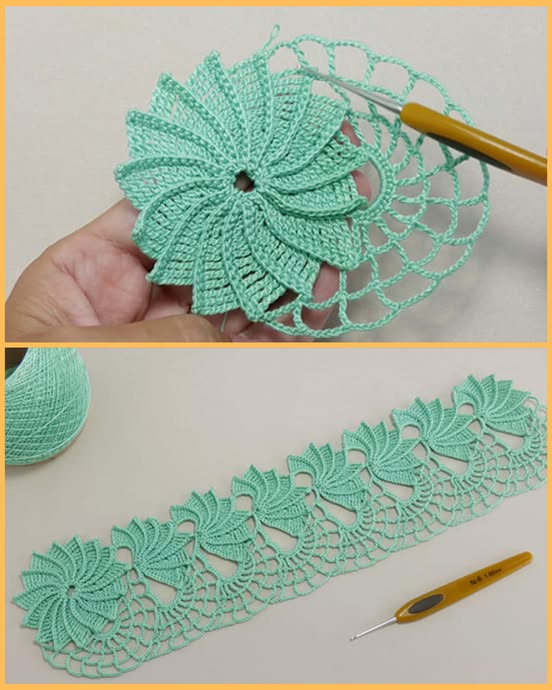
If you love adding charming handmade details to your projects, this Crochet Flower Ribbon – Free Pattern is the perfect choice for you.
Whether you are decorating gift packages, adding accents to garments, or enhancing your home décor, this adorable crochet ribbon will bring a lovely touch to anything you create.
The beauty of the Crochet Flower Ribbon – Free Pattern lies in its versatility. You can use it to make headbands, bookmark straps, curtain tiebacks, or embellishments for bags and hats. It’s a creative and enjoyable project that lets you use up yarn scraps in the most delightful way.
In this detailed guide, we’ll walk you through everything you need to create your own Crochet Flower Ribbon – Free Pattern.
From materials to step-by-step instructions, this article is designed to help crocheters of all skill levels complete this beautiful and functional design.
Before you begin your Crochet Flower Ribbon – Free Pattern, it’s important to gather the right materials. Having the proper supplies on hand ensures your project goes smoothly from start to finish.
First, you will need yarn. This pattern works beautifully with lightweight yarn such as cotton, which provides crisp and well-defined stitches. You can also use leftover yarn scraps to create a variety of colorful flowers.
Selecting the right crochet hook is essential. Typically, a 2.5 mm to 4 mm hook works well, depending on your yarn thickness. Check your yarn label for the recommended hook size or adjust to achieve the desired tension.
Sharp scissors are a must for trimming yarn ends neatly. A tapestry needle is also necessary for weaving in loose ends and connecting flowers if needed.
Optional but recommended are stitch markers. These help keep track of your rounds, especially when crocheting multiple flowers in a row.
You may also want buttons, beads, or pearls to add as embellishments at the center of each flower, giving your Crochet Flower Ribbon – Free Pattern an extra decorative touch.
Lastly, prepare a measuring tape if you need your ribbon to fit specific lengths, such as for bookmarks or headbands.
Now let’s dive into crocheting the adorable flowers that make up the Crochet Flower Ribbon – Free Pattern. This step is fun, quick, and satisfying.
Begin by making a magic ring. This is the foundation for most crochet flowers, allowing you to start in the center without leaving a hole.
Work the center of the flower by crocheting single crochets or half-double crochets into the ring. Typically, 6 to 8 stitches form the base round for small flowers.
Once the center is complete, start forming the petals. Petals are usually created with combinations of chains, single crochets, double crochets, and slip stitches.
For example, a simple petal may consist of chaining 3, working 2 double crochets in the same stitch, and slip stitching into the next stitch.
Repeat this petal sequence all around the center circle until you have a full flower. Most small flowers have 5 to 6 petals depending on your initial stitch count.
Fasten off the flower, leaving a long tail if you plan to sew it onto the ribbon. Alternatively, you can crochet directly onto the ribbon as you progress.
With your flowers ready, it’s time to crochet the ribbon that connects them. The ribbon can be as simple or elaborate as you wish, but it’s usually a narrow strip of stitches.
Start by chaining the length you desire for your Crochet Flower Ribbon – Free Pattern. For bookmarks, around 60 to 80 chains is typical. For headbands or curtain ties, you may need over 100 chains.
Work a row of single crochets into each chain for a firm, neat base. This is the simplest and most common approach for the ribbon.
For a lacier look, consider alternating chains with single or double crochets, forming small gaps that add visual interest to the ribbon.
Another lovely option is to create scalloped edges. This involves working groups of stitches (like 5 double crochets) into a single stitch, then skipping a stitch and repeating.
Attach your flowers either by crocheting them directly into the ribbon stitches or sewing them afterward using the tails left when finishing each flower.
Spacing the flowers evenly along the ribbon is important for a balanced look. You can cluster them together or spread them out depending on your design preference.
Once your Crochet Flower Ribbon – Free Pattern is assembled, it’s time to focus on finishing touches and styling ideas to make your project shine.
Secure all loose ends by weaving them in with a tapestry needle. This ensures your ribbon is tidy and durable.
Consider adding buttons, beads, or pearl accents to the center of each flower for a polished and decorative finish. These little details make a big difference.
If you want to stiffen the ribbon for certain uses (like wall hangings or bookmarks), lightly spray it with starch and block it into shape as it dries.
Think about the purpose of your ribbon. If it’s for gift wrapping, leave the ends simple. For headbands or tiebacks, you might want to add small loops or ties to each end.
You can also join multiple ribbons together to create larger decorative pieces, such as garlands for parties, weddings, or nurseries.
Don’t be afraid to experiment with different yarn colors and textures. Variegated yarn creates beautiful, multicolored flowers, while metallic threads add a subtle shimmer.
1. Is the Crochet Flower Ribbon suitable for beginners?
Yes! This is a beginner-friendly project. It uses basic stitches like chain, single crochet, double crochet, and slip stitch, making it easy to follow.
2. How much yarn do I need for this pattern?
Very little! You can complete an entire ribbon with small leftover scraps. Depending on the length, 20 to 50 grams of yarn is usually enough.
3. Can I make the ribbon longer or shorter?
Absolutely. Simply adjust the number of starting chains to create the length you need for bookmarks, headbands, or decorative tiebacks.
4. What type of yarn works best for this pattern?
Cotton yarn is ideal because it holds shape well and gives crisp stitch definition. However, you can use acrylic or blended yarns for different textures.
5. How do I attach the flowers to the ribbon?
You can either crochet them directly onto the ribbon as you go or sew them afterward using the yarn tails and a tapestry needle.
6. Is the Crochet Flower Ribbon washable?
Yes. If you use cotton or acrylic yarn, it can be hand washed or gently machine washed. Be cautious with added embellishments like buttons or beads.
The Crochet Flower Ribbon – Free Pattern is a delightful project that brings beauty and charm to any craft or gift. From creating the lovely little flowers to assembling the ribbon and adding your own special touches, this tutorial gives you everything you need to succeed.
Whether you’re making a thoughtful handmade gift or adding a pretty accessory to your home décor, the Crochet Flower Ribbon – Free Pattern offers endless creative possibilities. I hope you enjoyed this tutorial and found it helpful. Please leave your sincere opinion in the comments and share any suggestions or ideas for future patterns. Your feedback is incredibly valuable and helps inspire new creative journeys for everyone in our community.


