
If you’re looking for a practical yet beautiful way to organize your home, the Crochet Hanging Basket – Free Pattern is the perfect project. Right from the first stitch, this handmade storage solution offers both charm and functionality.
Whether you’re a beginner or an experienced crocheter, this pattern is designed to be easy to follow and fun to create. Plus, it works up quickly, making it an ideal last-minute gift or home décor addition.
Using a Crochet Hanging Basket – Free Pattern is a fantastic way to bring handmade warmth into any room. These baskets are perfect for holding garlic in the kitchen, storing small items in the bathroom, or organizing craft supplies in your studio.
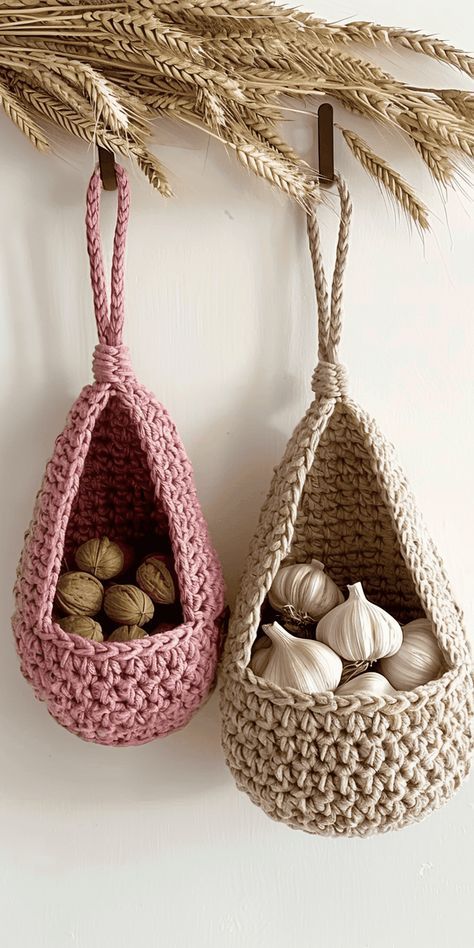
Their natural texture and neutral tones can match any style, from rustic to modern minimalist. And since they’re crocheted by hand, every piece carries a unique, personal touch.
This tutorial will guide you through each step of the process, from choosing materials to creating the hanging loop. You’ll also learn how to customize your basket in terms of size and style, so you can make several versions for different uses. Whether you’re crocheting for your own home or creating thoughtful handmade gifts, the Crochet Hanging Basket – Free Pattern is a wonderful project to add to your collection.
1. Materials and Yarn Suggestions
To begin your Crochet Hanging Basket – Free Pattern, you’ll need a few basic supplies. Choosing the right yarn is essential for creating a basket that is both sturdy and stylish. For best results, opt for thick, durable fibers that hold their shape well.
First, you’ll need bulky cotton yarn, t-shirt yarn, or even macramé cord. These materials provide enough structure for the basket to stay upright and carry small items like produce or yarn balls. Cotton is especially popular because it’s washable and eco-friendly.
You’ll also need a crochet hook that matches your yarn thickness. Most patterns recommend between a 6.0 mm and an 8.0 mm hook. Using a slightly smaller hook than usual can help your stitches be tighter, which gives the basket more strength.
In addition to yarn and hook, prepare scissors and a yarn needle for weaving in your ends. A wooden or metal ring is optional but can add strength and aesthetic appeal to the hanging loop. These rings are great if you plan to hang your baskets from hooks or knobs.
You may also want a stitch marker to help you keep track of your rounds, especially when working in spirals. This small detail can make the process more efficient and help maintain a uniform shape.
Make sure your yarn color fits your décor. Neutral tones like beige, ivory, and gray work well for minimalist spaces, while bolder shades like mustard or terracotta can add a pop of color. It’s always fun to personalize the palette of your Crochet Hanging Basket – Free Pattern.
Finally, keep comfort in mind while crocheting. Thicker yarn can be harder on the hands, so take breaks and use ergonomic hooks if needed. Enjoy the process—this is as much about relaxation as it is about the finished product.
2. Step-by-Step Instructions for the Base
The base of your Crochet Hanging Basket – Free Pattern determines the size and shape of the entire basket. You’ll begin by working in the round, using simple stitches to form a solid circular foundation.
Start with a magic ring or a chain loop. A magic ring allows for a tighter, cleaner center, which is ideal for structural stability. Into this ring, you’ll place your first round of single crochets (sc)—usually around six stitches.
From here, you’ll increase each round to build a flat circle. For example, in round two, place two sc in each stitch around. In round three, alternate one sc with two sc in the next stitch. This gradual increase helps the circle stay flat without curling.
Continue increasing until the base is the diameter you desire—typically 4 to 6 inches across for small baskets. Keep your tension even, and don’t worry if the edges curl slightly; they will straighten once the sides are added.
Once your base is the right size, crochet one round without increases to prepare for the side walls. This helps transition from the flat base to vertical sides cleanly and makes the structure sturdier.
If you’d like a deeper basket, simply add more rounds of increases before transitioning to the sides. On the other hand, fewer rounds will result in a narrower, taller design. This is one of the ways to personalize your Crochet Hanging Basket – Free Pattern.
Use a stitch marker at the beginning of each round to help maintain your place, especially if you’re working in continuous rounds without joining. This small habit improves symmetry and results in a professional look.
3. Shaping the Basket and Creating the Opening
Now that your base is ready, you’ll begin forming the walls of your Crochet Hanging Basket – Free Pattern. This step defines the overall structure and gives the basket its functional shape.
Begin by working single crochet stitches into the back loop only of each stitch around the base. This technique creates a crisp edge that separates the base from the sides and helps the basket stand upright.
Continue crocheting in rounds, building up the height with each pass. Most baskets are around 10 to 15 rows tall, depending on your needs. The taller the basket, the more it can hold, but it’s also important to balance height with stability.
To make the front scoop opening seen in many hanging basket designs, you’ll begin working short rows after reaching mid-height. Simply crochet only part of the way around, turn your work, and continue back. Repeat this for several rows to shape the opening.
Once the scoop is the depth you want, return to working in full rounds to even out the top. This gives your basket a clean, finished appearance and prepares it for the hanging loop.
Optional decorative touches at the top include crab stitch (reverse single crochet) for a firm edge or a round of slip stitches for a subtle finish. Both methods help reinforce the basket’s structure.
The sides are now complete! Whether you’ve made a deep or shallow version, your Crochet Hanging Basket – Free Pattern is coming together beautifully.
4. Making and Attaching the Hanging Loop
No Crochet Hanging Basket – Free Pattern is complete without a strong, stylish hanging loop. This is the final touch that makes your basket functional and ready to display.
The simplest method is to chain around 25–30 stitches after the final round of the basket. Then, join the chain to the opposite side with a slip stitch, forming a loop. To make the loop stronger, crochet a second round of single crochets into the chain.
Another option is a braided handle. Make three short chains, stitch single crochets along each one, and then braid them together. Attach each end to the top of the basket securely. This adds a handmade rustic flair.
You can also use wooden or metal rings for a sleek, modern look. Create a short strap at the top of the basket and loop it through the ring before stitching it closed. This method is both stylish and strong.
When attaching the loop, make sure it’s centered and secure. Reinforce with extra stitches or even a few whip stitches for added strength. A weak loop could cause the basket to fall when filled with items.
Keep the hanging height in mind. If your basket will hang from a kitchen hook or pantry peg, adjust the length accordingly. For bathrooms or entryways, shorter loops may be more appropriate.
Once complete, your Crochet Hanging Basket – Free Pattern is ready to be filled with anything from garlic to yarn balls. You’ve just created a piece that’s both practical and beautiful.
FAQ – Crochet Hanging Basket – Free Pattern
Can beginners make this pattern?
Yes! The Crochet Hanging Basket – Free Pattern uses basic stitches like single crochet and is beginner-friendly. Even those new to crochet can follow the instructions with ease.
What yarn works best for this project?
Bulky cotton yarn, macramé cord, or t-shirt yarn are excellent options. These materials give the basket structure and durability for daily use.
How do I make the basket larger or smaller?
You can increase or decrease the number of rounds on the base and sides. Adjusting yarn thickness and hook size also changes the final dimensions.
Is the basket machine washable?
Yes, if made with 100% cotton yarn. Always check your yarn label and consider air drying to maintain the basket’s shape.
Can I use this pattern to make gift sets?
Absolutely. These baskets make wonderful gift containers. Add bath bombs, soaps, or yarn for a thoughtful handmade touch.
What else can I store in these baskets?
Anything small and lightweight—garlic, onions, toys, makeup, keys, or even small potted plants. They’re both decorative and functional.
Conclusion
The Crochet Hanging Basket – Free Pattern is the perfect mix of creativity and utility. You’ve learned how to select the right materials, crochet the base and sides, shape the scoop, and attach a strong hanging loop. This project fits beautifully into any room and offers endless personalization options.
Whether you’re crocheting for yourself or gifting a loved one, this handmade basket adds a special touch. Now it’s your turn—try the pattern, get creative, and don’t forget to share your experience.
VIDEO TUTORIAL
We’d love to hear from you! Leave a sincere comment below sharing what you thought of the pattern, your favorite yarn to use, or any suggestions for future tutorials. Happy crocheting! 🧶


