
Macrame Heart Bracelet - Free Tutorial

The Crochet Montessori Puzzle Ball – PATTERN is a wonderful combination of functionality, fun, and early childhood development.
Originally inspired by Montessori educational principles, this crochet item is both a tactile toy and a brilliant introduction to spatial awareness for babies and toddlers. Handmade with love, it also offers crocheters a creative and rewarding project to work on.
Unlike typical soft toys, the Crochet Montessori Puzzle Ball – PATTERN is composed of three interlocking segments that can be assembled and disassembled, challenging little minds and fingers. It’s soft and safe, which makes it ideal for babies, and its design supports both gross and fine motor skills.
As a crochet project, it provides enough variation to keep the process engaging while remaining accessible to confident beginners and intermediate crafters.
In this article, you’ll discover everything you need to know to start making your own puzzle ball. We’ll cover how the structure works, what stitches and materials are commonly used, why it’s so loved in
Montessori circles, and how to personalize your ball for gifting, nursery decor, or even sensory therapy. Get ready to explore the delightful and practical world of the Crochet Montessori Puzzle Ball – PATTERN.
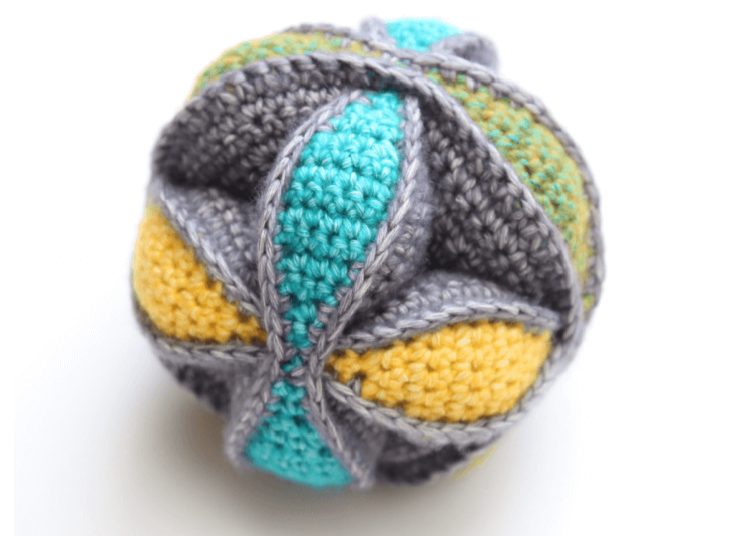
The Crochet Montessori Puzzle Ball – PATTERN is made up of three distinct segments that fit together like a soft sphere. Each segment is usually shaped as a curved wedge or a petal that, when joined, forms a complete 3D circle.
Each segment typically consists of an outer shell and an inner crescent or wedge. These parts are worked separately and then sewn or crocheted together. The repetition makes it perfect for batching the work before assembly.
While the structure might look complicated at first glance, it’s actually very straightforward once you understand the pattern’s logic. Each of the three sections includes four identical wedges, meaning you’ll crochet 12 pieces in total.
The beauty of the structure is in its interlocking form. Babies love pulling it apart and fitting it back together, and older toddlers may start to understand the concept of shape and space through it.
Using soft, squishy yarn ensures the ball retains its shape while still being gentle for tiny hands. You can also insert a small rattle or bell inside one of the wedges to add sound stimulation.
Overall, understanding the build of the Crochet Montessori Puzzle Ball – PATTERN helps you plan your color choices, yarn weight, and filling method before you begin.
When starting your Crochet Montessori Puzzle Ball – PATTERN, the choice of yarn and hook matters both for durability and safety. The ideal yarn is soft yet strong, machine-washable, and easy to work with.
Cotton yarn is highly recommended. It’s breathable, gentle on the skin, and holds its shape well. Organic cotton yarns are a great option for those prioritizing eco-conscious or baby-safe materials.
Avoid fluffy or overly textured yarns, as these can shed and become a choking hazard. Smooth yarns allow you to clearly see your stitches and keep the pattern even.
For hook size, follow the recommendations on your yarn label, but consider going down half a size to keep your stitches tight. This prevents stuffing from showing through and helps maintain the structure.
Color selection is where you can really personalize your puzzle ball. Choose three complementary or contrasting shades for visual stimulation, or match nursery themes for a cohesive gift.
Keep in mind that high-contrast colors like black and white or red and yellow are particularly engaging for newborns who are still developing their vision.
Using safe, hypoallergenic stuffing is also essential, especially if your puzzle ball will be used by infants. Polyester fiberfill is a popular choice, as it’s soft, lightweight, and washable.
Creating the Crochet Montessori Puzzle Ball – PATTERN involves basic to intermediate crochet techniques. The key stitches include single crochet (sc), increase (inc), and decrease (dec), making it accessible for those with a basic crochet background.
Begin by creating the inner wedges. These are small, curved pieces that look like crescent moons. Each one starts with a magic ring, then expands outward using increases to form the right shape.
Next, crochet the outer rings or “covers” that will hold each wedge. These are usually oval or boat-shaped, designed to encase the wedges snugly. Once done, sew or crochet the wedge inside each cover.
You’ll end up with 12 covered wedges—four for each of the three interlocking sections. Assemble each set of four into a circular segment by sewing them side by side in a curved line.
After the three segments are complete, you’ll assemble the full puzzle ball. The segments fit together by sliding one into the other, locking in place like a soft 3D puzzle.
Some crafters choose to lightly stitch the segments together for younger babies, preventing them from coming apart completely while still providing sensory play.
Don’t rush the process—take your time with each piece to ensure consistent shape and size. The final puzzle ball will not only look better but function more effectively.
The Crochet Montessori Puzzle Ball – PATTERN is not just a toy—it’s a multi-purpose handmade item that offers many uses and gift possibilities. With just a bit of customization, it becomes a cherished keepsake.
These puzzle balls are ideal baby shower gifts. You can create sets in coordinating colors with baby blankets or booties. Add initials or birth dates with embroidery for a personal touch.
For older children or kids with special needs, use different textures of yarn on each segment to create a sensory toy. This enhances tactile learning and keeps them engaged.
In Montessori classrooms, these balls are often used as early manipulatives. They help with problem-solving, dexterity, and concentration. Making a few for donation is a thoughtful and impactful gesture.
Want to create a seasonal twist? Use themed colors for holidays like Christmas, Halloween, or Easter. They can serve as soft decorations or festive baby gifts.
You can also scale the ball up or down depending on your hook and yarn size. Jumbo versions work as room décor, while mini ones can become mobile pieces or keychains.
The flexibility and joy of making the Crochet Montessori Puzzle Ball – PATTERN make it a favorite among crochet lovers who value both beauty and function.
What age is the puzzle ball suitable for?
It’s safe for babies from 3 months and up, but always supervise during play. Older toddlers enjoy the puzzle aspect.
Can I wash the puzzle ball in a machine?
Yes, if you use machine-washable yarn and secure the segments. A mesh bag and gentle cycle are recommended.
Is this pattern suitable for beginners?
Yes! If you know basic stitches like single crochet, increase, and decrease, you can follow this pattern easily.
How many pieces do I need to crochet in total?
You’ll crochet 12 wedges that are assembled into three sections. Each wedge includes an inner and outer part.
Can I stuff the pieces with something other than fiberfill?
You can use wool roving or cotton batting, but make sure it’s soft, lightweight, and baby-safe.
Is the pattern customizable for size?
Absolutely! Use thicker yarn and a larger hook for a bigger ball, or fine yarn for a smaller version.
The Crochet Montessori Puzzle Ball – PATTERN combines playful design with educational value, making it a brilliant crochet project for crafters of all levels. Whether you’re creating a unique gift, a learning toy, or simply want to explore 3D crochet shapes, this pattern delivers on all fronts.
We’ve explored how the structure works, the best materials to use, step-by-step techniques, and creative personalization ideas. This project offers both satisfaction in the making and joy in the giving.
Now it’s your turn! We’d love to hear your thoughts—have you made a crochet puzzle ball before? What colors or ideas do you plan to try? Leave your honest opinion and suggestions in the comments below. Your feedback helps inspire our creative community!


