
Macrame Heart Bracelet - Free Tutorial

Creating a CROCHET NECK AND SCARF SET STEP BY STEP is one of the most satisfying and cozy projects you can make with your crochet hook. This type of pattern allows you to combine elegance and warmth, resulting in a stylish accessory that enhances your outfit during the coldest days of the year.
Whether you’re an experienced crocheter or just starting out, this step-by-step project will guide you through every detail to ensure that your finished set is both beautiful and functional.
The CROCHET NECK AND SCARF SET STEP BY STEP is designed to be simple enough for beginners while still offering enough creative flexibility for advanced makers. You can personalize it with your favorite yarns, colors, and stitches to make it uniquely yours.
The satisfaction of wearing something handmade—or gifting it to someone special—adds emotional warmth to the physical comfort the scarf provides. Each loop and stitch becomes a reflection of your creativity and patience.
One of the best things about working on a CROCHET NECK AND SCARF SET STEP BY STEP project is that it can be adapted to any season or occasion. You can use lightweight yarns for spring or fall or thicker wool for the winter months.
The scarf and neck set can also become a statement fashion piece when you use bold colors or textured stitches. Before diving into the steps, let’s explore the materials, techniques, and preparation that will help you make your set a success.
To begin your CROCHET NECK AND SCARF SET STEP BY STEP, selecting the right materials is essential. The type of yarn, hook size, and accessories you choose will affect the overall texture, drape, and warmth of your finished project. Many crocheters prefer soft yarns such as wool, acrylic, or cotton blends that feel comfortable against the skin while maintaining shape and structure.
Yarn weight is another important factor. If you want a lightweight, flowy scarf, choose DK or sport-weight yarn. For a cozier and thicker set, bulky or super bulky yarns work beautifully. The key is to choose a yarn that matches the season and purpose of your design. Don’t forget to select complementary colors for the neckpiece and scarf—neutral tones for a classic look, or bright hues for a fun, youthful vibe.
The hook size should correspond to your chosen yarn. Typically, a 5mm or 6mm hook works well for medium-weight yarns, but you can always adjust based on your tension and desired outcome. Looser stitches create a softer, drapier feel, while tighter stitches produce a denser and warmer fabric.
Before starting, it’s helpful to make a small swatch to check your stitch pattern, tension, and the feel of the yarn. This will prevent unwanted surprises later and help ensure your CROCHET NECK AND SCARF SET STEP BY STEP project turns out perfectly.
You’ll also need basic crochet tools: scissors, a yarn needle for weaving in ends, and stitch markers to keep track of your rows. Having all these materials prepared will make your crocheting experience smooth and enjoyable.
Lastly, choose a cozy, well-lit space where you can relax and focus on your work. The process of crocheting is not only about the final result—it’s also about finding peace and joy in the rhythmic motion of your hook and yarn.
The CROCHET NECK AND SCARF SET STEP BY STEP can be broken down into manageable parts. Let’s start with the scarf, as it’s often easier and serves as a great warm-up for the neckpiece.
Begin by making a foundation chain that matches your desired length. For most scarves, this will be between 150 and 180 cm. Make sure your chain isn’t too tight; a flexible foundation ensures your scarf drapes nicely.
Once the chain is complete, you can start the first row using a simple stitch like single crochet or half double crochet. Both stitches provide a beautiful texture and are ideal for beginners. Continue working in rows until your scarf reaches your preferred width.
You can add a border for a clean finish by working a round of single crochet around the entire edge. If you want a more decorative look, try shell stitches or picots along the border. This small detail gives your CROCHET NECK AND SCARF SET STEP BY STEP an elegant, handmade touch.
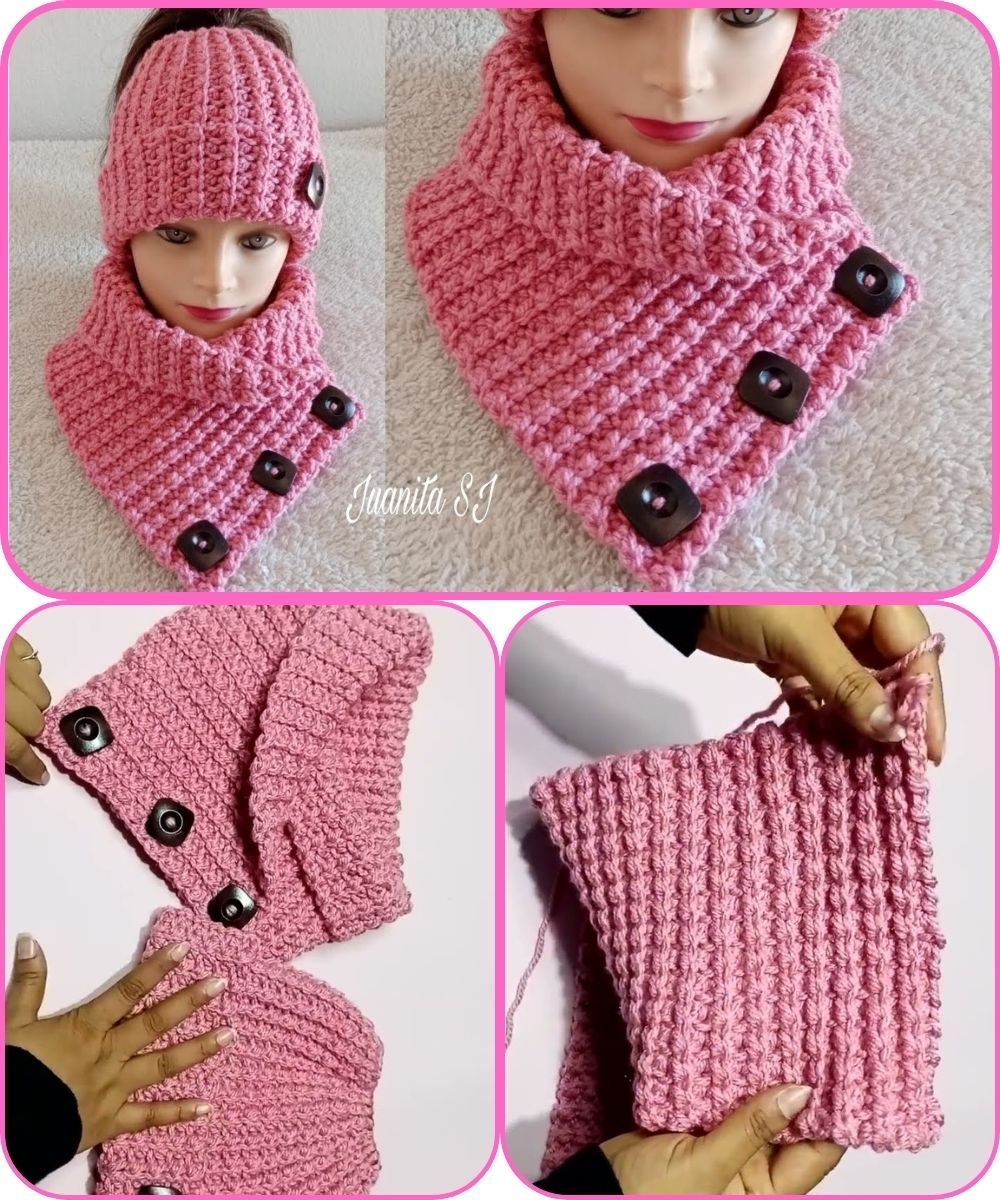
For the neck warmer or cowl, start with a smaller foundation chain that fits comfortably around your neck. You can make it flat and sew the ends together or crochet in the round to avoid seams. Using stitches like puff stitch, cluster stitch, or ribbed half double crochet creates warmth and stretchiness.
After completing both pieces, weave in the loose ends carefully and block them if necessary to shape and smooth the fabric. This step enhances the final appearance and ensures your set looks polished and professional.
The beauty of the CROCHET NECK AND SCARF SET STEP BY STEP lies in its adaptability. You can personalize it in endless ways to reflect your style and creativity.
Consider playing with color gradients or ombré yarns to give your set a dynamic, modern touch. Variegated yarns create beautiful natural color transitions without the need to switch yarns manually.
Texture is another element that can transform your project. Using alternating stitch patterns—such as combining double crochet with front-post stitches—adds dimension and visual interest. For a more sophisticated look, incorporate lace stitches or openwork designs.
You can also embellish your set with decorative elements like tassels, fringes, or buttons. Adding fluffy pompoms at the scarf ends can make the design playful, while wooden or metal buttons on the neck warmer bring a rustic charm.
Mixing different fibers within the same set is another creative approach. For instance, pairing wool with a touch of metallic yarn gives your CROCHET NECK AND SCARF SET STEP BY STEP a luxurious sparkle that’s perfect for winter celebrations.
Lastly, consider gifting your finished set to someone special. Handmade scarves and neckpieces are thoughtful presents that express love and care, making them ideal for holidays and birthdays.
Proper care is essential to maintain the softness and quality of your CROCHET NECK AND SCARF SET STEP BY STEP over time. Since most yarns used in scarves are delicate, gentle washing and drying are important.
Always check the yarn label for care instructions. Typically, hand washing in cool water with a mild detergent is the safest option. Avoid wringing or twisting your crochet work, as this can distort the shape and stretch the stitches.
After washing, press out excess water gently with a towel. Lay your items flat to dry on a clean surface, reshaping them as they dry to maintain the proper dimensions. Avoid hanging your scarf or cowl, as it can stretch under its own weight.
If your yarn type allows, you can block your pieces after washing. Blocking helps smooth out the stitches and gives your CROCHET NECK AND SCARF SET STEP BY STEP a neat, professional finish.
When not in use, store your set in a cool, dry place. Fold it neatly instead of hanging it to preserve its shape. If you live in a humid area, consider using breathable storage bags or placing a small sachet with lavender or cedar to prevent odors.
Taking care of your handmade pieces ensures they last longer and continue to bring warmth and beauty to your wardrobe year after year.
What skill level do I need for the Crochet Neck and Scarf Set?
This pattern is beginner-friendly. Basic knowledge of stitches like single and double crochet is enough to complete the project successfully.
How long does it take to finish the Crochet Neck and Scarf Set?
Depending on your speed and the yarn used, you can complete the set in two to four days. It’s a relaxing and rewarding project that doesn’t take too long.
Can I use different yarn weights?
Yes! The CROCHET NECK AND SCARF SET STEP BY STEP can be made with various yarn weights. Just remember to adjust your hook size and gauge accordingly.
What is the best yarn for beginners?
Acrylic yarn is ideal for beginners because it’s affordable, easy to work with, and washable. It also holds its shape well.
Can I make the neckpiece adjustable?
Absolutely. You can add buttons or ties to make the neckpiece adjustable and more comfortable.
How can I make the set more unique?
Experiment with stitch patterns, color combinations, or embellishments like tassels and fringe to make your CROCHET NECK AND SCARF SET STEP BY STEP one-of-a-kind.
The CROCHET NECK AND SCARF SET STEP BY STEP is a beautiful and practical project that blends comfort, creativity, and fashion. With the right materials, stitches, and care, you can create a timeless accessory that reflects your style and keeps you warm all season long. Whether it’s your first crochet project or one of many, this pattern offers endless opportunities for personalization and learning.
We hope this guide inspires you to start your own CROCHET NECK AND SCARF SET STEP BY STEP today! Leave your honest opinion and share your suggestions below—your feedback helps us keep creating wonderful content for crochet lovers like you.


