
The Crochet Ombre Christmas Trees pattern is a beautiful and modern twist on traditional holiday decor. Combining the soothing gradient of ombre colors with the cozy charm of handmade crochet, these trees bring a touch of elegance and warmth to any festive space.
Whether you are a beginner or an experienced crafter, this project offers a fun and creative way to express your holiday spirit through yarn and imagination.
One of the best things about Crochet Ombre Christmas Trees is how versatile and customizable they are. You can experiment with color palettes—soft pastels for a calm and snowy look, or classic greens fading into white for a more natural feel.
Using ombre yarns makes it even easier, as the color transition happens seamlessly as you crochet. The result is a set of mini trees that look sophisticated yet charmingly handmade.
These Crochet Ombre Christmas Trees are perfect for decorating mantels, shelves, or tables. You can make a set of three in different heights to create a layered display, or make them as gifts for friends and family.
Since they are lightweight and durable, they also make lovely ornaments or centerpieces that last year after year. Now, let’s dive into the materials, steps, and creative ideas to make your ombre Christmas trees truly special.
Materials You’ll Need
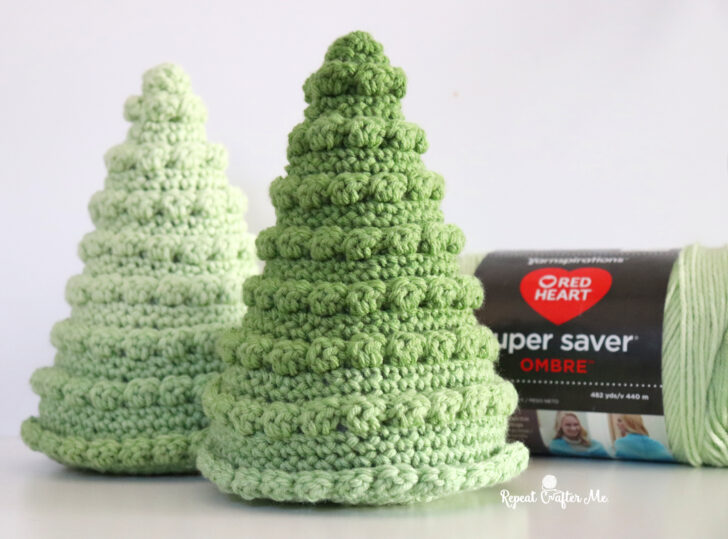
Before you start making your Crochet Ombre Christmas Trees, gather all the materials to make your crafting process smooth and enjoyable. The main item you’ll need is yarn, and choosing the right type is key to achieving that soft ombre gradient effect. Ombre or gradient yarns are perfect because they transition smoothly between shades, but you can also combine three or four solid-colored yarns manually to create your own ombre effect.
For a natural Christmas vibe, shades of green fading into white or cream work beautifully. If you prefer a modern and chic look, try silver to white, or even pink to blush tones. Cotton and acrylic yarns are both great options—cotton gives structure, while acrylic offers a soft and fluffy finish.
Next, select a crochet hook that matches your yarn weight. Most Crochet Ombre Christmas Trees use medium-weight yarn, so a 4 mm or 4.5 mm hook works well. Make sure to have scissors and a yarn needle for trimming and weaving in ends neatly once your tree is finished.
You’ll also need stuffing to give your trees shape. Fiberfill or leftover yarn scraps work perfectly for this. If you want your trees to stand upright, consider using a small wooden base, cork, or cone form for support. Some crafters also like to use cardboard cones as a base to wrap their crochet around, making the tree sturdy and decorative.
Optional materials include tiny beads, buttons, or sequins if you wish to add sparkle to your finished design. These little embellishments can transform a simple crochet project into a dazzling holiday display.
Finally, keep your workspace well-lit and organized. Having everything ready before you start ensures a relaxing crochet session where you can focus entirely on bringing your Crochet Ombre Christmas Trees to life.
Step-by-Step Crochet Instructions
The Crochet Ombre Christmas Trees pattern is simple enough for beginners yet allows room for creativity. Start with the base color—the darkest shade of your ombre sequence—and work upward toward the lightest tone. This gradient creates a natural fading effect that gives the tree depth and dimension.
Begin by creating a magic ring and working six single crochet stitches into it. Pull the ring tight and join with a slip stitch. This forms the tip of your Christmas tree. The pattern builds downwards, gradually increasing the stitch count as you go to create a cone shape.
In each round, make single crochets, increasing evenly around the circle. After every few rounds, change to the next lighter color in your ombre palette. Make sure to blend the color transition smoothly by alternating a few rows with both shades. This technique creates that signature ombre effect without harsh lines.
Continue crocheting until your tree reaches the desired size. You can stop at a small cone for a mini tree or keep going to make a larger, statement piece. Before finishing, stuff the inside gently to keep its shape firm and structured.
Once stuffed, close the base neatly with slip stitches or sew it onto a round piece of felt or cardboard for a clean finish. If you are using a cone base or stand, you can glue the crochet piece around it instead.
When your tree is complete, fluff it a little to make the stitches even and the ombre pattern flow beautifully. You can leave it plain for a minimalist look or decorate it with tiny crochet stars, bows, or beads for extra Christmas charm.
Creative Ideas for Decorating and Displaying
Your Crochet Ombre Christmas Trees can be displayed in countless beautiful ways, depending on your style and the look you want for your space. One idea is to create a forest of ombre trees in varying heights and colors—perhaps one in green tones, one in white and gold, and another in red and pink. Group them together on a mantle or table for a warm, handmade centerpiece.
You can also use your crochet trees as ornaments. Make smaller versions and add a simple yarn loop or ribbon to hang them on your Christmas tree. They’re lightweight, durable, and add a cozy, personal touch to your holiday decorations.
If you enjoy gifting handmade crafts, these trees make perfect little presents. Wrap them in cellophane or tie a ribbon around them with a holiday tag. Everyone loves a handmade touch, especially one as festive and charming as a Crochet Ombre Christmas Tree.
Another creative idea is to use them as part of your holiday table setting. Place one next to each plate as a little decorative surprise for guests. It’s an easy way to make your Christmas dinner table feel elegant and thoughtfully designed.
For those who love crafting with kids, this project is a fun family activity. Children can help stuff the trees, choose colors, or add embellishments. It’s a wonderful way to spend time together while creating lasting memories and decorations that can be reused every year.
Lastly, consider combining your Crochet Ombre Christmas Trees with other handmade decorations like crochet snowflakes, stars, or garlands. Mixing different textures and shapes adds visual interest and helps create a cohesive, handmade holiday theme throughout your home.
Tips for a Perfect Ombre Effect
Creating the perfect ombre transition is the key to making your Crochet Ombre Christmas Trees stand out. Start by choosing colors that blend well together. A good rule is to pick yarn shades from the same color family, gradually moving from dark to light. You can also use variegated yarns designed specifically for gradient effects to make the process easier.
When changing colors, always do so at the end of a round for a clean look. Before cutting the old yarn, work a few stitches alternating the two shades—this helps the transition appear smoother.
Tension control is another important factor. Consistent stitch tension ensures that your ombre flow looks even and the cone shape remains symmetrical. Take your time and don’t rush the color changes.
If you want to experiment, try reversing the gradient—starting with the lightest color at the top and fading to a darker shade at the base. This can create a unique “frosted” appearance that’s perfect for a snowy winter theme.
Adding texture can also enhance the ombre look. For example, alternate between single crochet and half double crochet stitches in different rows. This slight variation adds depth and shadow, highlighting the gradient effect even more.
Finally, remember that practice makes perfect. If your first Crochet Ombre Christmas Tree doesn’t turn out exactly as you imagined, keep trying! Each tree you make will improve your technique and inspire new ideas.
FAQ – Crochet Ombre Christmas Trees
1. Are Crochet Ombre Christmas Trees beginner-friendly?
Yes! This project is great for beginners since it uses basic stitches like single crochet and simple increases. The color changes are easy to learn with a bit of practice.
2. What yarn works best for ombre trees?
Gradient or ombre yarns are ideal, but you can also combine multiple shades of the same color manually. Acrylic yarn is a popular choice because it’s soft and holds its shape well.
3. How long does it take to make one tree?
Depending on the size, each tree can take between one and three hours to complete, making it a perfect weekend or evening project.
4. Can I wash my crochet trees?
Yes, but it’s best to hand wash them gently with cold water and mild soap. Let them air dry completely to maintain their shape.
5. How can I make my trees stand upright?
You can insert a cone base made of cardboard, foam, or wood inside, or attach a small wooden disc at the bottom to stabilize it.
6. Can I use leftover yarn for this project?
Absolutely! The Crochet Ombre Christmas Trees are great for using up yarn scraps. You can mix and match shades to create unique, colorful gradients.
Conclusion
The Crochet Ombre Christmas Trees pattern combines creativity, color, and the cozy spirit of handmade crafts. It’s a project that allows you to personalize your holiday decor while practicing crochet skills in a fun and relaxing way. From selecting the perfect yarn to watching the gradient unfold stitch by stitch, every part of the process brings joy and satisfaction.
By making your own crochet trees, you not only add warmth to your home but also create lasting decorations that can be cherished for years. Whether you make them for yourself, as gifts, or to share the holiday cheer, this project is sure to become one of your seasonal favorites.
Now it’s your turn! Gather your yarn, pick your colors, and start crocheting your own set of Crochet Ombre Christmas Trees. When you’re done, we’d love to hear from you—leave your honest opinion and suggestions below. Your feedback helps us keep creating inspiring crochet tutorials for makers like you!


