
If you’re a pet lover and enjoy crocheting, the Crochet Paw Print Granny Square Pattern Free is an ideal project for you. This fun and heartwarming pattern brings the love for animals into your crochet work.
Whether you’re making a blanket for your furry friend, a gift for a fellow animal lover, or a simple decorative piece, the paw print granny square adds a personal and unique touch to your crochet projects.
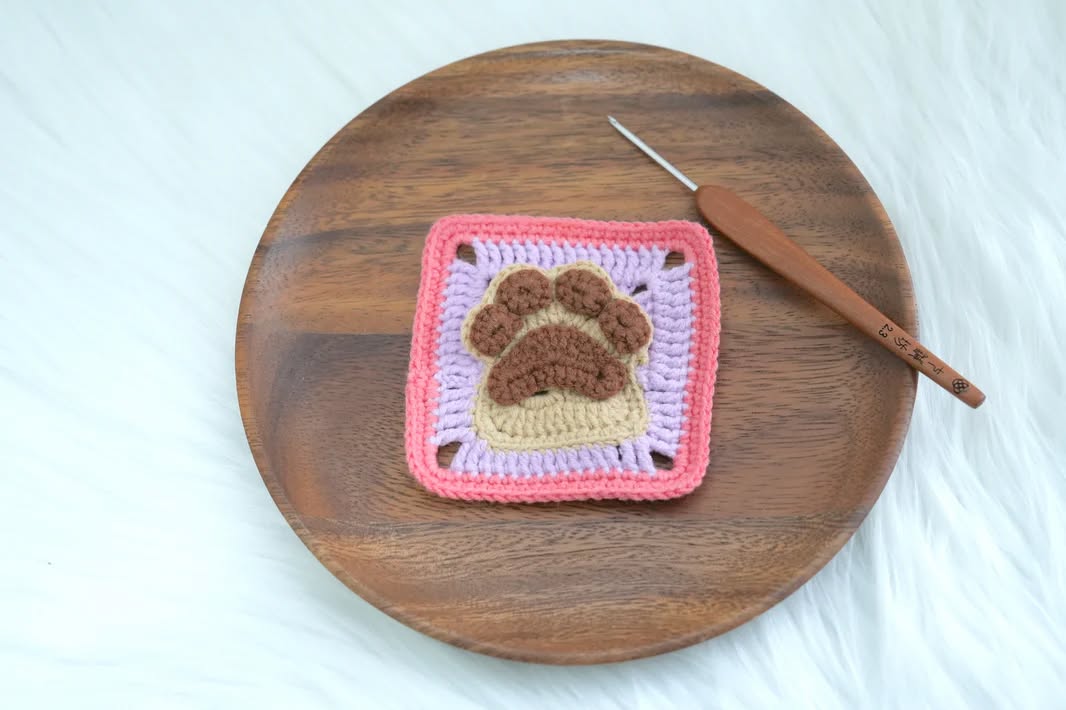
The Crochet Paw Print Granny Square Pattern Free is a charming, easy-to-follow design that can be customized with different colors to create a variety of beautiful effects.
It can be used as the focal point of a larger project or as individual squares to create blankets, bags, pillows, or even a pet-themed afghan. This pattern is not only fun but also perfect for crafters of all skill levels.
In this article, we’ll guide you through the entire process of creating your own Crochet Paw Print Granny Square, starting with the materials you’ll need, followed by step-by-step instructions on how to make the squares. We’ll also give you some tips and tricks to help you customize the design and make it your own.
1. Materials Needed for the Crochet Paw Print Granny Square
Before you begin making your Crochet Paw Print Granny Square, it’s important to gather all the materials you’ll need. This ensures that the crochet process goes smoothly and your squares turn out beautifully.
First, choose a yarn that is comfortable to work with and appropriate for the project. Medium-weight yarn (also known as worsted weight yarn) works best for this pattern, as it provides the right balance between structure and flexibility. You’ll need at least three colors: one for the main background, one for the paw print itself, and one for the outline or other decorative elements.
A crochet hook sized to your yarn is crucial for achieving the right tension. Typically, a 5.0mm (H-8) crochet hook works well for worsted weight yarn, but make sure to adjust depending on your yarn’s thickness. You’ll also need a yarn needle for weaving in the ends and scissors to trim any excess yarn.
Don’t forget to have a stitch marker on hand! This will help you keep track of your rounds, especially when you’re working in the round to create the square. If you prefer, you can also use a contrasting color to mark the beginning of each round.
Lastly, make sure you have a comfortable place to crochet. Whether you’re working on the couch, at a crafting table, or even on the go, having a cozy spot will keep you motivated and focused throughout the project.
2. Step-by-Step Instructions for Making the Crochet Paw Print Granny Square
Now that you have your materials ready, let’s dive into the step-by-step process of making the Crochet Paw Print Granny Square. The first thing to know is that this pattern is worked in rounds, beginning with a central ring and then expanding outward.
Start by creating a magic ring. To do this, wrap the yarn around your fingers to form a loop, then insert your hook into the loop, yarn over, and pull through. You’ll work all of the stitches into this loop to create your square’s center.
Round 1: Make a chain of 3 (counts as the first double crochet), then work 11 more double crochets into the ring. Join with a slip stitch to the top of the first chain to close the round. At this point, you should have 12 double crochet stitches in total.
Round 2: Chain 3 to begin the second round, and then make 1 double crochet in the same stitch. Work 2 double crochets into each stitch around the entire round. Join the round with a slip stitch. This will create the first solid round of your granny square.
Round 3: For this round, you’ll change colors to create the paw print. Start by chaining 3, then make a double crochet in the next stitch. In the next 3 stitches, work a double crochet into each. These are the “toes” of your paw print. After you’ve finished the toes, change to the second color for the paw pad in the center.
Continue with this round by creating 3 double crochets in the next space, following the instructions for the paw print design.
Round 4: Once you’ve completed the paw print design, continue to expand the square by adding more rounds of double crochet stitches, ensuring that you have enough stitches to form a nice square. Repeat the process for each granny square you’re creating.
After each round, check your work to ensure the stitches are even and there’s no bunching. Make sure that your corners are square, which may take a bit of practice but will make a big difference in the final project.
3. Customizing Your Crochet Paw Print Granny Square
One of the great things about the Crochet Paw Print Granny Square Pattern Free is that it’s highly customizable. You can play around with the colors to create different effects that match your personal style or fit the theme of your project.
To start, you can choose different colors for the background, paw prints, and outlines. If you’re creating a blanket, you might want to use neutral tones for the background and bright colors for the paw prints to make them stand out. Alternatively, a more monochromatic palette can give your project a more subtle, sophisticated look.
If you’re making a pet-themed blanket or throw, consider using colors that match your pet’s fur color or favorite toys. You can even add decorative elements like hearts, bones, or paw prints in a different size for a more playful effect.
You can also adjust the size of your squares to fit the project you’re working on. If you want smaller squares, use a thinner yarn and a smaller hook. For larger squares, opt for a thicker yarn and a larger hook.
Consider adding borders around your paw print granny squares to tie the entire project together. A simple single crochet border in a contrasting color can add a polished touch to your work.
Finally, experiment with different variations of paw print designs. You can make the paw print larger or smaller, or try different shapes to add more variety to your squares.
4. Tips and Tricks for Successful Crochet Paw Print Granny Squares
As with any crochet project, there are a few tips and tricks that can make the Crochet Paw Print Granny Square Pattern Free easier and more enjoyable to work on.
First, take your time and don’t rush. While granny squares are relatively simple to make, perfecting your tension and stitch consistency will make a big difference in the final product. If you find that your stitches are too tight or too loose, adjust your tension until you find a comfortable rhythm.
Second, always check your work as you go. It’s easier to fix any mistakes early on than to rip out entire sections later. Use a stitch marker to mark the beginning of each round, and check your stitch count periodically to ensure you’re on track.
If you find that your granny squares are becoming too bulky or uneven, consider blocking them once you’ve finished. Blocking helps square up your squares and ensures they all have the same size.
Another helpful tip is to keep track of the number of rounds and stitches you’ve worked for each square. This way, your squares will all be uniform and fit together nicely when you assemble them later.
Finally, don’t be afraid to get creative. Add embellishments like buttons, beads, or embroidery to give your granny squares a unique flair. Personalizing your work is one of the joys of crochet.
FAQ – Frequently Asked Questions
1. Can I make the Crochet Paw Print Granny Square with other types of yarn?
Yes, you can experiment with different yarn types. However, be sure to adjust your hook size to match the yarn thickness for best results.
2. How do I make the paw prints more pronounced?
To make the paw prints stand out more, consider using a high-contrast color for the paw print against the background. You can also add a border around the square to highlight the design.
3. Can I create larger or smaller squares with this pattern?
Absolutely! To make smaller squares, use thinner yarn and a smaller hook. For larger squares, use thicker yarn and a larger hook.
4. How do I join the granny squares together?
You can join the squares using the whip stitch, slip stitch, or a decorative method like the join-as-you-go technique.
5. What other items can I make with this pattern?
You can use the paw print granny square pattern for blankets, bags, cushions, or even pet accessories like a dog sweater or blanket.
6. Is this pattern suitable for beginners?
Yes, this pattern is beginner-friendly! As long as you are familiar with basic crochet stitches like double crochet and slip stitch, you can easily follow along.
Conclusion
The Crochet Paw Print Granny Square Pattern Free is a wonderful project for anyone who loves crochet and animals. It offers a fun, creative way to show off your crochet skills while making something special for yourself or a loved one.
Whether you’re creating a large blanket, small accessories, or a pet-themed gift, this pattern will allow you to express your love for animals in a beautiful and personal way.
We’ve covered all the steps, tips, and tricks to help you create perfect paw print granny squares. Now it’s your turn! Share your thoughts, ask any questions, or leave suggestions in the comments. Happy crocheting!


