
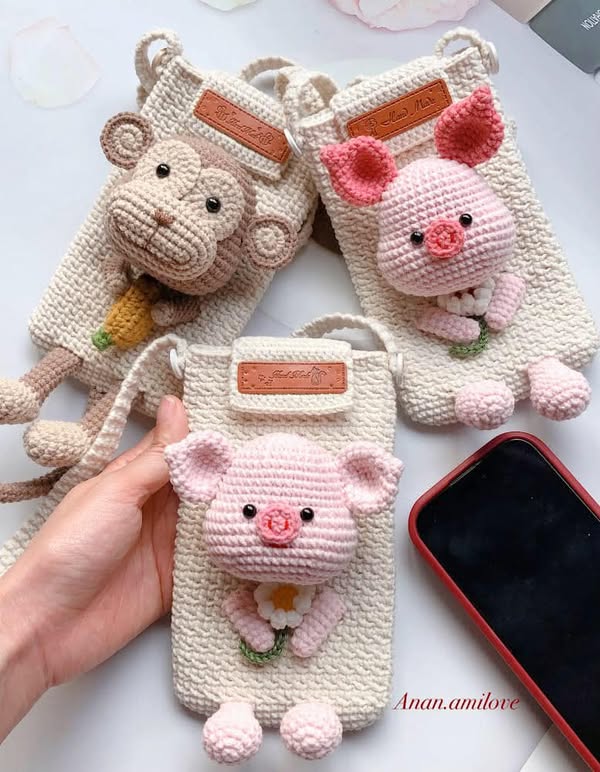
If you’ve ever wanted to make a cute and functional crochet project, this Crochet Pig Phone Pouch – Step by Step tutorial is the perfect choice. This little pouch is not only adorable, but it’s also practical for keeping your phone safe and scratch-free.
Whether you’re a beginner or a seasoned crocheter, this pattern is simple to follow and produces an irresistibly charming result.
A crochet phone pouch is a great gift idea and a fun way to add personality to your accessories. With the piggy design, you combine playfulness with purpose.
The best part? It doesn’t require a lot of yarn or time, and you’ll love how customizable it is—use your favorite colors, add a strap, or even make a whole collection of animals.
Throughout this guide, we’ll walk you through each step in making your very own Crochet Pig Phone Pouch – Step by Step. You’ll learn what materials to use, how to crochet the base, add the pig features, and finish everything neatly. Let’s begin this delightful journey!
1. Materials Needed for the Crochet Pig Phone Pouch
Before diving into your Crochet Pig Phone Pouch – Step by Step, it’s important to gather the right materials. The success of your pouch depends not only on your crochet skills but also on the tools and yarn you use.
Choose a soft but durable yarn like worsted-weight cotton or acrylic. Cotton yarn holds shape better and gives a neat finish, while acrylic can be more flexible and budget-friendly.
You’ll need a 3.5 mm or 4 mm crochet hook. These sizes are ideal for creating tight, even stitches that will support your phone without being too loose or stretchy.
Pick up some safety eyes or small black buttons for the pig’s eyes. Alternatively, you can embroider them if the pouch is for a child or if you prefer a softer look.
You’ll also need a yarn needle for weaving in ends, scissors for trimming, and some light pink and dark pink yarn for the pig’s snout, ears, and cheeks.
Optional items include a snap button or Velcro to close the top of the pouch, and a strap if you want to wear it crossbody or hang it from your bag.
Make sure you have your phone nearby to measure the size of the pouch. It should fit snugly without being too tight or too loose.
2. Creating the Base of the Phone Pouch
The base is the foundation of your Crochet Pig Phone Pouch – Step by Step, so it’s important to get it right. You want a piece that’s slightly larger than your phone to allow for seams and decorations.
Start with a chain that matches the width of your phone plus two stitches. This will form the bottom edge of your pouch.
Work single crochet stitches along the chain. When you reach the end, continue around the opposite side of the chain to work in the round. This creates a seamless, oval base.
Continue crocheting in rounds using single crochet stitches. This keeps the structure tight and firm, perfect for protecting your phone.
Measure your phone’s height and continue adding rounds until the pouch reaches the top edge of your phone. Remember, the pig features will go on the front side.
Once you’ve reached the desired height, fasten off and weave in any loose ends. Leave the top open for inserting and removing your phone easily.
If you want to add a flap or closure, don’t fasten off yet. Chain a few stitches and work back and forth in rows to create a flap that folds over the front.
3. Adding the Pig Details
Now it’s time to bring your Crochet Pig Phone Pouch – Step by Step to life by adding those adorable piggy features! These little details make your pouch extra special.
Start with the pig snout. Using darker pink yarn, make a small oval shape using rounds of single crochet. Sew it securely onto the center front of the pouch.
Add nostrils by stitching two tiny vertical lines on the snout using a needle and black yarn or embroidery floss.
Make the ears by crocheting two small triangles or semi-circles in light pink. Attach them to the top corners of the pouch for a 3D effect.
For the eyes, sew on safety eyes, buttons, or use black yarn to create stitched circles. Position them above the snout and evenly spaced.
To add a cute touch, stitch on small pink cheeks next to the snout. You can use blush yarn or even tiny fabric circles if you prefer.
Feel free to add a little tail on the back with a twist of yarn or a curly cue made from a chain and slip stitches. It adds character and fun to the design!
4. Finishing Touches and Customization
You’ve almost completed your Crochet Pig Phone Pouch – Step by Step! Now it’s time to make it truly your own with final details and customizations.
If you’d like your pouch to be wearable, crochet a strap using a long chain and single crochet rows. Attach it securely to the sides of the pouch.
Add a snap button, Velcro, or even a zipper to close the pouch. This keeps your phone extra secure, especially when carrying it around.
Consider lining the pouch with fabric for a cleaner interior and extra protection. This step is optional but can improve durability and appearance.
Customize the pouch with other accessories like small bows, flowers, or even a name tag. These additions make your pouch unique and personal.
Try different colors! While pink is classic for a pig, you can make your pouch in blue, purple, or even rainbow for a more playful look.
Take photos of your finished pouch and share them with friends or on crafting groups. It’s a wonderful way to inspire others and show off your creative work.
FAQ – Crochet Pig Phone Pouch – Step by Step
Q: Is this project beginner-friendly?
A: Yes! The Crochet Pig Phone Pouch – Step by Step tutorial is ideal for beginners. It uses basic stitches and easy shaping, making it accessible to all skill levels.
Q: What’s the best yarn for making a phone pouch?
A: Cotton or acrylic yarns work best. Cotton holds its shape better, while acrylic is softer and comes in more vibrant colors.
Q: Can I make the pouch in a different animal design?
A: Absolutely! Once you’ve mastered the base pouch, you can modify the facial features to create cats, dogs, bunnies, and more.
Q: How do I make sure my phone fits?
A: Measure your phone before starting and adjust your starting chain and rounds accordingly. Always test fit as you go.
Q: Is it safe for children?
A: If making for children, avoid using small buttons or safety eyes and instead use embroidered features to avoid choking hazards.
Q: Can I wash the pouch?
A: Yes, most crochet pouches are washable. Use cold water and mild soap, and air dry to prevent shrinking or damaging the details.
Conclusion
In this guide, we’ve walked you through the Crochet Pig Phone Pouch – Step by Step, from choosing the best materials to adding cute pig features and finishing touches. This project is perfect for gifting, selling, or simply enjoying a creative break from routine.
With a few simple stitches and a touch of imagination, you can create a functional piece that’s as charming as it is practical. Whether you’re making it for yourself or someone special, this pouch is sure to bring smiles.
We’d love to hear from you! If you tried this pattern, please leave a sincere comment with your thoughts, tips, or suggestions for future tutorials. Let’s keep the creativity flowing!
4o


