
Macrame Heart Bracelet - Free Tutorial

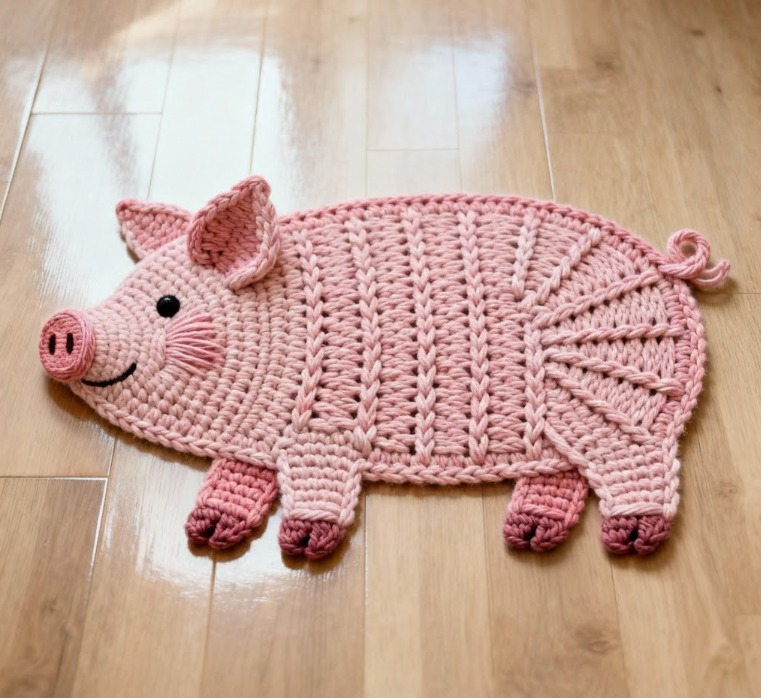
If you’re looking for a fun and cheerful crochet project that brings both warmth and charm to your home, the Crochet Pig Rug – Free Pattern is a perfect choice. This adorable rug adds a touch of whimsy to any space, making it ideal for children’s rooms, play areas, or even farmhouse-style décor.
The cute pig face design brings a smile to everyone who sees it, while the soft texture makes it cozy to step on. Whether you’re an experienced crocheter or just starting out, this project is easy to follow and deeply rewarding.
The Crochet Pig Rug is a delightful way to blend functionality with creativity. Unlike traditional rugs, a handmade crochet rug carries a personal touch — every stitch tells a story. The pig design is especially popular for nurseries and animal lovers because of its friendly and joyful appearance.
With simple materials and easy-to-learn stitches, you can create a unique decorative piece that adds warmth and character to your home. Plus, it’s washable and long-lasting, making it both beautiful and practical.
Before you begin crocheting, it’s good to know why the Crochet Pig Rug – Free Pattern has become so loved among crafters. Animal-inspired crochet projects bring personality and life to your space. The pig motif, in particular, symbolizes good fortune and playfulness.
Whether you make it for yourself or as a handmade gift, this rug represents care and creativity. It’s also an excellent way to practice circular crochet, color changes, and basic shaping techniques in a relaxing, enjoyable way.
To make your Crochet Pig Rug, you’ll need a few basic supplies that are easy to find and budget-friendly. Start with cotton yarn or acrylic yarn in pink, white, and black. Cotton yarn is ideal for rugs because it’s strong, durable, and easy to clean. Acrylic yarn, on the other hand, provides a softer texture and vibrant color options. Choose a soft pastel pink for a classic pig look or a brighter tone for a playful twist.
Next, select a crochet hook that matches your yarn weight. For medium-weight yarn, a 5.0 mm (H) or 6.0 mm (J) hook works best. The larger the hook, the looser and softer your stitches will be — perfect for creating a rug that feels plush underfoot.
You’ll also need a yarn needle for sewing pieces together, a pair of scissors, and stitch markers to keep track of your rounds. If you want to make the rug slip-resistant, have a non-slip rug pad or rug backing ready to attach to the bottom. This helps prevent sliding, especially if the rug is placed on a smooth surface like hardwood or tile.
Some crocheters like to double up their yarn strands for extra thickness. Using two strands together not only makes the rug sturdier but also gives it a professional, cushioned feel. It’s a great way to make your Crochet Pig Rug extra comfortable and durable for high-traffic areas.
Finally, prepare a comfortable workspace with good lighting. Crocheting is much more enjoyable when your materials are organized and you can clearly see your stitches. Once everything is ready, you’re all set to start creating your cheerful pig rug!
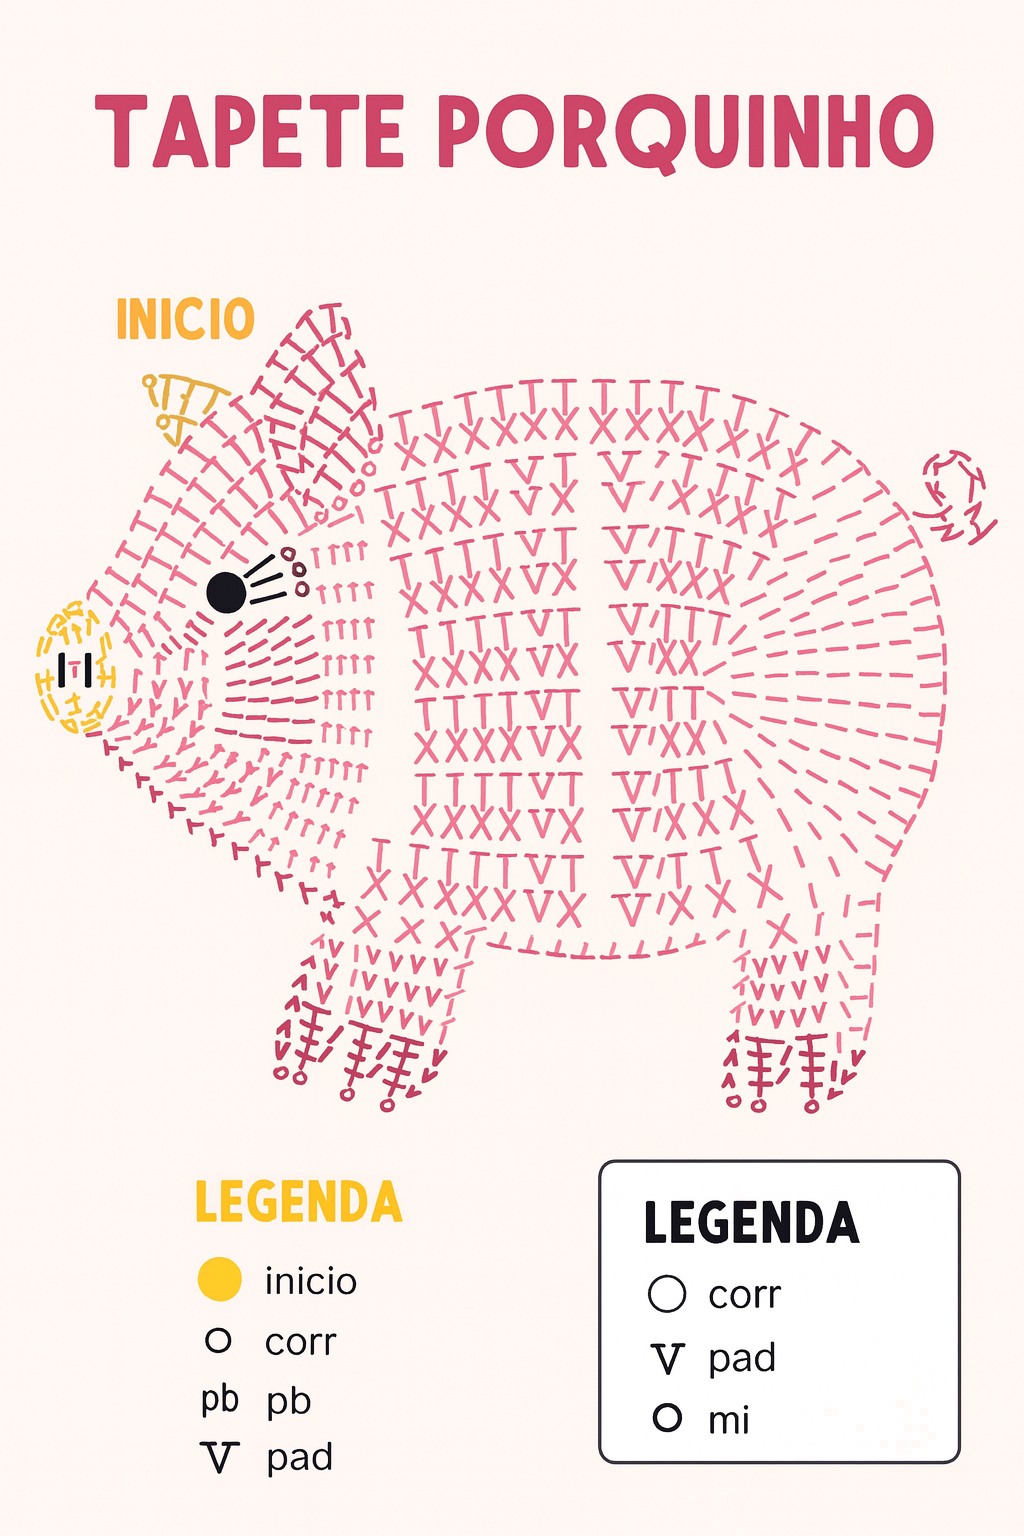
To begin your Crochet Pig Rug, start by forming the base — the pig’s round body. Create a magic ring, then crochet several double crochets (dc) into the center. Continue increasing in each round to form a flat circle. Depending on your desired rug size, the circle can range anywhere from 20 inches to 36 inches in diameter.
As you crochet, make sure your circle stays flat. If it begins to curl, you may need to add more stitches in the next round. If it starts to ripple, reduce your increases slightly. Keeping the base flat is essential for your rug to lay nicely on the floor.
Once the body is finished, it’s time to make the pig’s snout, ears, eyes, and legs. The snout can be crocheted separately using a small oval shape. Add two black stitches or small crocheted circles for nostrils. This gives your pig a cute and expressive face. The ears are simple triangles or teardrop shapes made from pink yarn, while the eyes can be made using white and black circles.
Attach the pieces securely to the main circle using your yarn needle. For the eyes, position them evenly above the snout to give your pig a friendly appearance. The ears should be attached to the top, slightly tilted outward for a realistic touch.
If you want to add extra detail, you can use surface crochet or simple embroidery stitches to outline the snout and add character to the face. This technique helps define the features and gives the Crochet Pig Rug a more polished, handcrafted look.
Finish by weaving in all yarn ends neatly on the back side. For safety and durability, apply a non-slip backing or place a rug pad underneath. This ensures your rug stays in place and remains safe for kids and pets to enjoy.
Creating a flawless Crochet Pig Rug requires patience and attention to detail, but with a few simple tips, your project will turn out beautifully. First, always maintain consistent tension in your stitches. Uneven tension can cause your rug to become wavy or uneven. If that happens, you can lightly block the rug to help it flatten out.
Second, choose high-quality yarn that can withstand frequent cleaning. Rugs tend to collect dust, so it’s important to use yarn that is washable and durable. Cotton and acrylic blends are ideal because they’re soft yet strong enough for everyday use.
When assembling the facial features, pin the pieces in place before sewing them down. This helps ensure symmetry — nothing makes your pig cuter than a perfectly even smile and centered snout. Take your time during this step to make sure everything looks balanced.
Another useful tip is to use two strands of yarn for the rug’s outer border. This adds strength and a defined edge, preventing the rug from curling up over time. You can even switch to a slightly darker shade of pink for a nice contrast around the edges.
If you plan to make your rug as a gift, consider adding personalized details like initials or a small heart stitched into one corner. Handmade gifts are always more special when they include a personal touch.
Finally, don’t forget to care for your rug properly. Hand wash it in cold water or use a gentle machine cycle, then lay it flat to dry. This helps preserve the stitches and keeps your Crochet Pig Rug looking adorable for years to come.
The beauty of the Crochet Pig Rug – Free Pattern is its flexibility. Once you master the basic design, you can easily adapt it to different styles and sizes. For instance, make a mini version to use as a placemat, coaster, or wall hanging. It’s a fun way to use leftover yarn and brighten up small spaces.
For children’s rooms, try adding playful details like a small bow, eyelashes, or even a flower crown on your pig’s head. These little touches make the rug extra cute and personalized for the child’s personality.
If you love color, experiment with different yarn combinations. A light pink base with darker pink accents can create dimension, while pastel shades of yellow, white, or even lavender add a modern, whimsical twist. For a farmhouse look, use muted or rustic tones that match country-style décor.
Another creative idea is to make a set of animal rugs — a pig, cow, and sheep — for a themed nursery or playroom. These handmade pieces bring warmth and playfulness to any environment, and they’re wonderful conversation starters when guests visit.
You can also adapt the pattern to make seasonal versions. For example, add a Santa hat for Christmas or small heart appliqués for Valentine’s Day. This keeps your crochet projects fresh and festive throughout the year.
Finally, remember that your creativity has no limits. The Crochet Pig Rug can be as simple or as detailed as you like. Whether you’re crocheting for fun, for family, or for your craft business, this project will always bring joy and a sense of accomplishment.
1. Is the Crochet Pig Rug suitable for beginners?
Yes! This project uses basic stitches such as single crochet and double crochet, making it perfect for beginners who want to improve their circular crochet skills.
2. What type of yarn is best for the Crochet Pig Rug?
Cotton or acrylic yarn is recommended. Cotton is durable and washable, while acrylic provides softness and vibrant color options.
3. Can I make the rug larger or smaller?
Absolutely. Simply continue increasing rounds for a larger rug or stop earlier for a smaller one. Adjusting your hook size also affects the overall size.
4. How do I keep my rug from slipping on the floor?
Use a non-slip rug pad or apply rug backing to the underside to keep it steady and safe on smooth floors.
5. Can I wash my Crochet Pig Rug in the washing machine?
Yes, but use a gentle cycle with cold water. Always lay the rug flat to dry to prevent stretching or warping.
6. How can I make my rug look more professional?
Block your finished piece, maintain even tension, and carefully align facial features before sewing. A neat border also enhances the final look.
Making your own Crochet Pig Rug – Free Pattern is a fun, relaxing, and creative project that brings personality and warmth to your home. From choosing the perfect pink yarn to shaping the pig’s adorable features, every step offers joy and satisfaction. It’s a project that beginners can enjoy and experts can customize endlessly.
Handmade crochet rugs like this one are not just decorative pieces — they are expressions of love, patience, and imagination. Whether you create it for a child’s room, a gift, or your own living space, your Crochet Pig Rug will become a cherished part of your home.
We hope this guide has inspired you to start your own pig rug today! Please leave your honest opinion and suggestions in the comments — we’d love to hear how your Crochet Pig Rug turned out and how you added your personal touch to this adorable pattern.


