
The Crochet Pumpkin Coasters Patterns are a charming and practical way to bring a touch of autumn into your home. Perfect for fall décor, Thanksgiving celebrations, or cozy evenings with hot drinks, these pumpkin-themed coasters are both functional and decorative.
Whether you are an experienced crocheter or a beginner looking for a seasonal project, these patterns provide a fun and creative way to add handmade charm to your tables and surfaces. With vibrant colors and whimsical shapes, the Crochet Pumpkin Coasters Patterns allow you to explore your creativity while crafting something useful.
One of the best things about the Crochet Pumpkin Coasters Patterns is their versatility. They can be used to protect your tabletops from spills, serve as a base for candles, or even be grouped together as a festive centerpiece.
Each coaster can be customized in color, size, and style, giving you endless possibilities to match your home décor or seasonal theme. The patterns are designed to be approachable while allowing for creative expression, making them perfect for all levels of crocheters.
Creating the Crochet Pumpkin Coasters Patterns is not just about making coasters; it’s an enjoyable crafting experience. You get to work with simple crochet techniques like single crochet, half-double crochet, and slip stitches, while also learning how to shape and assemble pieces into a three-dimensional pumpkin form. This makes the project educational, fun, and satisfying when you see the final set come together.
1. Materials Needed for Crochet Pumpkin Coasters Patterns
To begin the Crochet Pumpkin Coasters Patterns, you will need a few basic materials. Having all supplies ready ensures a smooth crafting process and an enjoyable experience.
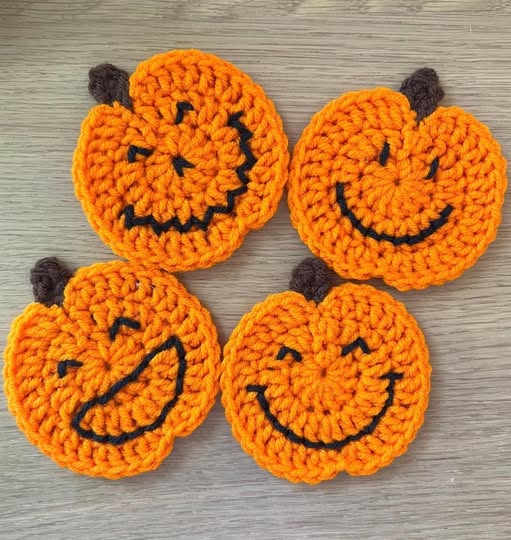
First, select your yarn. Worsted-weight cotton or acrylic yarn works best for coasters because it is durable, absorbent, and holds its shape well. Orange is typically used for the pumpkin body, with green for the leaves and brown for the stem. However, you can experiment with shades like yellow, red, or cream for a unique twist.
Next, choose an appropriate crochet hook for your yarn. A 4.0 mm or 4.5 mm hook is commonly recommended for worsted-weight yarn. Using the correct hook ensures even tension and clean stitches, which is essential for a polished final product.
You’ll also need basic crochet tools such as scissors, stitch markers, and a tapestry needle. The needle is useful for weaving in ends and sewing on details such as the stem or leaves. Stitch markers help you keep track of rounds, especially when shaping the pumpkin.
Optional materials include small embellishments like beads or embroidery thread for decorative touches. Some crafters like to add tiny tendrils or textured leaves for extra visual interest.
Finally, patience and creativity are key! The Crochet Pumpkin Coasters Patterns offer endless opportunities for personalization and experimentation, allowing you to create a set of coasters that are truly unique.
2. Step-by-Step Instructions for Crochet Pumpkin Coasters Patterns
The Crochet Pumpkin Coasters Patterns are worked in the round, beginning with the base and building up the pumpkin shape. Each coaster is made individually and can be embellished with leaves, stems, or other details.
Start by creating the pumpkin’s base. Using orange yarn, crochet a small circle with single crochet stitches, increasing evenly to form a flat round. This will serve as the main surface of the coaster.
Once the base is complete, shape the pumpkin by working additional rounds with slight increases and decreases. This technique creates the characteristic ribbed look of a pumpkin, giving the coaster its three-dimensional charm.
Next, create the stem. Using brown yarn, crochet a small cylinder or cone and attach it to the top center of the pumpkin. This completes the traditional pumpkin appearance and adds an extra layer of detail.
Leaves and tendrils are optional but recommended for a more natural look. Using green yarn, crochet small leaf shapes and attach them around the stem. You can also add tiny spiral tendrils using chain stitches for a whimsical touch.
Finally, weave in all yarn ends and block the coasters if necessary. Blocking helps even out stitches and gives the coasters a neat, professional finish. Your Crochet Pumpkin Coasters Patterns are now ready to use, display, or gift.
3. Creative Uses for Crochet Pumpkin Coasters Patterns
The Crochet Pumpkin Coasters Patterns are highly versatile. They can be used to protect tabletops from hot drinks, adding a functional and festive touch to your home during fall and Thanksgiving.
These coasters can also serve as decorative pieces. Grouped together, they make a lovely centerpiece or accent on a dining table, coffee table, or sideboard. Their bright orange hues and playful shapes instantly bring autumn vibes to any space.
They make thoughtful handmade gifts for friends, family, or coworkers. A set of crocheted pumpkin coasters packaged beautifully can be a unique and appreciated gift during the holiday season.
Additionally, these coasters can be used in seasonal craft projects. They pair wonderfully with other fall-themed decorations like gourds, candles, and autumn leaves for a cohesive look.
For educators or crafters, the pattern can also be adapted for classroom activities or craft fairs. Creating these coasters with children or students can be a fun way to introduce basic crochet techniques.
Finally, you can mix and match colors to create a set of pumpkins in different shades, creating a more vibrant and playful display. Each coaster can be slightly different, making the set more dynamic and visually appealing.
4. Tips for Perfecting Crochet Pumpkin Coasters Patterns
To achieve the best results with the Crochet Pumpkin Coasters Patterns, maintain even tension throughout the project. Consistent stitches ensure a neat, professional appearance.
Use stitch markers to keep track of rounds and increases. This is especially helpful when shaping the pumpkin and adding details like ribs or leaves.
Experiment with yarn textures and thicknesses. While worsted-weight yarn is ideal, using slightly thicker or thinner yarn can give your pumpkins a unique look and feel.
When attaching stems and leaves, sew them securely. This ensures the coasters maintain their shape and remain durable for daily use.
Consider blocking your coasters after finishing. Lightly dampening and shaping them allows the stitches to settle evenly, resulting in a more polished final product.
Finally, don’t hesitate to personalize your coasters. Add embroidery, beads, or even tiny glitter accents for a playful, festive touch. The Crochet Pumpkin Coasters Patterns encourage creativity and allow each set to reflect your individual style.
FAQ about Crochet Pumpkin Coasters Patterns
Q: Are these pumpkin coasters suitable for beginners?
Yes, the pattern is beginner-friendly and uses basic stitches such as single crochet, increases, and decreases.
Q: What yarn is best for making pumpkin coasters?
Worsted-weight cotton or acrylic yarn is ideal for durability, absorbency, and easy shaping.
Q: How long does it take to make one coaster?
Depending on experience, each coaster can take 30–60 minutes to complete.
Q: Can I customize the colors?
Absolutely! You can use different shades of orange, green, or even cream for unique designs.
Q: Are the coasters washable?
Yes, cotton and acrylic yarn coasters can be gently hand-washed or machine-washed on a delicate cycle.
Q: Can I gift these pumpkin coasters?
Yes, they make excellent handmade gifts for autumn, Thanksgiving, or fall-themed parties.
Conclusion
The Crochet Pumpkin Coasters Patterns are a fun, creative, and practical way to celebrate the fall season. From crafting the pumpkin base to adding stems, leaves, and tendrils, this project allows you to practice crochet skills while creating functional and decorative items. Perfect for gifting or using in your own home, these pumpkin coasters combine charm, creativity, and utility.
Have you tried the Crochet Pumpkin Coasters Patterns yet? Share your thoughts, variations, and suggestions in the comments. Your feedback helps inspire new projects and brings together the creativity of the crochet community.


