
Are you looking for a functional and stylish way to organize your home? The Crochet Rope Basket is an excellent project that will not only help you tidy up your space but also give you a beautiful handmade item. In this article, we will walk you through the steps to create your own Crochet Rope Basket with a free pattern that’s easy to follow.
This guide is designed for crocheters of all skill levels, and it’s a great project if you’re looking to add a personal touch to your home décor.
Crochet Rope Baskets are versatile, and they can be used for a wide variety of purposes, from holding yarn and craft supplies to storing household items like toys, keys, or magazines. The best part about this project is that it’s incredibly customizable.
You can choose the colors and sizes that fit your needs and style. Whether you’re a beginner or an experienced crocheter, this free pattern will guide you through creating your very own crochet rope basket.
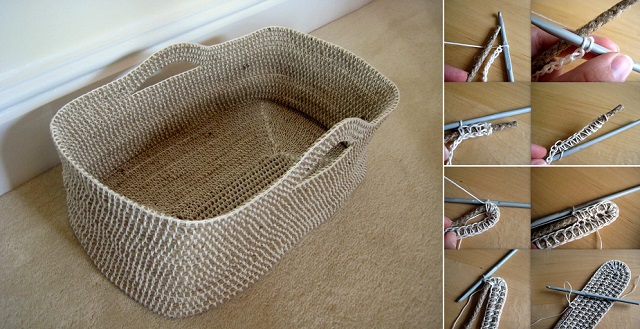
The Crochet Rope Basket is created by crocheting around a sturdy rope or cord, which gives the basket its structure and strength. This method results in a durable, yet soft, basket that’s perfect for use in any room of the house.
The pattern can be adapted to create baskets of various sizes, so you can make one to fit any space in your home. If you’re ready to dive in and get started, let’s move on to the first step!
1. Materials You Will Need for Your Crochet Rope Basket
Before starting your Crochet Rope Basket, it’s essential to gather all the necessary materials. Having everything ready will help the process go smoothly and ensure that your basket turns out just as you envision.
The most important material you’ll need is the rope or cord. Cotton rope is a popular choice because it’s sturdy and easy to work with. It’s also soft to the touch, which makes it ideal for creating a basket that will be used frequently. You can find cotton rope in various thicknesses, but for this project, a medium thickness (about 6mm to 8mm) is recommended. This thickness gives the basket enough structure without being too stiff.
Next, you’ll need a crochet hook that matches the thickness of your rope. A 6mm or 8mm hook is typically the best option when working with medium-weight cotton rope, but be sure to check the size recommended for the rope you are using. If the rope is thinner or thicker, you may need to adjust the size of your hook.
In addition to the rope and hook, you will need scissors for cutting the rope, a yarn needle for weaving in any ends, and a ruler or measuring tape to help you keep track of the size of your basket. You may also want to use a stitch marker to mark the beginning of each round, which can be especially helpful when working in the round.
Lastly, choose a color or color combination that suits your style. The great thing about a Crochet Rope Basket is that it can be made to match your home décor. You could go with a neutral color for a minimalist look, or choose vibrant shades to add a pop of color to a room.
2. Starting the Crochet Rope Basket: Foundation and First Round
The first step in creating your Crochet Rope Basket is to create the foundation. This step is crucial because the base will determine the size and shape of your basket. Start by making a slipknot with the rope, and then use your crochet hook to begin crocheting the first round. This is typically done by creating a magic circle or starting with a chain loop and working in the round.
To begin, make a chain of six to eight stitches, depending on the desired diameter of your basket. This will be the center of your basket. Once you’ve completed the chain, join it with a slip stitch to form a loop. Be sure to pull the tail end of the rope tightly to close the circle.
Now, start working in the round. You’ll crochet around the base, increasing the number of stitches in each round to make the basket grow larger. The most common stitch for this type of project is the single crochet stitch, as it provides a tight, sturdy fabric. For the first few rounds, you’ll increase evenly by crocheting two single crochet stitches into each stitch from the previous round.
As you work your way around the circle, it’s important to keep track of the number of stitches in each round. Use a stitch marker to mark the first stitch of each round so you don’t lose your place. It’s also essential to make sure that your tension is consistent throughout the project. If your stitches are too tight, the rope may curl or cause the basket to be too stiff. Conversely, if the stitches are too loose, the basket may lose its shape.
After several rounds of increases, you will begin to form the bottom of the basket. Keep measuring the diameter as you go to ensure that it’s the right size. Once you have reached the desired base size, you will move on to the sides of the basket.
3. Crocheting the Sides of the Basket
Once the base of your Crochet Rope Basket is complete, it’s time to start working on the sides. The process for crocheting the sides is quite similar to the base, but this time you will not need to increase the number of stitches. Instead, continue crocheting in the round without increasing, which will allow the basket to rise up and form its sides.
For the sides, continue crocheting with single crochet stitches around the entire base. Make sure that the tension is consistent, as this will determine how tightly or loosely the sides of the basket will be. If you want a more structured basket, you can tighten your stitches slightly. If you prefer a softer, more flexible basket, you can loosen your stitches.
You can continue crocheting in the round until your basket reaches the desired height. For a more polished look, you may want to add a finishing edge by working a few rounds of slip stitches around the top of the basket. This will create a smooth, clean edge that gives the basket a professional appearance.
If you’d like to add a handle to your basket, you can create one by crocheting a chain of stitches and attaching it to the sides of the basket. The handle can be crocheted directly onto the basket, or you can attach it with a yarn needle after finishing the basket. Handles are especially useful if you plan to use your Crochet Rope Basket for carrying items, such as toys or laundry.
Once you’ve completed the sides and the handle (if desired), it’s time to finish your basket.
4. Finishing and Customizing Your Crochet Rope Basket
To complete your Crochet Rope Basket, it’s essential to finish off all loose ends and give your basket a neat, polished appearance. Begin by cutting off any excess rope and using a yarn needle to weave in the ends of the rope. This will prevent any unraveling and help secure the structure of your basket.
You can also personalize your Crochet Rope Basket by adding decorative touches, such as embroidery, pom-poms, or fabric liners. Fabric liners are a great way to add color and texture to your basket, and they can be easily sewn or attached with fabric glue. You can also add a decorative bow or button to the handle for extra flair.
Once the basket is complete, you can use it for a variety of purposes. The Crochet Rope Basket is great for organizing your home, holding yarn and crochet supplies, or even storing blankets or pillows. Because it’s made from sturdy cotton rope, it’s also durable enough to be used as a laundry basket or for carrying groceries.
FAQ: Crochet Rope Basket – Free Pattern
Q: What type of rope is best for making a crochet rope basket?
A: Cotton rope is the most common choice for crochet rope baskets because it’s strong, flexible, and easy to work with. You can also experiment with other types of rope, such as jute or nylon, depending on your desired look and the purpose of your basket.
Q: Can I make a crochet rope basket without a handle?
A: Yes, you can absolutely make a Crochet Rope Basket without a handle. It’s entirely up to you whether or not to include a handle, based on how you plan to use the basket.
Q: How do I prevent my basket from losing its shape?
A: To prevent your basket from losing its shape, be sure to crochet tightly and use a sturdy rope. If necessary, you can reinforce the basket by adding a fabric liner or stiffening the rope with fabric stiffener.
Q: Can I make a large crochet rope basket?
A: Yes, you can make a larger basket by simply continuing to increase the base size and then working the sides as you would for a smaller basket. Just be sure to adjust the amount of rope and the size of the crochet hook accordingly.
Q: Is this crochet rope basket pattern suitable for beginners?
A: Yes, this Crochet Rope Basket pattern is suitable for beginners. It uses basic crochet stitches and techniques, but with a bit of practice, anyone can create a beautiful basket.
Join our VIP broadcast list and gain access to exclusive patterns, all for free. As a VIP member, you’ll receive the best patterns daily, delivered directly to your device. ✨📱 It’s a unique opportunity to stay up-to-date with the latest trends and designs, curated just for you. Don’t miss out on enhancing your projects and discovering new inspirations with the best patterns every day! 🎨🔝
Conclusion
In this article, we’ve covered everything you need to know about making a Crochet Rope Basket. From gathering materials and starting the base to crocheting the sides and finishing the basket, you now have a complete guide to creating your own stylish and functional storage solution.
The Crochet Rope Basket is a fun project that allows you to get creative with colors and customization. Whether you’re using it to organize your home or as a decorative piece, this basket is sure to be a hit.
We hope you found this tutorial helpful and encourage you to share your thoughts and suggestions in the comments below. Happy crocheting!


