
If you’re looking for a timeless, elegant, and versatile crochet project, the Crochet Rose Granny Square (Style Ⅱ) Pattern Free is a perfect match. This charming design brings together the classic appeal of the granny square with the beauty of a blooming rose.
Whether you’re new to crochet or a seasoned creator, this pattern will add a delicate and graceful touch to your projects, making it ideal for blankets, cushion covers, table runners, and more.
The Crochet Rose Granny Square (Style Ⅱ) Pattern Free stands out for its three-dimensional rose at the center, giving it a textured and realistic floral look. It’s a favorite among crafters who love mixing classic techniques with modern aesthetics.
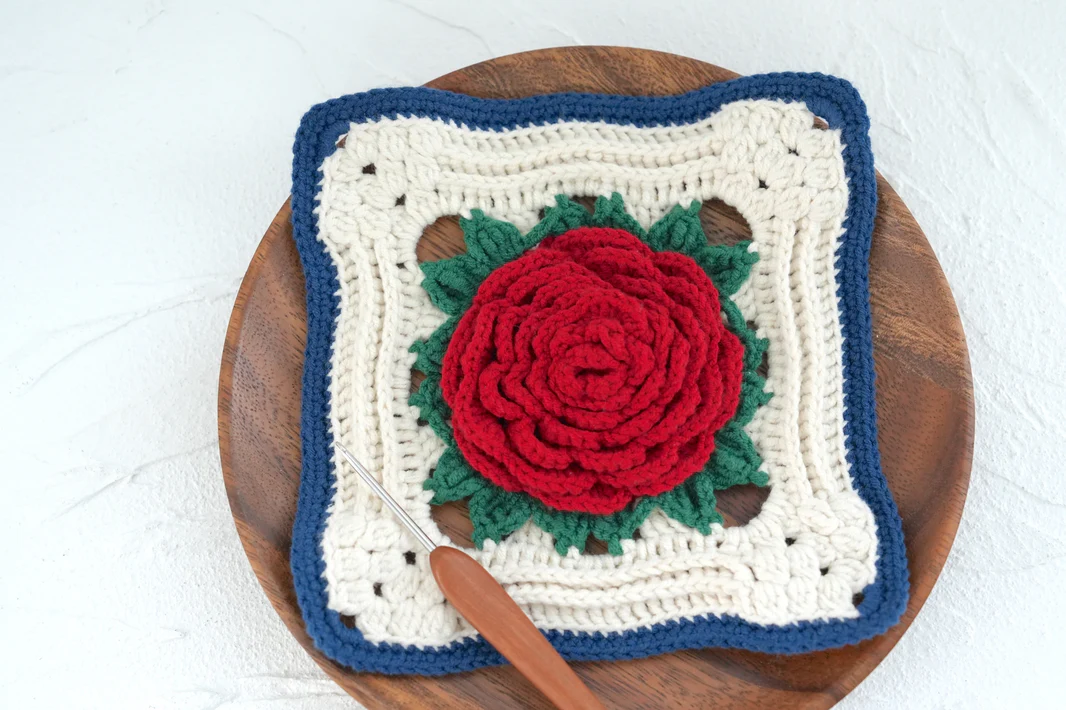
The combination of the granny square base and the rose embellishment offers both structure and style, and it works wonderfully as a stand-alone motif or as part of a larger piece.
In this article, you’ll learn everything you need to create this stunning square, from the essential materials and tools to step-by-step instructions. We’ll also cover customization tips, creative uses, and answers to the most common questions about this beautiful pattern.
1. Materials and Tools Needed
To begin your Crochet Rose Granny Square (Style Ⅱ) Pattern Free, you’ll need a few basic materials and tools. Choosing the right supplies will help you achieve clean, crisp stitches and a professional-looking finish.
You’ll want to select a soft, medium-weight yarn, such as a worsted weight or DK yarn. This yarn type offers the perfect balance between durability and flexibility, making it suitable for the rose design and granny square structure. Pick at least two contrasting colors: one for the rose and another for the square background.
Your crochet hook should correspond to the yarn weight. Most crafters use a 4.0 mm (G) or 5.0 mm (H) hook, but always check the yarn label for the recommended size. A comfortable grip will help reduce hand fatigue, especially if you’re making multiple squares.
You’ll also need scissors for trimming ends and a yarn needle for weaving in tails. Stitch markers can help you keep track of rounds or important points in your pattern, especially while forming the petals of the rose.
Make sure to have a flat and well-lit workspace. This helps you clearly see the stitch patterns and color transitions, especially with detailed parts like the rose petals. Good lighting is essential for both accuracy and eye comfort.
Before starting, it’s a good idea to practice your double crochet, chain, and slip stitch techniques. These are commonly used in the Crochet Rose Granny Square (Style Ⅱ) Pattern Free, and mastering them will make your work smoother and more enjoyable.
2. How to Crochet the Rose Center
The defining feature of the Crochet Rose Granny Square (Style Ⅱ) Pattern Free is the delicate rose at its center. This section may seem intricate at first glance, but it’s surprisingly beginner-friendly when broken down into steps.
To start, create a magic ring using your rose-colored yarn. This adjustable loop makes the base of your rose compact and clean. Chain 3 (counts as the first double crochet), then work a series of double crochets into the ring to form a small circle.
Next, you’ll build the first layer of petals by working into each stitch around the ring. Typically, you’ll chain 2 or 3, then make several double crochets into the same stitch, followed by a chain to anchor the petal. Repeat this around to form the first petal round.
The second layer of petals is formed by working behind the first round. Slip your hook into the base stitches behind the petals and repeat the petal pattern. Each petal should be slightly larger and more curved than the last to give a blossoming effect.
To add depth and realism, continue adding layers of petals with slight increases. This creates a fuller and more dimensional rose. Keep your tension even and gentle, especially around curves, to avoid puckering or stiffness.
Once the rose is complete, fasten off your yarn and weave in the ends neatly. You now have a beautiful flower centerpiece that’s ready to be framed with a square border.
This 3D floral design makes your granny square look like a blooming garden, which is why the Crochet Rose Granny Square (Style Ⅱ) Pattern Free is so popular for gifts and home decor.
3. Building the Granny Square Around the Rose
After completing the rose, the next step in the Crochet Rose Granny Square (Style Ⅱ) Pattern Free is to build the square frame around it. This not only gives your piece structure but also allows it to be joined with other squares easily.
Begin by attaching your background color yarn to the back loops of the rose’s final round. This creates a clean and subtle transition from the rose to the square. Chain 3 to start your first double crochet corner.
Work in the classic granny square style, using clusters of three double crochets separated by chain spaces. The corners should include a set of three double crochets, chain two, and another set of three double crochets. This gives the square its defined shape.
As you complete each side, ensure that your clusters are evenly spaced around the rose. Keep checking your stitch count to avoid an uneven or lopsided square. You may need to slightly adjust your placement to fit your rose’s dimensions.
For additional rounds, simply build on the same cluster pattern, increasing at the corners to maintain the square shape. You can add as many rounds as needed to achieve your desired size, especially if you’re joining multiple squares together for a blanket.
If desired, you can add decorative edges such as picot or shell stitches around the outermost round. This can enhance the visual interest of the Crochet Rose Granny Square (Style Ⅱ) Pattern Free and make each square stand out.
Take your time during this step to ensure symmetry and alignment. The square frame brings harmony to the rose’s intricate design and prepares it for practical use in your projects.
4. Creative Uses and Personalization Ideas
One of the joys of the Crochet Rose Granny Square (Style Ⅱ) Pattern Free is its versatility. This pattern can be used in countless creative ways, limited only by your imagination. Here are some ideas to inspire your next crochet project.
You can use individual squares as coasters or applique patches on clothing, bags, or even wall art. The floral design makes it a standout accent on accessories like tote bags or pillow covers.
If you’re working on a larger piece, like a blanket or shawl, create multiple rose granny squares and join them using a slip stitch or invisible seam. You can alternate colors to create a garden effect or keep a uniform color scheme for a more sophisticated look.
These squares are also perfect for creating gifts. A set of rose granny square dishcloths, a baby blanket, or a decorative scarf can make heartfelt handmade presents for birthdays, housewarmings, or baby showers.
To make your project even more personal, incorporate colors that reflect the recipient’s preferences or the theme of the room. You can even add a touch of embroidery or beading to the rose for extra flair.
Another fun idea is to make a table runner or placemats using these floral granny squares. The rose motif adds a charming and romantic element to any dining space.
Finally, don’t be afraid to experiment! Combine this square with other granny square styles for a unique patchwork project that showcases your creativity and crochet skills.
FAQ – Frequently Asked Questions
1. Is the Crochet Rose Granny Square (Style Ⅱ) Pattern Free suitable for beginners?
Yes, this pattern is beginner-friendly with some basic crochet knowledge. It’s a great way to learn 3D crochet and how to work in the round.
2. What size yarn works best for this pattern?
Medium-weight (worsted) yarn is ideal for structure and texture. Lighter yarns can be used for a delicate look, while bulky yarn will create a larger square.
3. How many squares do I need for a blanket?
This depends on the size of your square and desired blanket size. For example, with 6-inch squares, you’ll need around 42–48 for a baby blanket and up to 100 for a full-sized throw.
4. Can I make the rose flat instead of 3D?
Yes, you can modify the petal structure to be flatter, especially if you prefer a lower profile for your project.
5. What’s the best way to join the squares together?
Slip stitch and whip stitch are popular options. For decorative joins, you can use a chain or shell join-as-you-go method.
6. How do I wash items made with these squares?
Always follow the yarn’s washing instructions. Most acrylic yarns are machine washable, but handwashing is best for preserving shape and detail.
Conclusion
The Crochet Rose Granny Square (Style Ⅱ) Pattern Free offers beauty, structure, and limitless creativity in one simple yet elegant design. We’ve explored the tools you need, how to craft the rose and granny square, and how to make this pattern your own through personalization and creative applications.
Whether you’re making a heartfelt gift or adding floral elegance to your decor, this pattern is sure to impress. We hope this guide helped you feel confident in starting your own rose granny square project.
VIDEO TUTORIAL
Please share your thoughts, suggestions, or any tips you’ve discovered while making your squares. Your feedback is valuable and helps build a community of passionate and supportive crafters. Happy crocheting!


