Creating your own Crochet Santa Claus is a fun and rewarding project that brings the festive spirit to life.
This tutorial will guide you step-by-step to craft a delightful Santa Claus figure perfect for decorating your home or giving as a heartfelt gift.
Whether you’re a crochet enthusiast or a beginner, this project is an excellent way to hone your skills while embracing the holiday season.
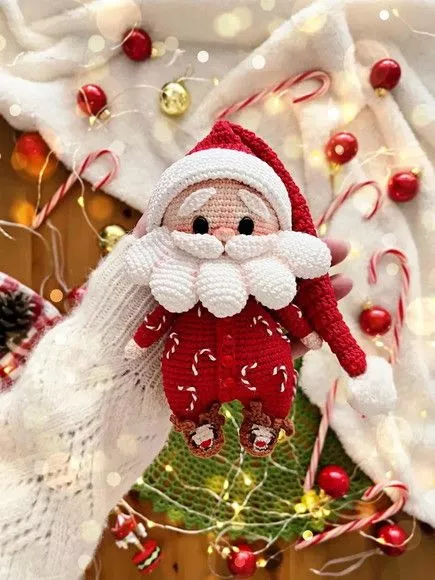
Image from google.
A handmade Crochet Santa Claus is a wonderful addition to any Christmas decor. With just a few simple materials and basic crochet techniques, you can create a charming Santa to hang on your tree, display on your mantle, or include in your holiday centerpiece. This project is also a thoughtful way to show your love and creativity to friends and family.
SEE MORE PATTERNS
In this tutorial, we’ll walk you through selecting the right materials, mastering the necessary stitches, assembling your Santa, and adding the finishing touches that make him truly unique. Let’s dive into the magic of crocheting Santa Claus!
1. Materials Needed for Your Crochet Santa Claus
Before starting your Crochet Santa Claus, gather all the materials you’ll need for this project. Having everything ready will make the process smoother and more enjoyable.
- Yarn
Choose high-quality yarn in traditional Santa colors: red, white, black, and a flesh tone. Acrylic yarn is a popular choice for its durability and affordability.
- Crochet Hook
Use the recommended crochet hook size for your chosen yarn. Typically, a 3.5mm or 4mm hook works well for creating detailed figures.
- Stuffing Material
Polyester fiberfill is ideal for stuffing your Santa Claus and giving him a plump, festive appearance.
- Stitch Markers
These are essential for keeping track of your stitches, especially when working in the round.
- Tapestry Needle
A blunt-tipped needle is necessary for sewing pieces together and weaving in yarn ends.
- Safety Eyes or Embroidery Thread
Use safety eyes for a polished look or embroidery thread to add facial details like eyes, eyebrows, and a cheerful smile.
Now that you have your materials ready, let’s move on to the first step: crocheting Santa’s body.
2. Crocheting Santa Claus’s Body
The body is the foundation of your Crochet Santa Claus, and it’s essential to get this step right.
- Start with a Magic Ring
Begin with a magic ring to create the base of Santa’s body. This technique ensures a tight, clean start with no gaps.
- Work in the Round
Santa’s body is typically worked in continuous rounds. Use a stitch marker to mark the beginning of each round to keep your place.
- Increase Stitches Gradually
To shape Santa’s body, increase stitches evenly in each round until you achieve the desired width. This creates a sturdy, rounded base.
- Switch Colors for the Belt
Midway through the body, switch to black yarn to create Santa’s iconic belt. Add a small square of gold yarn or embroidery thread for the belt buckle.
- Stuff as You Go
As the body takes shape, stuff it with fiberfill. This helps you maintain the figure’s fullness and prevents the finished piece from looking lopsided.
- Close the Top
Once the body is complete, decrease stitches to close the top. Ensure the stuffing is evenly distributed before closing the final round.
With Santa’s body complete, it’s time to move on to his head and hat.
3. Crocheting Santa Claus’s Head and Hat
Santa’s head and hat are what bring his personality to life. Follow these steps for a jolly finish.
- Crochet the Head
Start with flesh-toned yarn and work the head in the round, just like the body. Gradually increase stitches to form a round shape.
- Add Facial Features
Use safety eyes or embroider small black dots for eyes. Add a tiny triangle of red yarn or felt for the nose, and stitch a cheerful smile below.
- Create the Hat Base
Switch to red yarn to crochet the base of Santa’s hat. Work in the round, gradually decreasing stitches to form a pointed tip.
- Attach a White Brim
Add a round of white yarn at the base of the hat to mimic Santa’s fluffy hat brim. You can use single crochet or a decorative stitch like the bobble stitch for texture.
- Make a Pom-Pom
Use white yarn to create a small pom-pom and attach it to the tip of Santa’s hat for a whimsical touch.
- Attach the Hat to the Head
Secure the hat to Santa’s head using a tapestry needle and matching red yarn. Position the hat slightly tilted for a playful look.
Now that Santa has his body, head, and hat, let’s move on to his arms, legs, and other accessories.
4. Adding Final Details to Your Crochet Santa Claus
The final details bring your Crochet Santa Claus to life. These steps ensure he looks festive and complete.
- Crochet Arms and Legs
Use red yarn for the arms and legs, with small sections of white at the ends to mimic gloves and boots. Attach them securely to the body.
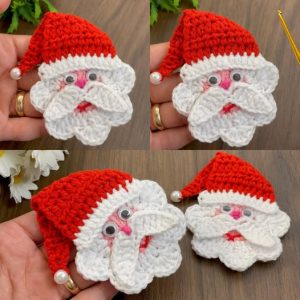
- Create a Beard
Use white yarn to crochet or stitch a fluffy beard. You can use a loop stitch for extra texture or attach strands of yarn to simulate a full beard.
- Add Accessories
Consider adding accessories like a tiny sack of toys, a candy cane, or a miniature Christmas tree to enhance Santa’s festive charm.
- Secure All Pieces
Ensure all parts are securely attached to prevent them from coming loose during handling or display.
- Check for Balance
Place your Santa Claus upright to check his balance. Adjust stuffing or the positioning of the legs as needed to ensure he stands or sits properly.
- Celebrate Your Creation
Take a moment to admire your work! Your Crochet Santa Claus is now ready to spread holiday cheer.
FAQ
1. What skill level is required for this Crochet Santa Claus tutorial?
This project is suitable for beginners with basic crochet knowledge, such as single crochet, increasing, and decreasing.
2. How long does it take to crochet Santa Claus?
Depending on your skill level, it may take 5–10 hours to complete the project.
3. Can I customize the design?
Absolutely! You can use different colors, add embellishments, or modify the size to suit your preferences.
4. What type of yarn is best for this project?
Acrylic yarn is ideal due to its durability and ease of use, but cotton yarn can also work well.
5. How do I clean my Crochet Santa Claus?
Spot clean with a damp cloth and mild soap. Avoid submerging it in water to maintain its shape.
6. Can I make this as a gift?
Yes! A handmade Crochet Santa Claus makes a thoughtful and cherished gift for the holiday season.
Join our VIP broadcast list and gain access to exclusive patterns, all for free. As a VIP member, you’ll receive the best patterns daily, delivered directly to your device. ✨📱 It’s a unique opportunity to stay up-to-date with the latest trends and designs, curated just for you. Don’t miss out on enhancing your projects and discovering new inspirations with the best patterns every day! 🎨🔝
JOIN NOW
Conclusion
This Crochet Santa Claus tutorial has provided you with everything you need to create a festive and charming holiday decoration. From gathering materials to adding the final touches, this guide ensures a delightful crafting experience.
PATTERN HERE
We’d love to hear from you! Share your thoughts, suggestions, or stories about your Crochet Santa Claus in the comments below. Happy crocheting and Merry Christmas!


