
Macrame Heart Bracelet - Free Tutorial

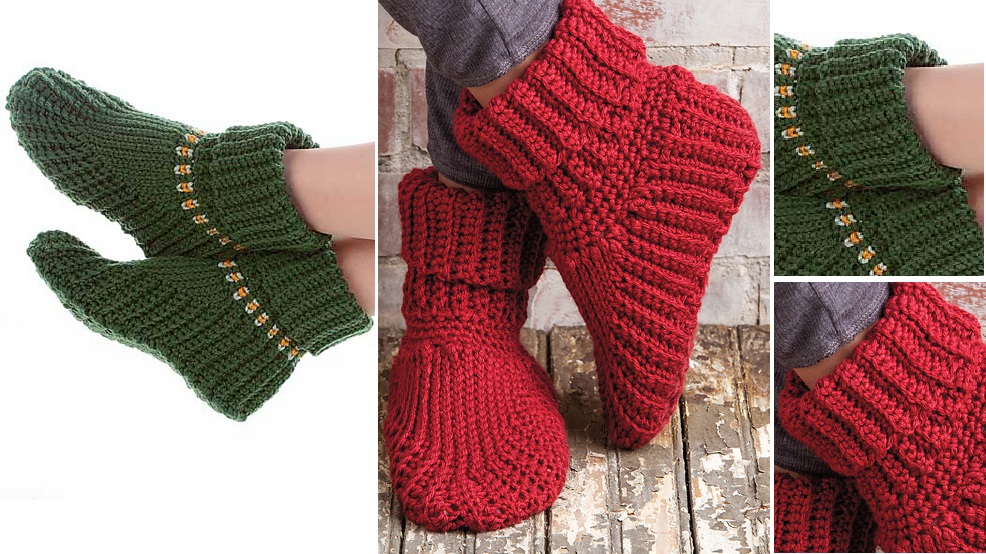
Looking for a cozy and creative project to keep your feet warm this season? These Crochet Slipper Boots – Free Pattern ideas are not only functional but also stylish and beginner-friendly.
Handmade slippers are a heartfelt gift or a fun treat for yourself, and with a bit of yarn and creativity, you can design your own comfy footwear that reflects your personality. This tutorial provides step-by-step guidance for crafting warm and fashionable slipper boots, using techniques accessible to crafters of all levels.
What makes these Crochet Slipper Boots – Free Pattern options truly special is how they blend comfort with flair. You can adapt the design with different yarns, colors, and stitch patterns, allowing full customization.
Whether you prefer a rustic winter look or something playful and vibrant, there’s room to get inspired and make your own mark. Plus, crocheted slipper boots are practical, washable, and perfect for staying cozy around the house.
This guide focuses on the most popular methods for constructing slipper boots, ensuring you’ll achieve both fit and durability. We’ll go over essential materials, walk you through each part of the boot, and highlight tips for adjusting sizes.
By the end, you’ll not only have the perfect pair of handmade slippers but also a new favorite pattern in your crochet collection. Let’s begin the journey into crafting Crochet Slipper Boots – Free Pattern that you’ll love to wear or gift!
To begin crafting your Crochet Slipper Boots – Free Pattern, you’ll need a few basic materials. Start with a medium or bulky-weight yarn for a warmer and more cushioned feel. Wool blends work especially well during colder months, while cotton yarns are breathable and ideal for springtime versions. Choose colors that reflect your style or match your home wear wardrobe.
You’ll also need an appropriate crochet hook—typically between 5.0 mm and 6.5 mm—depending on your yarn choice. The label on your yarn usually suggests a hook size, but feel free to adjust based on how tightly or loosely you crochet. Using a larger hook gives a more flexible slipper, while a smaller hook provides a snug fit.
A tapestry needle is essential for sewing parts together and weaving in ends. Make sure you have scissors, stitch markers (especially helpful when working in the round), and optional extras like non-slip soles or felt padding for added comfort. The right tools make the entire process smoother and more enjoyable.
Before you begin, print or write down your Crochet Slipper Boots – Free Pattern steps. Staying organized will help you avoid mistakes and track progress. Also, try making a quick gauge swatch to make sure your finished slipper fits properly. Sizing is crucial, especially if you’re gifting the boots.
Prepare your workspace by setting up a comfortable area with good lighting and minimal distractions. Crocheting should be a relaxing experience, so take your time and enjoy the rhythm of each stitch. Whether you’re watching your favorite show or listening to music, make it your creative space.
Lastly, don’t be afraid to test different yarn textures or even recycled yarn for eco-friendly options. You might be surprised by how fun and versatile it is to create Crochet Slipper Boots – Free Pattern using sustainable materials.
Begin your Crochet Slipper Boots – Free Pattern with the sole, which forms the foundation. Most patterns start at the toe or heel and work in rounds or rows. A common sole pattern is a flat oval created using single and half-double crochet stitches. As you shape the sole, maintain even tension for a neat result.
Once the sole is complete, transition into building the foot section. This part wraps around the top and sides of your foot. You’ll likely use continuous rounds or joined rounds for this step. Make sure to try on your work as you go, so you can adjust the size before finishing.
Next comes the ankle and leg section. This is where you can get creative with design! You might choose to crochet ribbed cuffs using front and back post stitches or make taller boots by adding extra rows. Use color changes or textured stitches to make this part stand out.
Some Crochet Slipper Boots – Free Pattern tutorials include a strap or button closure. These add a decorative touch and help with fit. If you’re a beginner, keep the design simple at first. Once you’re confident, you can add more features and personalize the look.
Don’t forget about reinforcing your slipper boots. Double up the yarn in high-wear areas or line the sole with felt or leather for durability. These additions help extend the life of your slippers, especially if you’ll be wearing them daily.
Finally, finish your slipper boots by sewing any open seams and weaving in all ends securely. Check the symmetry between both boots and block them if necessary to help shape the final form. Now you’re ready to enjoy your handmade comfort!
One of the best aspects of using a Crochet Slipper Boots – Free Pattern is how customizable it is. You can create versions that are elegant, funky, cozy, or minimalist. Choose colors that reflect the season—earthy tones for fall, icy hues for winter, or bold brights for fun all-year-round style.
Adding texture is another way to enhance your design. Puff stitches, bobbles, or shell patterns create visual interest and softness. You can also use color changes in stripes or gradients for a more dynamic look. Play with contrast, neutrals, or even holiday-inspired palettes.
Consider adding embellishments like pom-poms, tassels, or crochet flowers. These fun extras make your boots unique and gift-worthy. Kids especially love playful designs, so don’t hesitate to explore character themes or animal faces for little feet.
If you want a more elegant style, choose neutral tones like grey, ivory, or navy and add delicate lace details at the cuffs. Buttons and bows also offer a chic finish. You might even crochet matching accessories like headbands or gloves to complete the set.
Need a slipper boot that feels extra cozy? Try lining your slippers with soft fleece or adding a padded insole. For added grip, apply puffy paint or sew on a rubber sole to prevent slipping on wood or tile floors.
Remember, the best part of following a Crochet Slipper Boots – Free Pattern is making it yours. Use your creativity and don’t be afraid to mix patterns or experiment with new techniques. Each pair tells a story—make yours as fun and personal as possible.
When creating Crochet Slipper Boots – Free Pattern, accurate sizing is important. Slippers that are too loose may fall off, while tight ones can be uncomfortable. Most patterns include measurements for various sizes, but it’s helpful to compare the finished dimensions to the wearer’s foot.
If you’re making slippers as a gift, ask for the recipient’s foot length or shoe size in advance. You can also crochet a slightly larger slipper and include a drawstring cuff or elastic around the ankle to adjust the fit later. This ensures comfort and practicality.
Crocheted slipper boots are usually easy to care for. If made with machine-washable yarn, you can toss them in a gentle cycle and air dry. For delicate fibers like wool, hand-washing is best. Always read your yarn label for proper care instructions.
Packaging your slippers for gifts can be just as fun as making them. Use tissue paper, ribbon, and a tag with washing instructions or a personal note. You could even place them in a fabric bag or box for a handmade touch. These slippers make perfect holiday or birthday presents.
Thinking of selling your slipper boots? Make sure to offer a range of sizes and allow for customization. Choose high-quality yarn and be consistent in your stitching. A well-made slipper boot will attract customers who value craftsmanship and comfort.
Lastly, don’t underestimate the sentimental value of a handmade item. These Crochet Slipper Boots – Free Pattern creations show care, creativity, and warmth. Whether for loved ones or for yourself, they’re gifts that truly keep on giving.
What type of yarn is best for Crochet Slipper Boots?
The best yarns are soft yet durable, such as acrylic, wool blends, or cotton. Choose based on the season and washing preferences. Bulky yarn adds extra warmth and cushioning.
Can beginners make slipper boots using this free pattern?
Yes! Many Crochet Slipper Boots – Free Pattern options are beginner-friendly and use basic stitches like single and half-double crochet. Choose simple designs if you’re new.
How do I make my slipper boots non-slip?
Apply puffy fabric paint to the soles or sew on non-slip pads. You can also crochet a tighter sole using smaller hooks or add felt lining for grip.
Can I resize the pattern to fit children or men’s sizes?
Absolutely. Most patterns provide measurements for various sizes. Adjust the sole length and number of rounds to create the perfect fit for any age or gender.
Are these slippers machine washable?
That depends on your yarn. Acrylic and cotton blends are often machine washable. For wool or luxury yarns, hand wash and lay flat to dry for best results.
Can I add decorations like buttons or bows?
Definitely! Embellishments make each pair unique. Just ensure they’re securely sewn, especially if gifting to children or using them frequently.
Creating your own Crochet Slipper Boots – Free Pattern is a rewarding experience that combines creativity, practicality, and comfort. Throughout this guide, we explored the essential materials, the steps to construct your slipper boots, ways to customize your design, and tips for sizing and care. Whether you’re making a pair for yourself or crafting a thoughtful gift, this project is a perfect example of how crochet brings warmth and joy into everyday life.
We hope this tutorial inspires you to grab your hook and start creating. If you’ve enjoyed this article, please leave your honest opinion in the comments below. We’d love to hear how your slipper boots turned out and welcome any suggestions or tips you’d like to share with our crafting community. Happy crocheting!


